
版本要一致
# 安装:
sudo pacman -S elasticsearch
# 跨域处理
sudo -i
cd /etc/elasticsearch
vim elasticsearch.yml
添加
http.cors.enabled: true
http.cors.allow-origin: "*"
启动,默认地址9200
sudo systemctl start elasticsreach
本机运行多个elasticsearch
bin/elasticsearch -E node.name=node1 -E cluster.name=orangbus -E path.data=node1_data
bin/elasticsearch -E node.name=node2 -E cluster.name=orangbus -E path.data=node2_data
bin/elasticsearch -E node.name=node3 -E cluster.name=orangbus -E path.data=node3_data
删除进程
ps grep | elasticsearch / kill pid
安装可视化工具:elasticsearch-head
# 源码安装
下载:
wget https://artifacts.elastic.co/downloads/elasticsearch/elasticsearch-8.6.2-linux-x86_64.tar.gz

# 解压
tar -xzf elasticsearch-8.6.2-linux-x86_64.tar.gz
运行
# 创建一个es用户
useradd es

# 切换到es用户
su es

# 后台启动
./bin/elasticsearch -d -p pid
 # 最后会输出这些东西,需要保存一下

 Password for the elastic user (reset with `bin/elasticsearch-reset-password -u elastic`):
  9H5YDoVDwfBU1eSsUD_i

ℹ️  HTTP CA certificate SHA-256 fingerprint:
  b0bd5b1e1b35b53907e4054c393d14939f64a815309a4c22d09bd9f7a13f4ce8

ℹ️  Configure Kibana to use this cluster:
• Run Kibana and click the configuration link in the terminal when Kibana starts.
• Copy the following enrollment token and paste it into Kibana in your browser (valid for the next 30 minutes):
  eyJ2ZXIiOiI4LjYuMiIsImFkciI6WyIxMC4wLjAuMzo5MjAwIl0sImZnciI6ImIwYmQ1YjFlMWIzNWI1MzkwN2U0MDU0YzM5M2QxNDkzOWY2NGE4MTUzMDlhNGMyMmQwOWJkOWY3YTEzZjRjZTgiLCJrZXkiOiJ6UDNKVkljQkhDTzJPU29sN3ZPNzp1b0ZkT0lOeVF1LVVLcTlYaUdOZjdRIn0=

ℹ️ Configure other nodes to join this cluster:
• Copy the following enrollment token and start new Elasticsearch nodes with `bin/elasticsearch --enrollment-token <token>` (valid for the next 30 minutes):
  eyJ2ZXIiOiI4LjYuMiIsImFkciI6WyIxMC4wLjAuMzo5MjAwIl0sImZnciI6ImIwYmQ1YjFlMWIzNWI1MzkwN2U0MDU0YzM5M2QxNDkzOWY2NGE4MTUzMDlhNGMyMmQwOWJkOWY3YTEzZjRjZTgiLCJrZXkiOiJ6djNKVkljQkhDTzJPU29sN3ZPODpXbTFQZzE5TFRkYVIzOU1GMUNCT0x3In0=

  If you're running in Docker, copy the enrollment token and run:
  `docker run -e "ENROLLMENT_TOKEN=<token>" docker.elastic.co/elasticsearch/elasticsearch:8.6.2`
# docker运行
docker run -d \
    --name elasticsearch \
    -p 9200:9200 \
    --restart=always \
    -e "discovery.type=single-node" \
    -e "ES_JAVA_OPTS=-Xmx512m -Xms512m" \
    -v /root/Docker/elasticsearch/elasticsearch.yml:/usr/share/elasticsearch/config/elasticsearch.yml:ro \
    -v /root/Docker/elasticsearch/plugins:/usr/share/elasticsearch/plugins \
docker.elastic.co/elasticsearch/elasticsearch:8.7.0
# docker-composer
# .env
STACK_VERSION=8.6.1
ES_PORT=9200
KIBANA_PORT=5601
ELASTIC_PASSWORD=admin666
# cerebro 监控
cerebro_port=5000
version: "3.5"

networks:
  backend:
    driver: bridge

services:
  es:
    image: docker.elastic.co/elasticsearch/elasticsearch:${STACK_VERSION}
    privileged: true
    restart: always
    environment:
      - discovery.type=single-node
      - "ES_JAVA_OPTS=-Xmx512m -Xms512m"
      - ELASTIC_PASSWORD=elastic666 # elastic密码
    volumes:
      - ./elasticsearch/elasticsearch.yml:/usr/share/elasticsearch/config/elasticsearch.yml:rw
      - ./elasticsearch/jvm.options:/usr/share/elasticsearch/config/jvm.options:rw
      - ./elasticsearch/plugins:/usr/share/elasticsearch/plugins
      - ./data/elasticsearch:/usr/share/elasticsearch/data
    ports:
      - ${ES_PORT}:9200
      - "9300:9300"
    networks:
      - backend

  kibana:
    image: docker.elastic.co/kibana/kibana:${STACK_VERSION}
    volumes:
      - ./data/kibana:/usr/share/kibana/data
      - ./kibana/kibana.yml:/usr/share/kibana/config/kibana.yml:rw
    ports:
      - ${KIBANA_PORT}:5601
    environment:
      - SERVERNAME=kibana
      - ELASTICSEARCH_URL=http://es:9200
    depends_on:
      - es
    links:
      - es
    networks:
      - backend

  cerebro:
    image: lmenezes/cerebro
    container_name: cerebro
    restart: always
    ports:
      - "${cerebro_port}:9000"
    links:
      - es
    depends_on:
      - es
    networks:
      - backend
# 密码设置
docker-compose exec es bash

/bin/elasticsearch-reset-password -u elastic -i # 自定义密码:elastic
/bin/elasticsearch-reset-password -u kibana_system -i # 自定义kibana_system的密码:kibana666
# 安装kibana
dc up -d kibana
# 插件
下载插件放到elasticsreach 的plugin 文件夹即可
# 查看已安装插件
/bin/elasticsearch-plugin list
# 安装插件
/bin/elasticsearch-plugin install analysis-icu
bin/kibana-plugin install plugin_location
bin/kibana-plugin list
bin/kibana-plugin remove
# ik分词器
GET _analyze

{
    "analyzer":"user",
    "text": "orange"
}
# 项目升级初探elasticsearch
# 环境准备:
laradock
elasticsearch:7.13.2
ik:7.13.2
修改elasticsearch版本
vim laradock/.env

ELK_VERSION=7.13.2
# 安装ik分词器:
下载ik分词插件到elasticsearch目录:
cd laradock/elasticsearch/
mkdir plugins
cd plugins && wget https://github.com/medcl/elasticsearch-analysis-ik/archive/refs/tags/v7.13.2.tar.gz
修改elasticsearch 的Dockerfile文件
vim laradock/elasticsearch/Dockerfile
ARG ELK_VERSION=7.13.2
FROM docker.elastic.co/elasticsearch/elasticsearch:${ELK_VERSION}

COPY ./plugins/v7.13.2.tar.gz /usr/share/elasticsearch/plugins

EXPOSE 9200 9300
重新buildelasticsearch
docker-compose build elasticsearch
检查是否安装成功
docker-compose exec elasticsearch /usr/share/elasticsearch/bin/elasticsearch-plugin list
# 安装elasticsearch相关的扩展
# Kibana配置
启动
dc up -d kibana
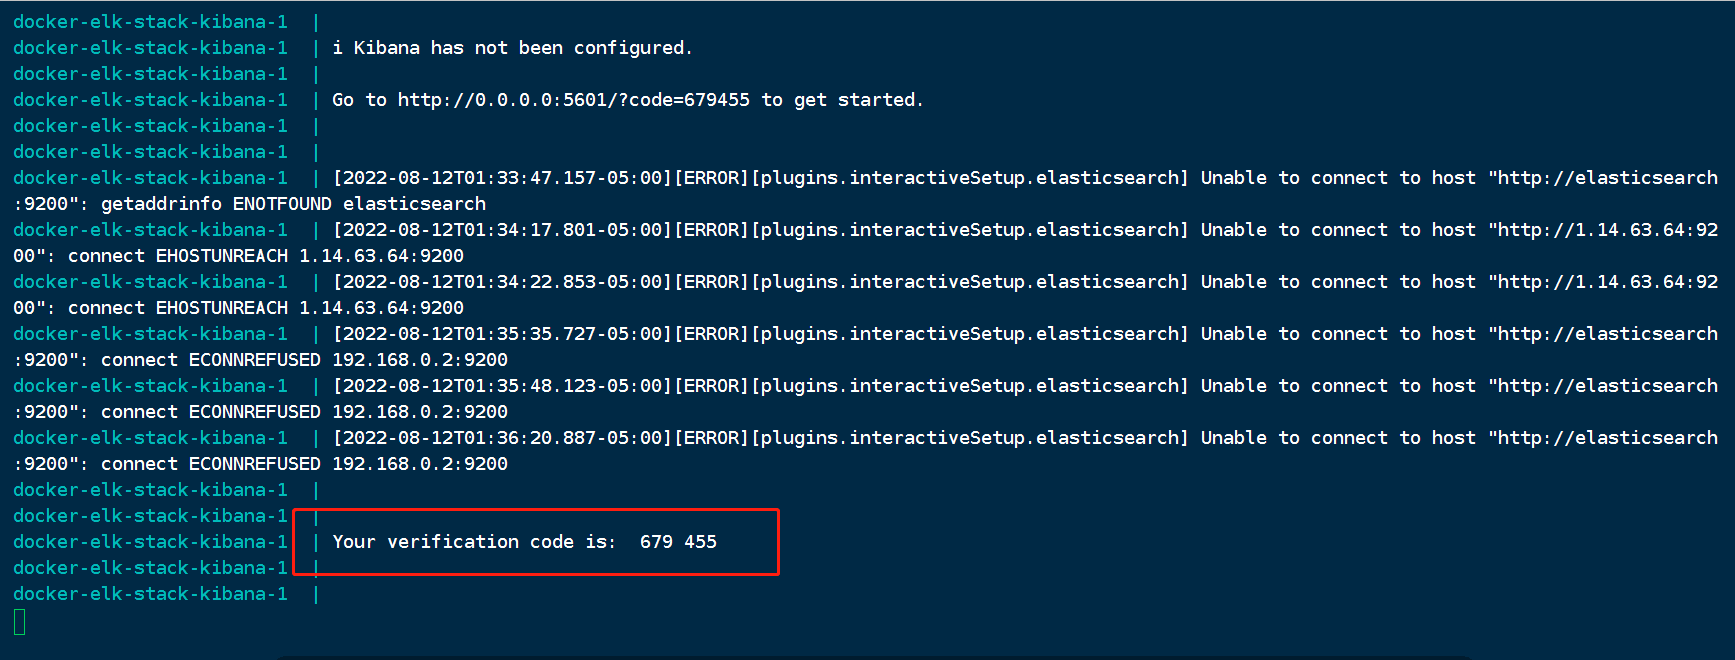
查看kibaba日志,这个时候会提示你访问 Go to http://0.0.0.0:5601/?code=679455 to get started 进行初始化
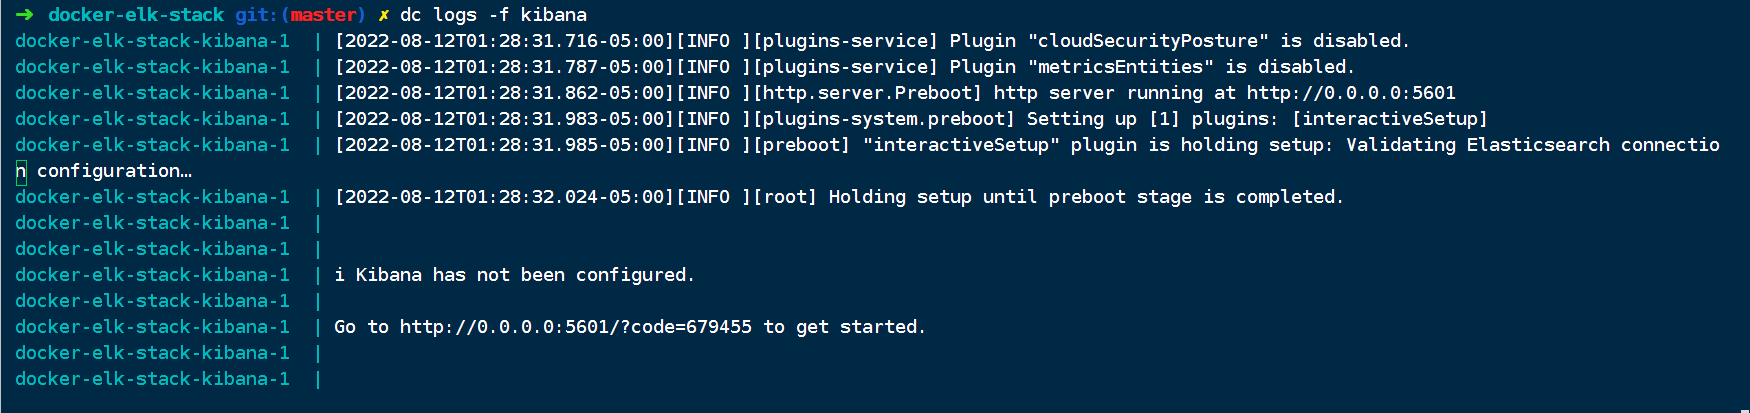
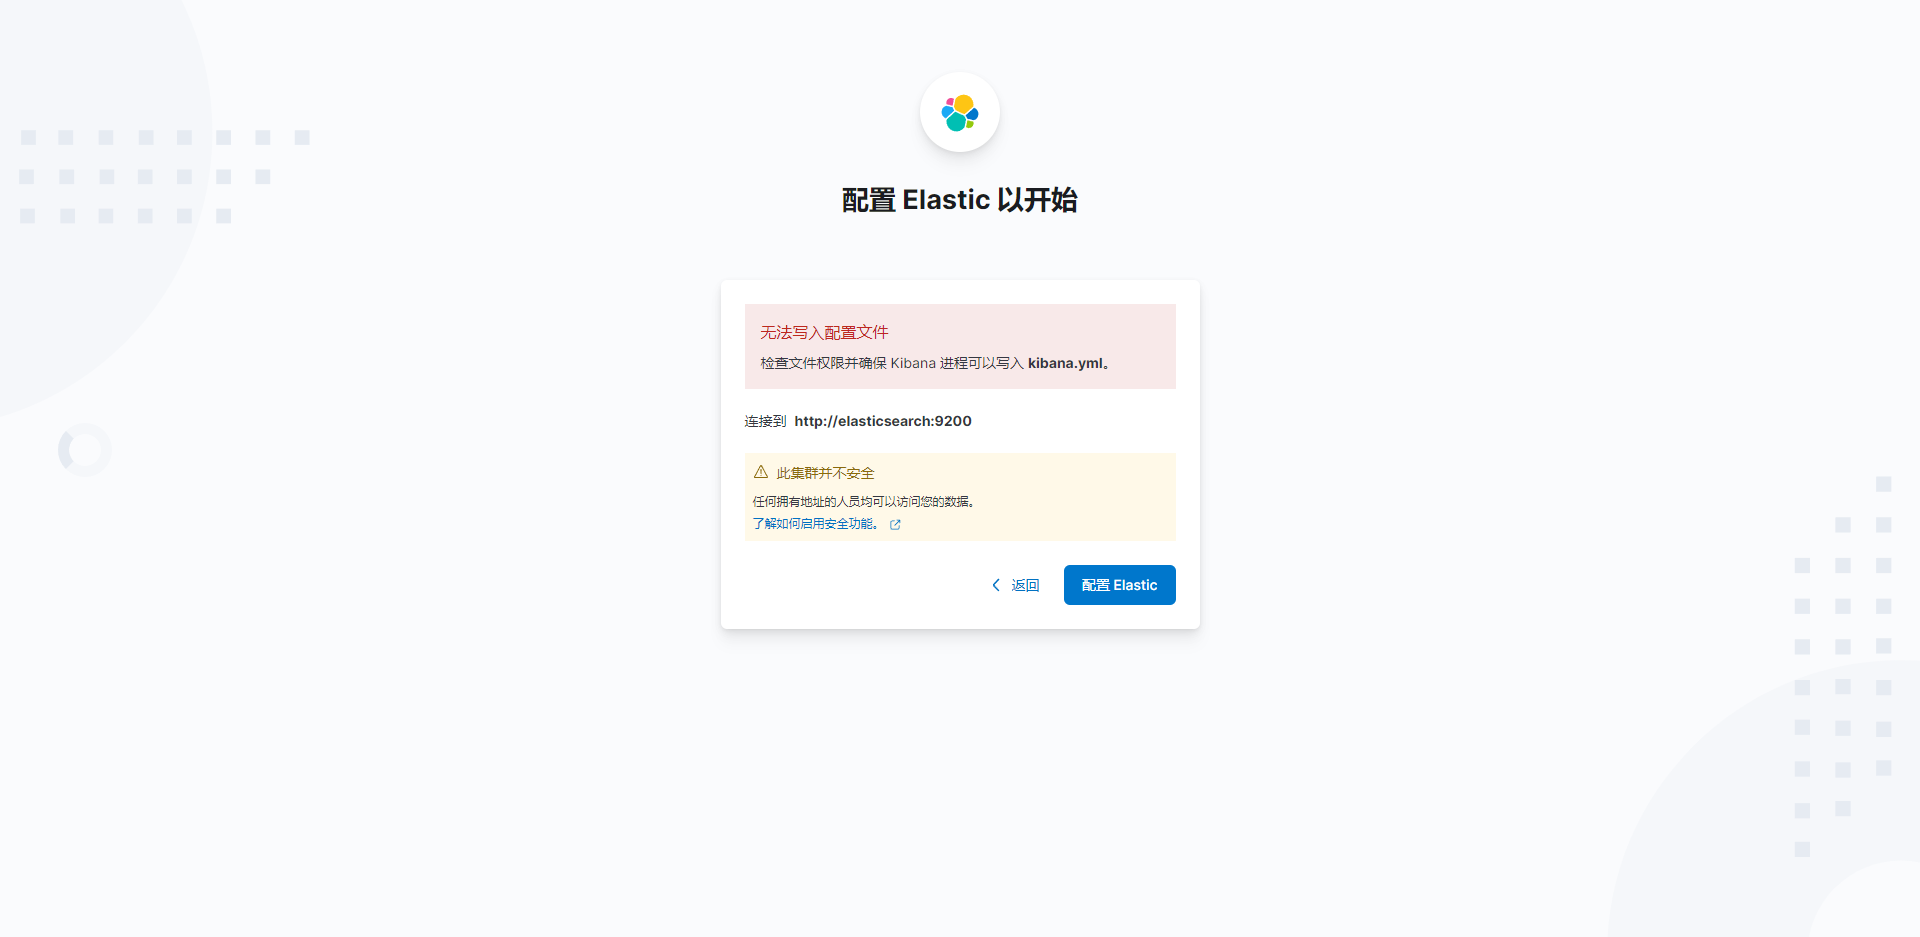
打开浏览器:输入提示的地址:http://0.0.0.0:5601/?code=679455
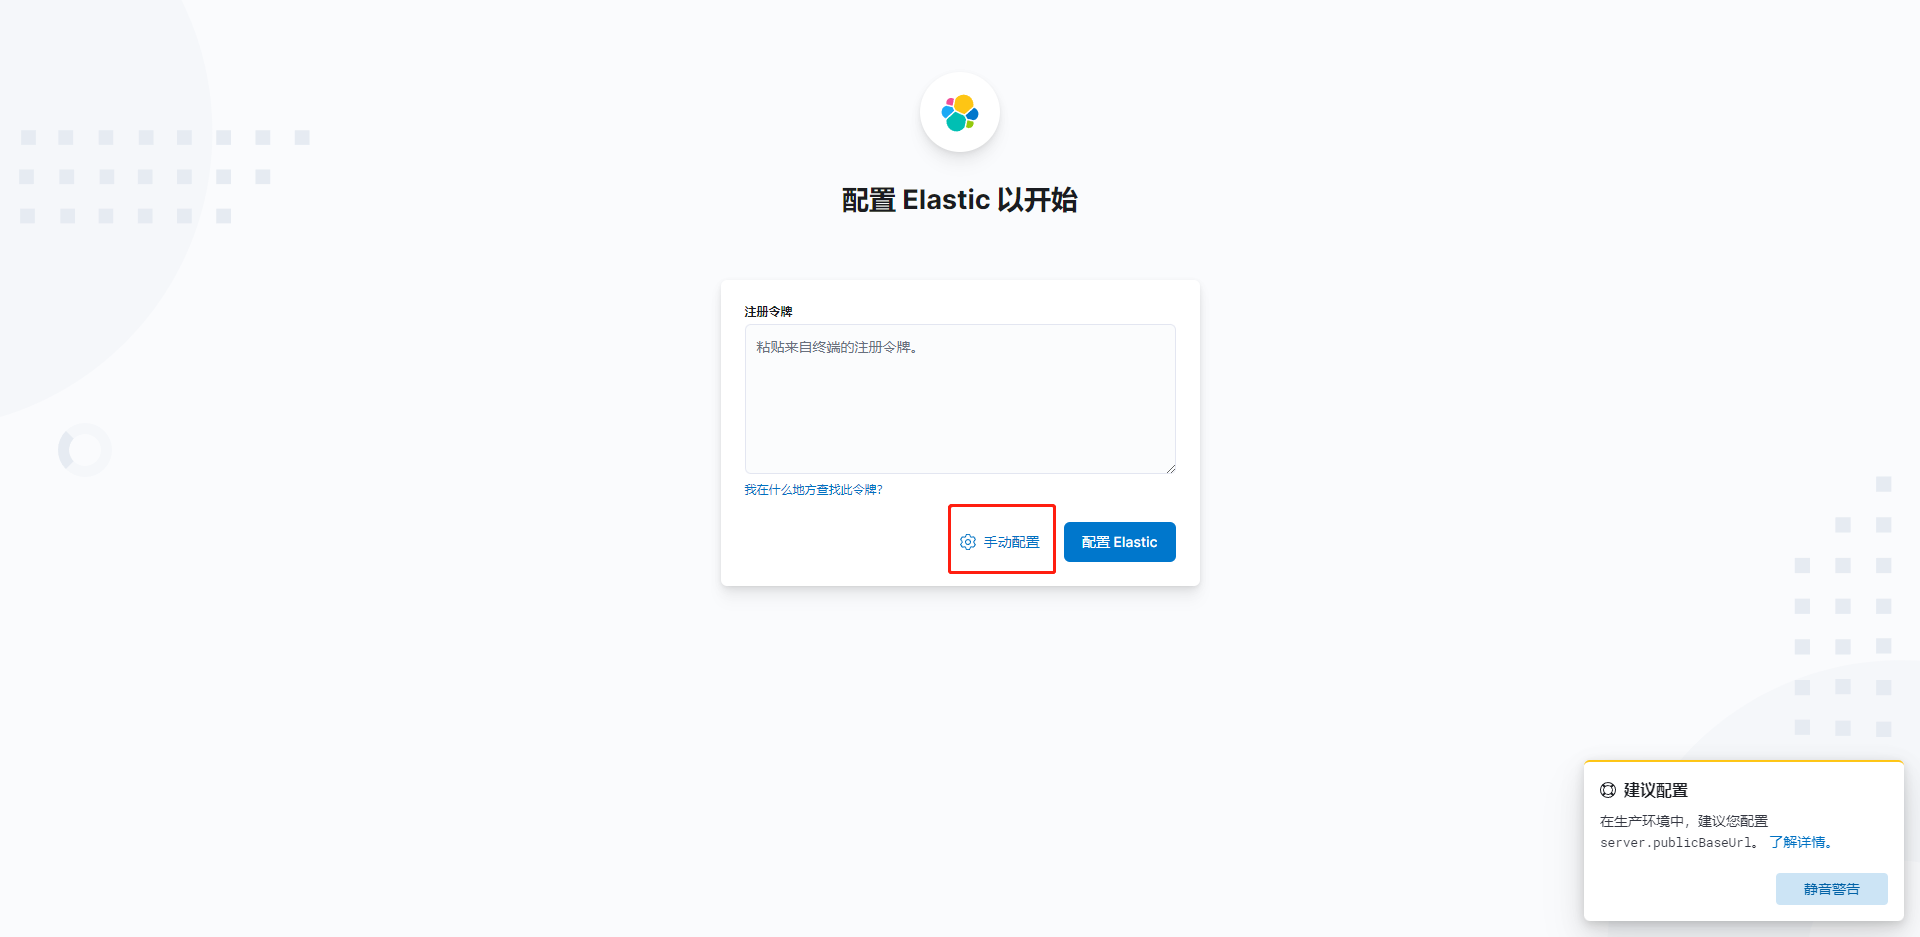
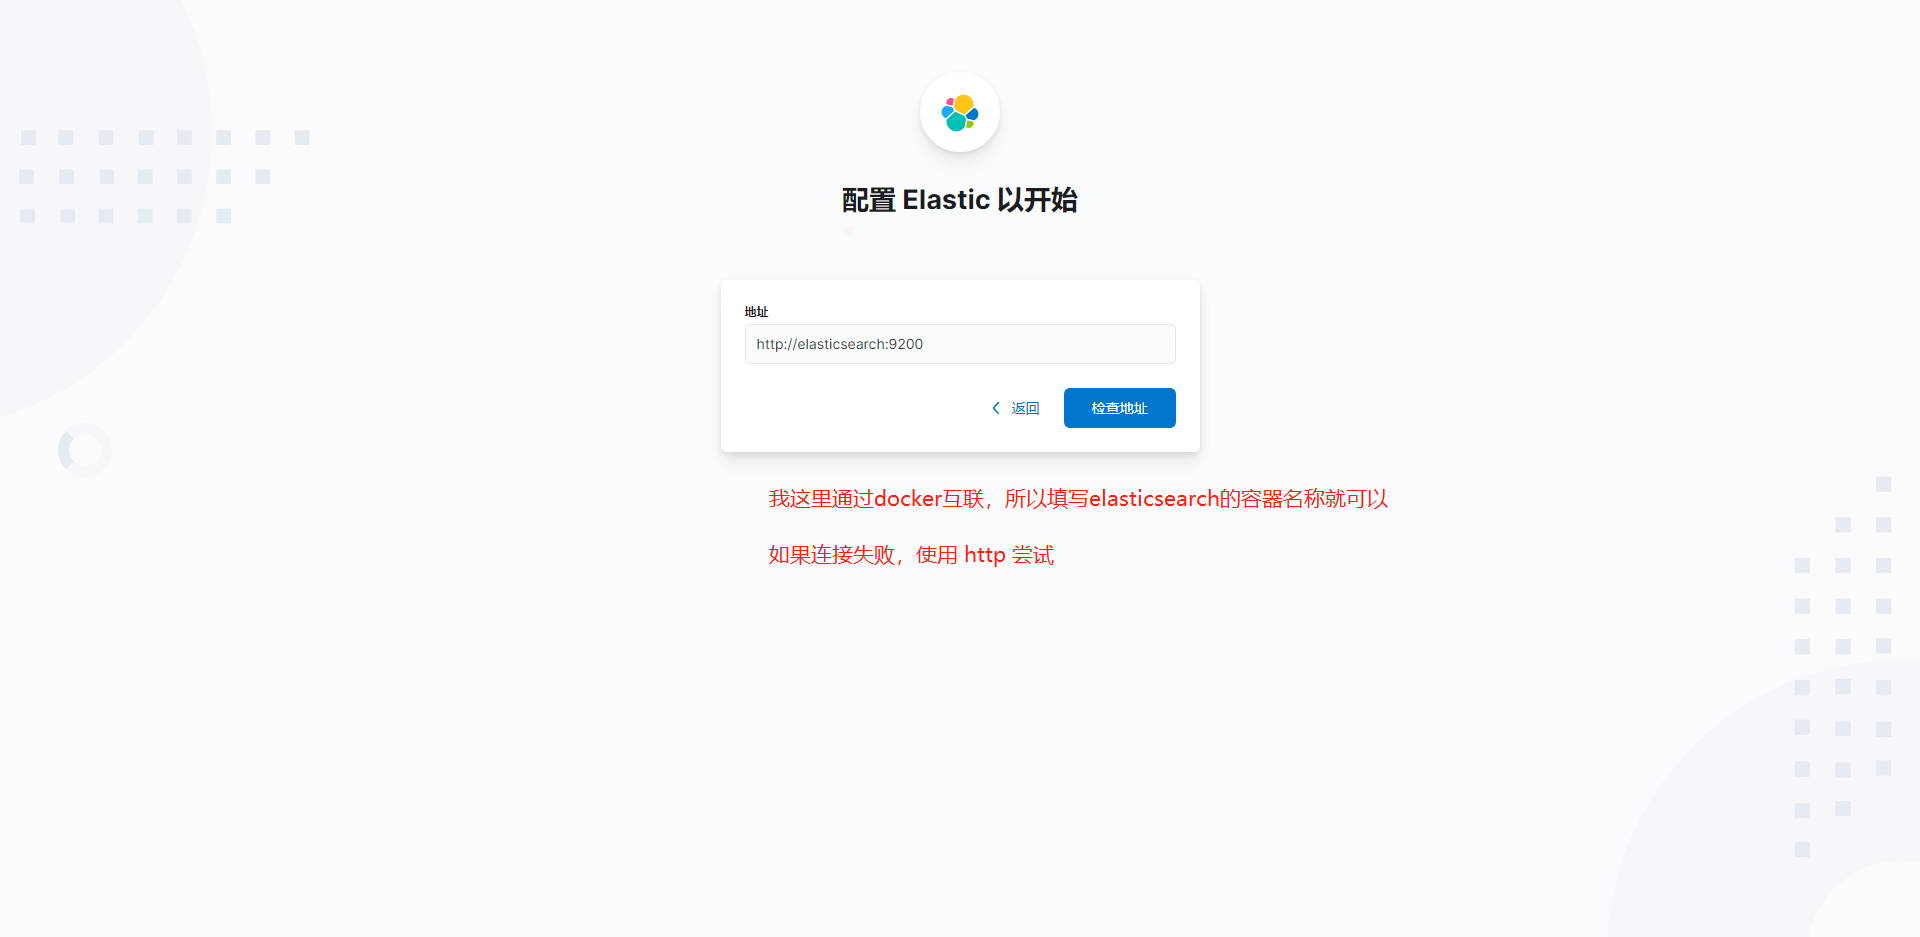
这个时候需要进行验证,这里的验证码可以去kibana日志里面去找到
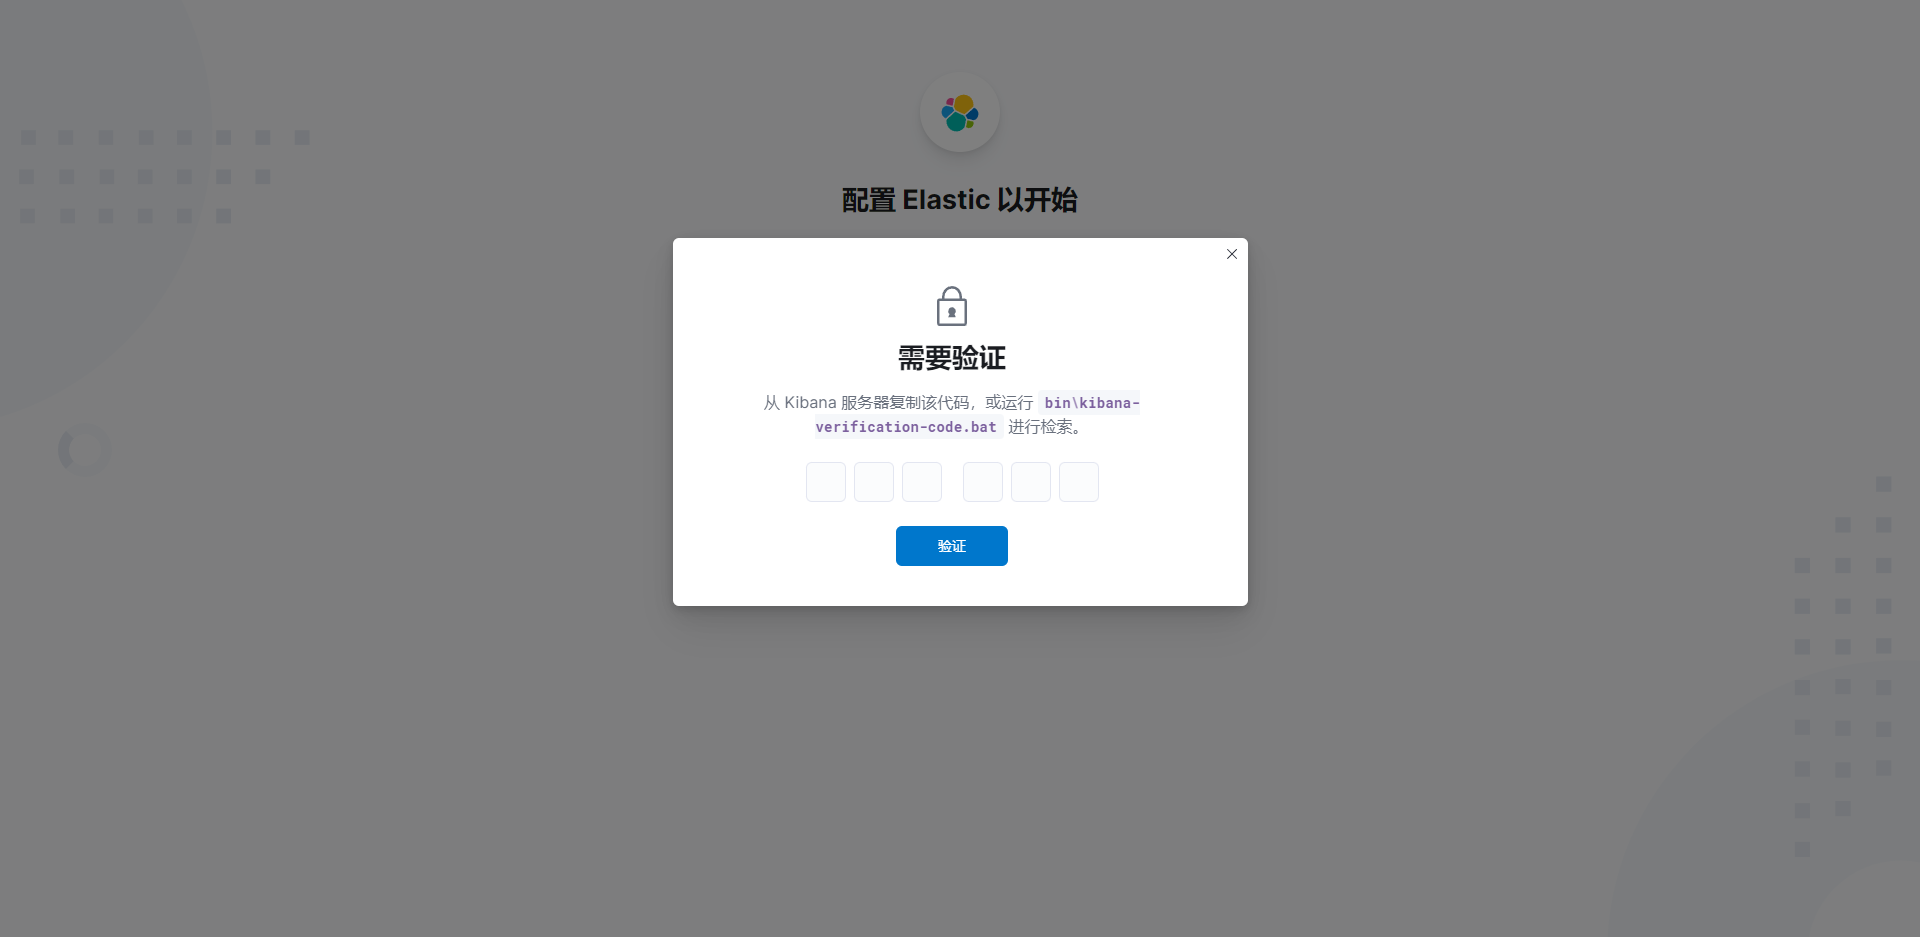
输入完成后,可能出现一下情况,重启一下整个应用就好了,或者看看是不是因为kibana配置文件没有权限。
至此kibaba就配置成功了。
# curd
# 索引操作(表)
# 创建索引
PUT /jokes

# 获取索引
GET /jokes

# 删除索引
DELETE /jokes

# 关闭索引
POST /jokes/_close

# 开启索引
POST /jokes/_open

# 重建索引
POST _reindex
{
  "source": {
    "index": "jokes2"
  }
}

# 查看所有索引
GET /_cat/indices/?v&pretty


// 查看索引分词


// 设置分片信息
PUT /jokes/_settings
{
  "settings":{
    "number_of_replicas":1
  }
}

// 设置分词器
PUT /jokes
{
  "settings": {
    "index":{
      "anlysis.analyzer.default.type": "ik_max_word"
    }
  }
}
# 文档操作(每一条数据)
# 添加文档
PUT user/_doc/1
{
  "name":"orangbus",
  "age":18
}

# 编辑文档
POST user/_doc/1
{
  "name":"orangbus",
  "age":20
}

# 查看文档
GET user/_doc/1


# 删除文档
DELETE user/_doc/1

# 文档搜索
GET user/_search
{
  "query": {
    "match": {
      "age": 18
    }
  }
}
# Elasticsearch做成systemctl服务
# 一、添加elasticsearch基本信息的配置文件
vim /etc/sysconfig/elasticsearch-1 #elasticsearch-1 这个名字任意定义,因为我服务器中有多个es所以加-1进行命名。
将下列内容添加到elasticsearch-1中
#es的目录文件地址
ES_HOME=/data/es-cluster/elasticsearch-7.9.2-1
#Java的目录文件地址(这里我就用es7中自带的jdk)
JAVA_HOME=/data/es-cluster/elasticsearch-7.9.2-1/jdk
#es中的config文件的地址
ES_PATH_CONF=/data/es-cluster/elasticsearch-7.9.2-1/config
#运行es进程的地址(这里需要注意由于es启动的时候非root用户启动 所以你配置的目录es用户要有写如的权限)
PID_DIR=/data/es-cluster/elasticsearch-7.9.2-1/run/elasticsearch-1
ES_STARTUP_SLEEP_TIME=5
# 二、编写控制elasticsearch启动的service文件
vim /usr/lib/systemd/system/elasticsearch-1.service #elasticsearch-1.service这个名字根据喜好定义,后续需要这个名字来进行启动关闭。
将下列内容添加到elasticsearch-1.service中
[Unit]
Description=Elasticsearch
Documentation=http://www.elastic.co
Wants=network-online.target
After=network-online.target

[Service]
Environment=ES_HOME=/data/es-cluster/elasticsearch-7.9.2-1
Environment=ES_PATH_CONF=/data/es-cluster/elasticsearch-7.9.2-1/config
Environment=PID_DIR=/data/es-cluster/elasticsearch-7.9.2-1/run/elasticsearch-1
EnvironmentFile=/etc/sysconfig/elasticsearch-1
WorkingDirectory=/data/es-cluster/elasticsearch-7.9.2-1
#启动的用户
User=es
#启动的用户组
Group=es
#启动线程地址
ExecStart=/data/es-cluster/elasticsearch-7.9.2-1/bin/elasticsearch -p ${PID_DIR}/elasticsearch.pid

#下列这些如无特殊情况,不需要进行修改直接进行复制就行
StandardOutput=journal
StandardError=inherit

# Specifies the maximum file descriptor number that can be opened by this process
LimitNOFILE=65536

# Specifies the maximum number of process
LimitNPROC=4096

# Specifies the maximum size of virtual memory
LimitAS=infinity

# Specifies the maximum file size
LimitFSIZE=infinity

# Disable timeout logic and wait until process is stopped
TimeoutStopSec=0

# SIGTERM signal is used to stop the Java process
KillSignal=SIGTERM

# Send the signal only to the JVM rather than its control group
KillMode=process

# Java process is never killed
SendSIGKILL=no

# When a JVM receives a SIGTERM signal it exits with code 143
SuccessExitStatus=143

[Install]
WantedBy=multi-user.target
添加可执行权限
chmod +x /usr/lib/systemd/system/elasticsearch-1.service
重新加载systemctl服务配置文件
systemctl daemon-reload
# 三、服务开启关闭自启动
启动
systemctl start elasticsearch-1.service
关闭
systemctl stop elasticsearch-1.service
重启
systemctl restart elasticsearch-1.service
开机自启动
systemctl enable elasticsearch-1.service
# Filebeat:8.7.0
sudo rpm --import https://packages.elastic.co/GPG-KEY-elasticsearch
编辑 /etc/yum.repos.d/elastic-filebeat.repo
[elastic-8.x]
name=Elastic repository for 8.x packages
baseurl=https://artifacts.elastic.co/packages/8.x/yum
gpgcheck=1
gpgkey=https://artifacts.elastic.co/GPG-KEY-elasticsearch
enabled=1
autorefresh=1
type=rpm-md
sudo yum install filebeat

sudo systemctl enable|start filebeat
默认目录
| Type | Description | Location |
|---|---|---|
| home | Home of the Filebeat installation. | /usr/share/filebeat |
| bin | The location for the binary files. | /usr/share/filebeat/bin |
| config | The location for configuration files. | /etc/filebeat |
| data | The location for persistent data files. | /var/lib/filebeat |
| logs | The location for the logs created by Filebeat. | /var/log/filebeat |
← docker-swarm elk 安装使用 →