个人linux常规配置
镜像网站:
华为云: https://mirrors.huaweicloud.com
# SSH-keygen免密登录
# 创建一个 SSH key
ssh-keygen -t rsa -C "your_email@example.com"

# 存放在位置:~/.ssh
ls ~/.ssh
目录下会包含两个文件: 私钥:id_rsa 公钥:id_rsa.pub
# 将公钥复制到远程主机中
第一种方式: 使用ssh-copy-id命令将公钥复制到远程主机。ssh-copy-id会将公钥写到远程主机的 ~/ .ssh/authorized_keys 文件中
ssh-copy-id root@192.168.0.1 // 回车后输入密码
第二种方式:
现在==服务器== 的==~/ .ssh/==目录下创建 authorized_keys 文件,然后将本地的公钥(id_rsa.pub)添加到这个文件即可
cat ~/.ssh/id_rsa.pub // 复制本机公钥信息
登录服务器,创建 authorized_keys 文件,并把刚刚复制的公钥粘贴进去就ok了。
vim ~/.ssh/authorized_keys
如果你想多个个人电脑 免密登录同一台服务器 ,只要按照上面的步骤操作,当我们把 2+1台个人电脑的公钥添加到authorized_keys 这个文件时,记得是追加,不是替换。
# 个人常用别名
# bash: vim ~/.zshrc
# author: OrangBus
# Github: https://github.com/orangbus/tool
# ============= Base =============================
alias cls="clear && ls"
alias RM='rm -rf'
alias ll='ls -alh'
# ============= Git ==============================
alias gi="git init"
alias ga="git add ."
alias gc="git commit -m "
alias gp="git push"
alias gl="git pull"
# ============== docker ==========================
alias dc='docker-compose'
alias dca='dc up -d nginx phpmyadmin'
alias dcps='docker-compose ps'
alias dcres='docker-compose restart && dcps'
alias dcn='docker-compose restart nginx && dcps'
alias dcd='dc down'
# ============ Docker Code Dir ===================
alias ld="cd /home/Code/laradock"
alias ldca="ld && dca && dcps && cd -"
alias ldps="ld && dcps  && cd -"
alias ldn="ld && dcn && cd -"
alias ldd="ld && dcd && cd -"
alias ldres="ld && dcres && cd -"
alias web="cd /home/Code/web"
alias www="cd /www/wwwroot"
# ============ laravel ===================
alias pa="php artisan"
alias paqc="pa queue:clear"
alias paqw="pa queue:work"
# ============= zsh-autosuggestions ==============
source ~/.zsh/zsh-autosuggestions/zsh-autosuggestions.zsh
# window在git中使用alias
bash: cd && vim .bashrc
=============================
alias cls="clear && ls"
alias web="cd /d/laragon/www"
# ubuntu卸载默认的apache
sudo apt-get --purge remove apache2
sudo apt-get --purge remove apache2.2-common
sudo apt-get autoremove

sudo find /etc -name "***apache***" -exec rm -rf {} \;
sudo rm -rf /var/www
重装apache2
sudo apt-get install **apache**2
sudo /etc/init.d/**apache**2 restart
# Linux 查看端口占用情况
Linux 查看端口占用情况可以使用 lsof 和 netstat 命令。
# lsof
lsof(list open files)是一个列出当前系统打开文件的工具。
lsof 查看端口占用语法格式:
lsof -i:端口号
# 实例
查看服务器 8000 端口的占用情况:
# lsof -i:8000
COMMAND   PID USER   FD   TYPE   DEVICE SIZE/OFF NODE NAME
nodejs  26993 root   10u  IPv4 37999514      0t0  TCP *:8000 (LISTEN)
可以看到 8000 端口已经被轻 nodejs 服务占用。
lsof -i 需要 root 用户的权限来执行,如下图:
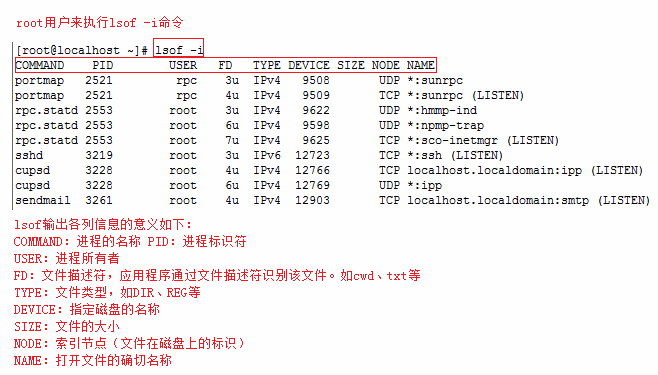
更多 lsof 的命令如下:
lsof -i:8080:查看8080端口占用
lsof abc.txt:显示开启文件abc.txt的进程
lsof -c abc:显示abc进程现在打开的文件
lsof -c -p 1234:列出进程号为1234的进程所打开的文件
lsof -g gid:显示归属gid的进程情况
lsof +d /usr/local/:显示目录下被进程开启的文件
lsof +D /usr/local/:同上,但是会搜索目录下的目录,时间较长
lsof -d 4:显示使用fd为4的进程
lsof -i -U:显示所有打开的端口和UNIX domain文件
# netstat
netstat -tunlp 用于显示 tcp,udp 的端口和进程等相关情况。
netstat 查看端口占用语法格式:
netstat -tunlp | grep 端口号
- -t (tcp) 仅显示tcp相关选项
- -u (udp)仅显示udp相关选项
- -n 拒绝显示别名,能显示数字的全部转化为数字
- -l 仅列出在Listen(监听)的服务状态
- -p 显示建立相关链接的程序名
例如查看 8000 端口的情况,使用以下命令:
# netstat -tunlp | grep 8000
tcp        0      0 0.0.0.0:8000            0.0.0.0:*               LISTEN      26993/nodejs
更多命令:
netstat -ntlp   //查看当前所有tcp端口
netstat -ntulp | grep 80   //查看所有80端口使用情况
netstat -ntulp | grep 3306   //查看所有3306端口使用情况
# kill
在查到端口占用的进程后,如果你要杀掉对应的进程可以使用 kill 命令:
kill -9 PID
如上实例,我们看到 8000 端口对应的 PID 为 26993,使用以下命令杀死进程:
kill -9 26993
# VirtualBox for koolshare
环境需求:
- 本机已经安装virtualbox虚拟机
# 安装koolshare
下载链接:https://firmware.koolshare.cn/LEDE_X64_fw867/
虚拟机: openwrt-koolshare-mod-v2.31-r10822-50aa0525d1-x86-64-uefi-gpt-squashfs.vmdk
如果是虚拟机安装,导入vmdk 文件启动就可以,需要注意的是需要把网络设置为 桥接模式
安装启动成功之后往下看:
登录虚拟机,修改后台IP地址:192.168.2.x 即后台访问地址
# opteion ipaddr = 192.168.2.x
vim /etc/config/network
修改后台 i p地址:opteion ipaddr选项,需要注意的是这里的ip地址必须和你的路由器处于同一个网段,假如我的路由器ip地址:192.168.2.1 那么我可以设置为:192.168.2.x ,x可随意,只要不要和现有的ip冲突即可,比如:192.168.2.200
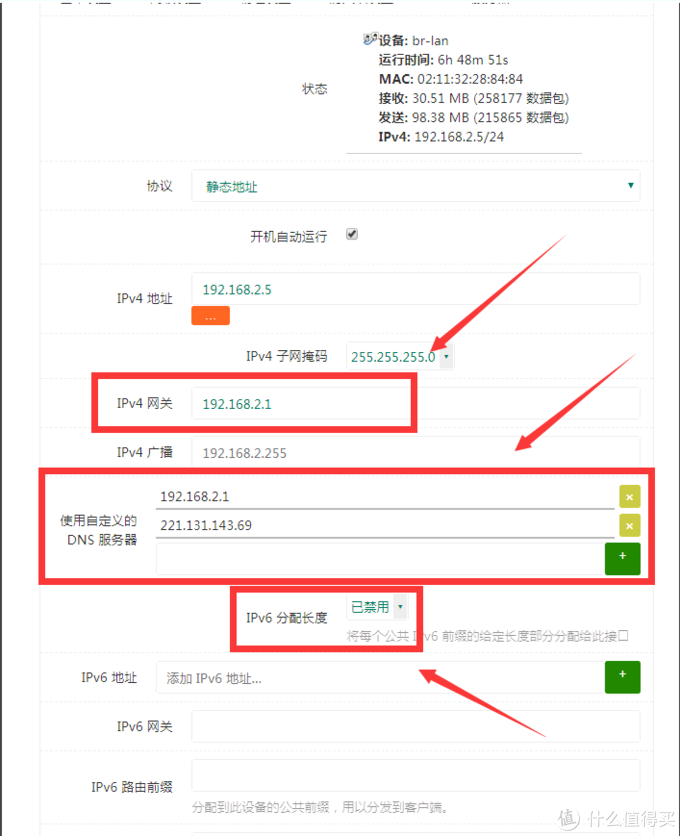
# Koolshre后台配置
【网络】【接口】【lan】
IPV4地址: 192.168.2.X
IPV4网关: 192.168.2.1 //主路由器的ip地址
自定义的 DNS 服务器(这个必须设置,不然无法安装插件)
114.114.114. 114
223.5.5.5
到酷软中心安装你需要的插件,科学上网配置ok之后,进行本地网络配置。(图是上网找的)
# 本地网络配置
linux系统设置 :【系统设置】【网络】
查看自己的现有的 ip 地址,比如我的是:
192.168.2.106,选择【IPv4】手动->地址地址 子网掩码 网关 本机ip地址 固定的 (当然我也不太懂,反正就这么填就对了) 软路由后台配置地址 192.168.2.106 255.255.255.0 192.168.2.x window
已经一年多没有使用window了,以后有机会使用在补充上吧. (不知道什么鬼,window提示我不能在本机安装window,艹,果断放弃,哈哈!!!)
# 常见问题
1、酷软插件版本信息不一致
lan 口的DNS 没有配置正确
所有配置都ok,但是还是不能科学上网
重启电脑试试。
# 禁止linux进入休眠
# 方法一
最新买了一台工控机,于是安装了一个manjaro系统,用于人服务器使用,但是这个玩意长时间不懂她,他自己就睡着了,必须得按一下电源键,那如何阻止他休眠呢?
禁止休眠
sudo systemctl mask sleep.target suspend.target hibernate.target hybrid-sleep.target
解除禁止休眠
sudo systemctl unmask sleep.target suspend.target hibernate.target hybrid-sleep.target
# 方法二
- 编辑
/etc/default/grub文件,将GRUB_CMDLINE_LINUX_DEFAULT="quiet"改为GRUB_CMDLINE_LINUX_DEFAULT="quiet acpi=off apm=off" - 执行
sudo update-grub命令
# 简单的vimrc配置
"======== orangbus .vimrc ===============
"github:https://github.com/orangbus/tool
"About Me : Bili search: Orangbus
"======== orangbus.cn ===================

syntax on "语法高亮
syntax enable
colorscheme desert "设置颜色

set number "设置行号
set history=1000 "设置历史记步
set nocompatible  "关闭vi兼容模式
set ruler "右下角显示光标的行列信息
set tabstop=4 "设置所有的Tab和缩进为4个空格
set wrap "自动换行
set hlsearch "搜索逐字符高亮
set encoding=utf-8 "设置编码
set autowrite "自动保存
set laststatus=2 "显示状态栏(默认值为1,表示无法显示状态栏)
set completeopt=longest,preview,menu "文件类型自动检测,代码智能补全

"用浅色高亮显示当前行"
autocmd InsertLeave * se nocul
autocmd InsertEnter * se cul

"============= 插件相关==================
filetype on " 检测文件类型
# nginx端口转发
server {
         listen       80;
         server_name  www.123.com;

        location / {
            proxy_pass http://127.0.0.1:8080;
             index  index.html index.htm index.jsp;
        }
     }
# nginx负载均衡
upstream guwenjie_http {
        server **.***.***.***:9503 weight=1;
        server **.***.***.***:8811 weight=2;
}
server
     {
        listen 80;
        #listen [::]:80 default_server ipv6only=on;
        server_name test1.freephp.top;
        index  index.php index.html   index.htm ;
        root   /home/wwwroot/workspace/public/static;

        #error_page   404   /404.html;

		location / {
             if (!-e $request_filename){
                #proxy_pass http://127.0.0.1:8855;
                proxy_pass http://guwenjie_http;
             }
         }

        location /nginx_status
        {
            stub_status on;
            access_log   off;
        }

        location ~ .*\.(gif|jpg|jpeg|png|bmp|swf)$
        {
            expires      30d;
        }

        location ~ .*\.(js|css)?$
        {
            expires      12h;
        }

        location ~ /.well-known {
            allow all;
        }

        location ~ /\.
        {
            deny all;
        }
# nginx伪静态配置实例
location / {
    proxy_pass http://162.14.72.65;
    proxy_set_header Host $host;
    proxy_set_header X-Real-IP $remote_addr;
    proxy_set_header X-Forwarded-For $proxy_add_x_forwarded_for;
	 # try_files $uri $uri/ /index.php$is_args$query_string;
}

    location ~ .*\.(gif|jpg|jpeg|png|bmp|swf)$
    {
        proxy_pass http://162.14.72.65;
    }

    location ~ .*\.(js|css)?$
    {
        proxy_pass http://162.14.72.65;
    }
# systemctl 如何启动、关闭、启用/禁用服务
启动服务:systemctl start xxx.service
关闭服务:systemctl stop xxx.service
重启服务:systemctl restart xxx.service
显示服务的状态:systemctl status xxx.service
在开机时启用服务:systemctl enable xxx.service
在开机时禁用服务:systemctl disable xxx.service
查看服务是否开机启动:systemctl is-enabled xxx.service
查看已启动的服务列表:systemctl list-unit-files|grep enabled
查看启动失败的服务列表:systemctl --failed
# vim配置
https://github.com/junegunn/vim-plug
# 安装
curl -fLo ~/.vim/autoload/plug.vim --create-dirs \
    https://raw.githubusercontent.com/junegunn/vim-plug/master/plug.vim
# 配置插件
# vim ~/.vimrc

call plug#begin('~/.vim/plugged')

Plug 'vim-airline/vim-airline'
Plug 'vim-airline/vim-airline-themes'
Plug 'preservim/nerdtree'
Plug 'Yggdroot/LeaderF', { 'do': './install.sh' }
Plug 'itchyny/lightline.vim'
Plug 'rdnetto/YCM-Generator', { 'branch': 'stable' }
Plug 'SirVer/ultisnips' | Plug 'honza/vim-snippets'
Plug 'junegunn/vim-easy-align'
Plug 'preservim/nerdtree'
Plug 'preservim/nerdcommenter'

call plug#end()
# 安装插件
vim demo.txt

# 按ESC
::PlugInstall
Commands
| Command | Description |
|---|---|
PlugInstall [name ...] [#threads] | Install plugins |
PlugUpdate [name ...] [#threads] | Install or update plugins |
PlugClean[!] | Remove unlisted plugins (bang version will clean without prompt) |
PlugUpgrade | Upgrade vim-plug itself |
PlugStatus | Check the status of plugins |
PlugDiff | Examine changes from the previous update and the pending changes |
PlugSnapshot[!] [output path] | Generate script for restoring the current snapshot of the plugins |
# centos8替换源
cd  /etc/yum.repos.d/ &&
rm -rf ./*.repo &&
wget -O /etc/yum.repos.d/CentOS-Base.repo https://mirrors.aliyun.com/repo/Centos-vault-8.5.2111.repo &&
yum clean all && yum makecache
# 子管理员权限
sudo vim /etc/sudoers
=======================
root    ALL=(ALL)   ALL
orangbus    ALL=(ALL)   ALL
# chmod 用法
chmod -R 777 dirname
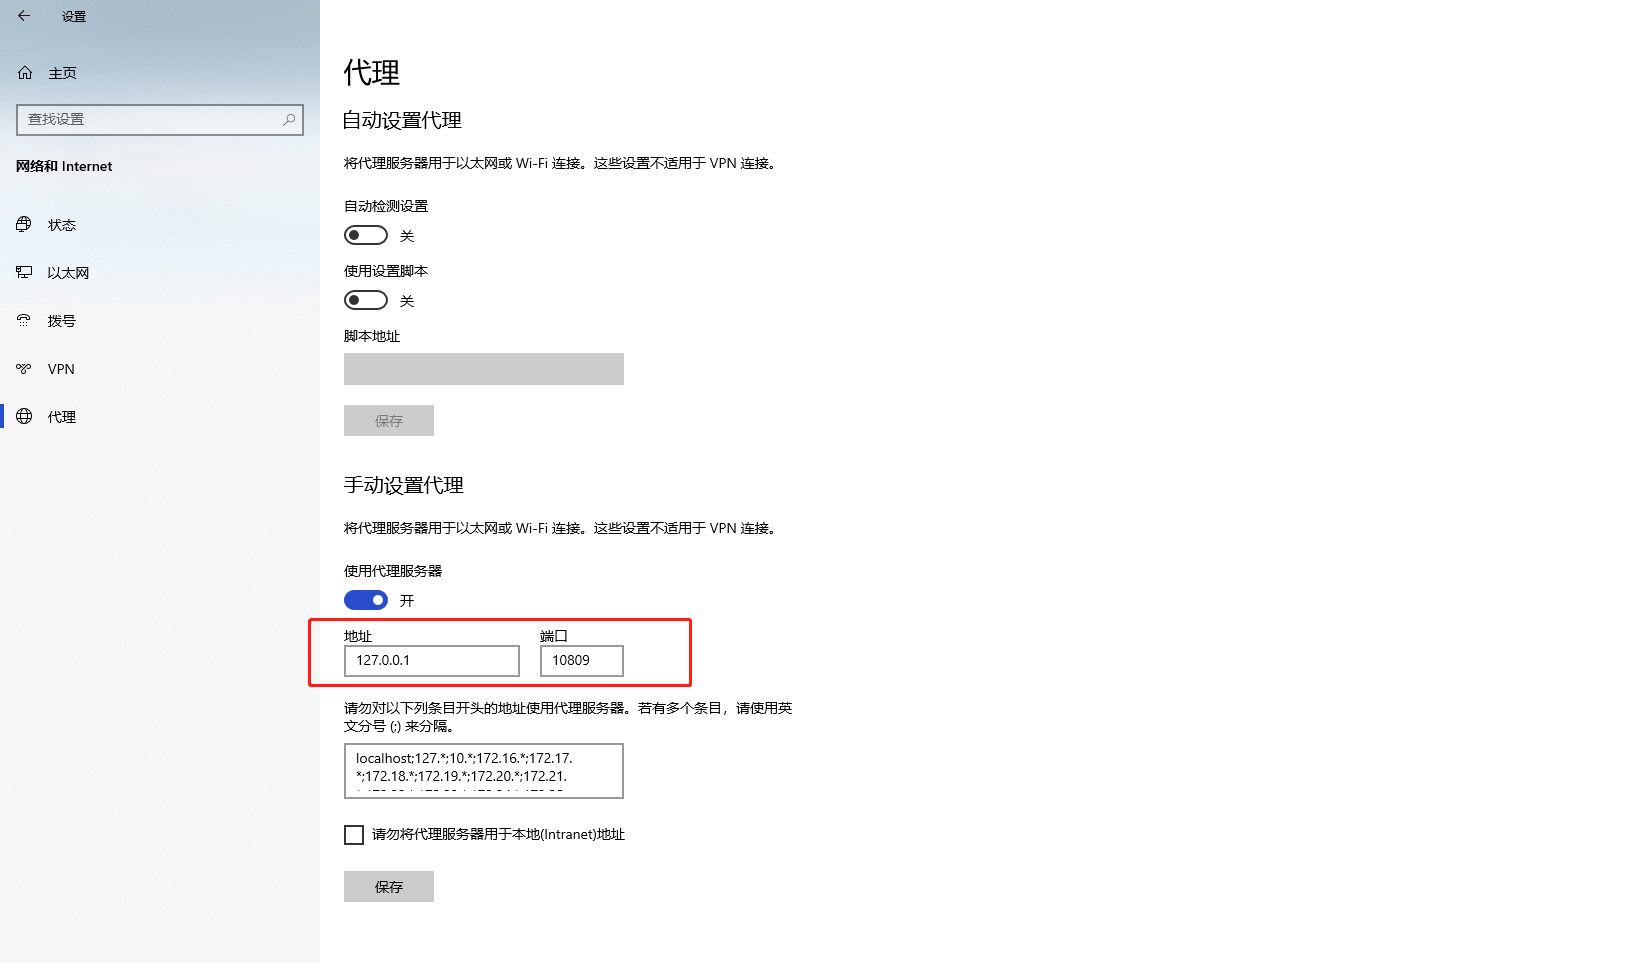
# git clone 配置代理
设置HTTP代理:
git config --global http.proxy <代理地址>将
<代理地址>替换为你的代理服务器地址,例如http://proxy.example.com:8080。设置HTTPS代理:
git config --global https.proxy <代理地址>将
<代理地址>替换为你的代理服务器地址,例如http://proxy.example.com:8080。执行git clone命令:
git clone <仓库URL>将
<仓库URL>替换为你要克隆的Git仓库的URL。
这样,Git将通过代理服务器进行克隆操作。
如果你需要移除已配置的代理,可以使用以下命令:
移除HTTP代理:
git config --global --unset http.proxy移除HTTPS代理:
git config --global --unset https.proxy
请注意,这些命令是针对全局Git配置的。如果你只想为特定的Git仓库设置代理,可以在仓库目录中执行相应的命令,而不使用--global选项。
代理地址可通过window的设置查看