# 学习目标
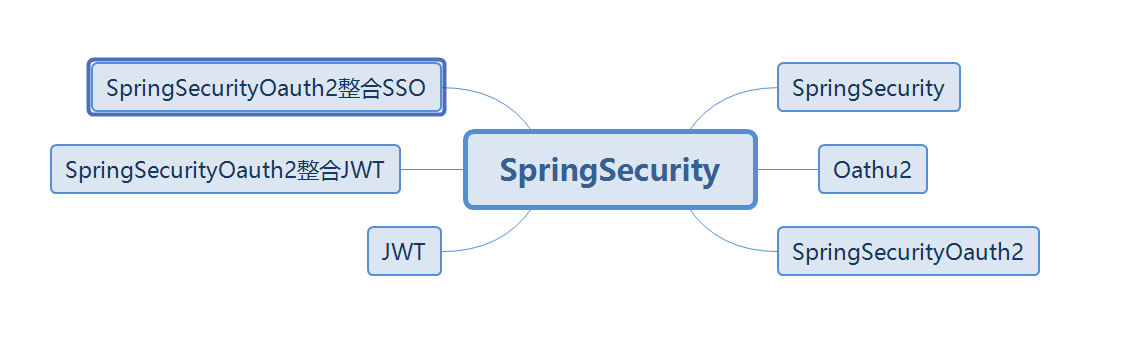
# SpringSecurity
# SpringSecurity简介
# 安全框架概述
什么是安全框架? 解决系统安全问题的框架。如果没有安全框架,我们需要手动处理每个资源的访问控制,非常麻烦。使用安全框架,我们可以通过配置的方式实现对资源的访问限制。
# 常用安全框架
Spring Security:Spring家族一员。是一个能够为基于Spring的企业应用系统提供声明式的安全访问控制解决方案的安全框架。它提供了一组可以在Spring应用上下文中配置的Bean,充分利用了
Spring IoC,DI(控制反转Inversion of Control,DI:Dependency Injection 依赖注入)和AOP(面向切面编程)功能,为应用系统提供声明式的安全访问控制功能,减少了为企业系统安全控制编写大量重复代码的工作。Apache Shiro:一个功能强大且易于使用的Java安全框架,提供了认证,授权,加密,和会话管理。
# Spring Security简介
概述
Spring Security是一个高度自定义的安全框架。利用 Spring IoC/DI和AOP功能,为系统提供了声明式安全访问控制功能,减少了为系统安全而编写大量重复代码的工作。使用 Spring Secruity 的原因有很多,但大部分都是发现了 javaEE的 Servlet 规范或 EJB 规范中的安全功能缺乏典型企业应用场景。同时认识到他们在 WAR 或 EAR 级别无法移植。因此如果你更换服务器环境,还有大量工作去重新配置你的应用程序。使用 Spring Security解决了这些问题,也为你提供许多其他有用的、可定制的安全功能。正如你可能知道的两个应用程序的两个主要区域是“认证”和“授权”(或者访问控制)。这两点也是 Spring Security 重要核心功能。“认证”,是建立一个他声明的主体的过程(一个“主体”一般是指用户,设备或一些可以在你的应用程序中执行动作的其他系统),通俗点说就是系统认为用户是否能登录。“授权”指确定一个主体是否允许在你的应用程序执行一个动作的过程。通俗点讲就是系统判断用户是否有权限去做某些事情。
历史
Spring Security 以“The Acegi Secutity System for Spring”的名字始于2003年年底。其前身为 acegi 项目。起因是 Spring 开发者邮件列表中一个问题,有人提问是否考虑提供一个基于 Spring 的安全实现。限制于时间问题,开发出了一个简单的安全实现,但是并没有深入研究。几周后,Spring 社区中其他成员同样询问了安全问题,代码提供给了这些人。2004 年 1 月份已经有 20 人左右使用这个项目。随着更多人的加入,在 2004 年 3 月左右在 sourceforge 中建立了一个项目。在最开始并没有认证模块,所有的认证功能都是依赖容器完成的,而 acegi 则注重授权。但是随着更多人的使用,基于容器的认证就显现出了不足。acegi 中也加入了认证功能。大约 1 年后 acegi 成为 Spring子项目。在 2006 年 5 月发布了 acegi 1.0.0 版本。2007 年底 acegi 更名为Spring Security。
# 快速入门
# 导入依赖
<?xml version="1.0" encoding="UTF-8"?>
<project xmlns="http://maven.apache.org/POM/4.0.0" xmlns:xsi="http://www.w3.org/2001/XMLSchema-instance"
         xsi:schemaLocation="http://maven.apache.org/POM/4.0.0 https://maven.apache.org/xsd/maven-4.0.0.xsd">
   <modelVersion>4.0.0</modelVersion>
   <parent>
      <groupId>org.springframework.boot</groupId>
      <artifactId>spring-boot-starter-parent</artifactId>
      <version>2.2.2.RELEASE</version>
      <relativePath/> <!-- lookup parent from repository -->
   </parent>
   <groupId>com.yjxxt</groupId>
   <artifactId>springsecurity-demo</artifactId>
   <version>0.0.1-SNAPSHOT</version>
   <name>springsecurity-demo</name>
   <description>Demo project for Spring Boot</description>

   <properties>
      <java.version>1.8</java.version>
   </properties>

   <dependencies>
      <!--spring security 组件-->
      <dependency>
         <groupId>org.springframework.boot</groupId>
         <artifactId>spring-boot-starter-security</artifactId>
      </dependency>
      <!--web 组件-->
      <dependency>
         <groupId>org.springframework.boot</groupId>
         <artifactId>spring-boot-starter-web</artifactId>
      </dependency>
      <!-- test 组件-->
      <dependency>
         <groupId>org.springframework.boot</groupId>
         <artifactId>spring-boot-starter-test</artifactId>
         <scope>test</scope>
         <exclusions>
            <exclusion>
               <groupId>org.junit.vintage</groupId>
               <artifactId>junit-vintage-engine</artifactId>
            </exclusion>
         </exclusions>
      </dependency>
      <dependency>
         <groupId>org.springframework.security</groupId>
         <artifactId>spring-security-test</artifactId>
         <scope>test</scope>
      </dependency>
   </dependencies>

   <build>
      <plugins>
         <plugin>
            <groupId>org.springframework.boot</groupId>
            <artifactId>spring-boot-maven-plugin</artifactId>
         </plugin>
      </plugins>
   </build>
</project>
# 前端页面
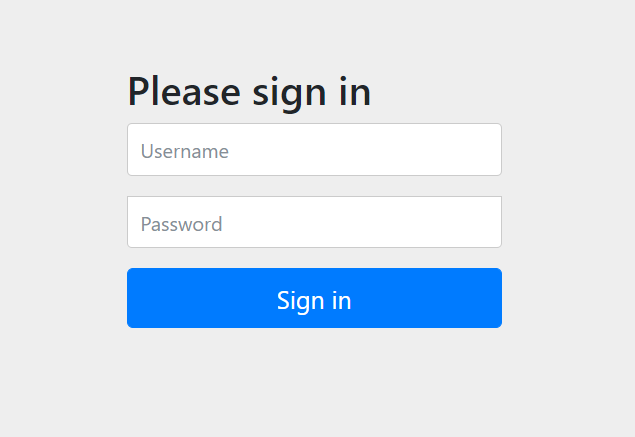
login.html
<!DOCTYPE html>
<html lang="en">
<head>
    <meta charset="UTF-8">
    <title>Title</title>
</head>
<body>
<form action="/login" method="post">
    用户名:<input type="text" name="username" /><br/>
    密码:<input type="password" name="password" /><br/>
    <input type="submit" value="登录" />
</form>
</body>
</html>
# 访问页面
导入spring-boot-starter-security 启动器后,Spring Security 已经生效,默认拦截全部请求,如果用户没有登录,跳转到内置登录页面。
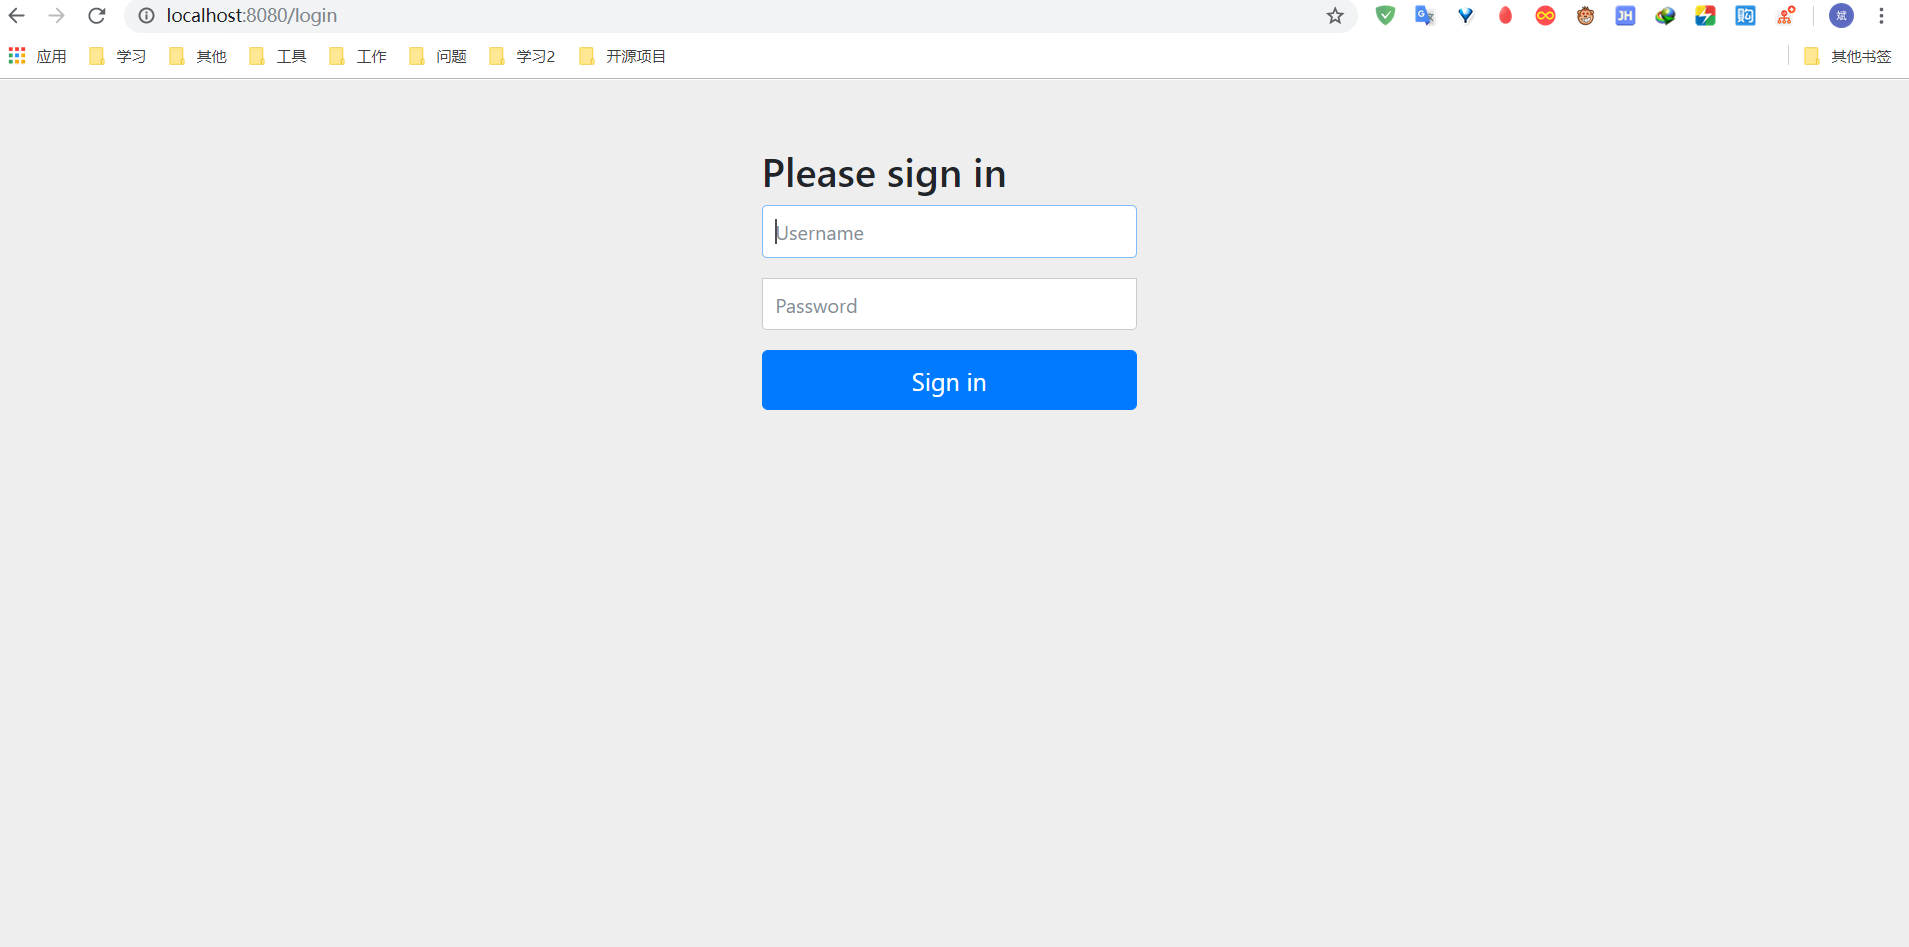
默认的 username 为 user,password 打印在控制台中。

在浏览器中输入账号和密码后会显示 login.html 页面内容。
# UserDetailsService详解
当什么也没有配置的时候,账号和密码是由 Spring Security 定义生成的。而在实际项目中账号和密码都是从数据库中查询出来的。所以我们要通过自定义逻辑控制认证逻辑。如果需要自定义逻辑时,只需要实现 UserDetailsService 接口即可。接口定义如下:

# 返回值
返回值 UserDetails 是一个接口,定义如下
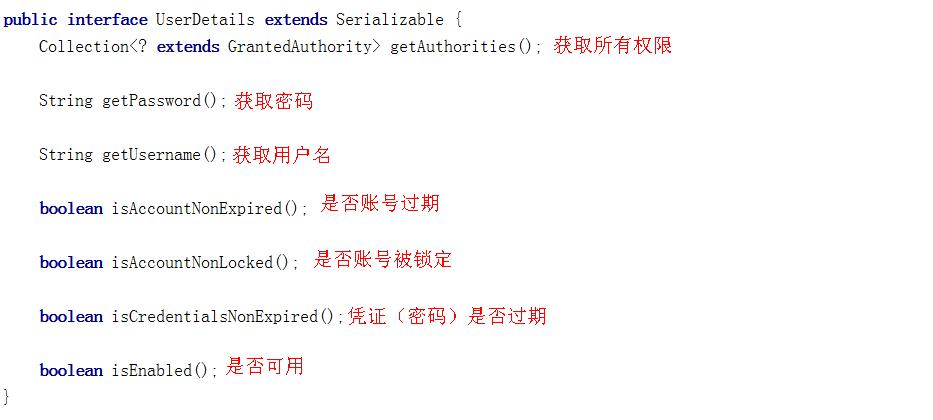
要想返回 UserDetails的实例就只能返回接口的实现类。SpringSecurity 中提供了如下的实例。对于我们只需要使用里面的 User类即可。注意 User 的全限定路径是:
org.springframework.security.core.userdetails.User此处经常和系统中自己开发的 User 类弄混。

在 User 类中提供了很多方法和属性。
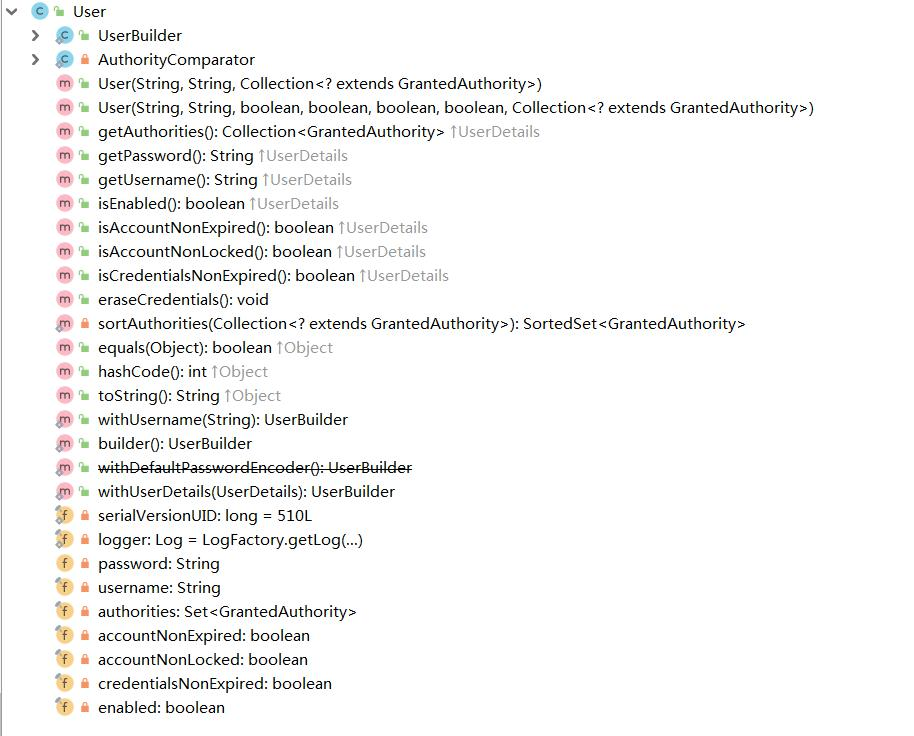
其中构造方法有两个,调用其中任何一个都可以实例化
UserDetails实现类 User类的实例。而三个参数的构造方法实际上也是调用 7 个参数的构造方法。
username:用户名password:密码authorities:用户具有的权限。此处不允许为 null

此处的用户名应该是客户端传递过来的用户名。而密码应该是从数据库中查询出来的密码。Spring Security 会根据 User 中的 password和客户端传递过来的 password进行比较。如果相同则表示认证通过,如果不相同表示认证失败。
authorities里面的权限对于后面学习授权是很有必要的,包含的所有内容为此用户具有的权限,如有里面没有包含某个权限,而在做某个事情时必须包含某个权限则会出现 403。通常都是通过AuthorityUtils.commaSeparatedStringToAuthorityList(“”) 来创建authorities 集合对象的。参数是一个字符串,多个权限使用逗号分隔。
# 方法参数
方法参数表示用户名。此值是客户端表单传递过来的数据。默认情况下必须叫 username,否则无法接收。
# 异常
UsernameNotFoundException用户名没有发现异常。在loadUserByUsername中是需要通过自己的逻辑从数据库中取值的。如果通过用户名没有查询到对应的数据,应该抛出UsernameNotFoundException,系统就知道用户名没有查询到。
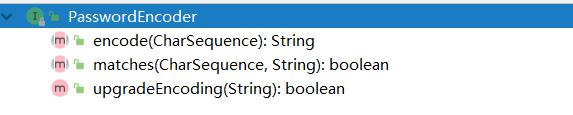
# PasswordEncoder 密码解析器详解
Spring Security 要求容器中必须有PasswordEncoder实例。所以当自定义登录逻辑时要求必须给容器注入PaswordEncoder的bean对象。
# 接口介绍
encode():把参数按照特定的解析规则进行解析。matches():验证从存储中获取的编码密码与编码后提交的原始密码是否匹配。如果密码匹配,则返回 true;如果不匹配,则返回 false。第一个参数表示需要被解析的密码。第二个参数表示存储的密码。upgradeEncoding():如果解析的密码能够再次进行解析且达到更安全的结果则返回 true,否则返回 false。默认返回 false。
# 内置解析器介绍
在 Spring Security 中内置了很多解析器。
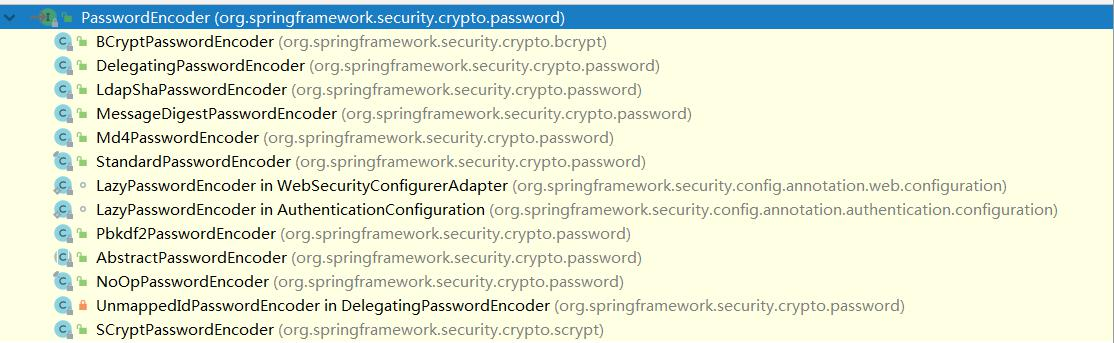
# BCryptPasswordEncoder 简介
BCryptPasswordEncoder 是 Spring Security 官方推荐的密码解析器,平时多使用这个解析器。
BCryptPasswordEncoder 是对 bcrypt强散列方法的具体实现。是基于Hash算法实现的单向加密。可以通过strength控制加密强度,默认 10.
# 代码演示
新建测试方法BCryptPasswordEncoder 用法。
package com.yjxxt.springsecuritydemo;

import org.junit.jupiter.api.Test;
import org.springframework.boot.test.context.SpringBootTest;
import org.springframework.security.crypto.bcrypt.BCryptPasswordEncoder;
import org.springframework.security.crypto.password.PasswordEncoder;

/**
 * @author zhoubin
 * @since 1.0.0
 */
@SpringBootTest
public class MyTest {

   @Test
   public void test(){
      //创建解析器
      PasswordEncoder pw = new BCryptPasswordEncoder();
      //对密码加密
      String encode = pw.encode("123");
      System.out.println(encode);

      //判断原字符和加密后内容是否匹配
      boolean matches = pw.matches("1234", encode);
      System.out.println("==================="+matches);
   }

}
# 自定义登录逻辑
当 进 行 自 定 义 登 录 逻 辑 时 需 要 用 到 之 前 讲 解 的UserDetailsService和 PasswordEncoder。但是 Spring Security 要求:当进行自定义登录逻辑时容器内必须有 PasswordEncoder实例。所以不能直接 new 对象。
# 编写配置类
package com.yjxxt.springsecuritydemo.config;

import org.springframework.context.annotation.Bean;
import org.springframework.context.annotation.Configuration;
import org.springframework.security.crypto.bcrypt.BCryptPasswordEncoder;
import org.springframework.security.crypto.password.PasswordEncoder;

/**
 * @author zhoubin
 * @since 1.0.0
 */
@Configuration
public class SecurityConfig {

   @Bean
   public PasswordEncoder getPw(){
      return new BCryptPasswordEncoder();
   }
}
# 自定义逻辑
在 Spring Security 中实现 UserDetailService 就表示为用户详情服务。在这个类中编写用户认证逻辑。
package com.yjxxt.springsecuritydemo.service;

import org.springframework.beans.factory.annotation.Autowired;
import org.springframework.security.core.authority.AuthorityUtils;
import org.springframework.security.core.userdetails.User;
import org.springframework.security.core.userdetails.UserDetails;
import org.springframework.security.core.userdetails.UserDetailsService;
import org.springframework.security.core.userdetails.UsernameNotFoundException;
import org.springframework.security.crypto.password.PasswordEncoder;
import org.springframework.stereotype.Service;

/**
 * @author zhoubin
 * @since 1.0.0
 */
@Service
public class UserServiceImpl implements UserDetailsService {
   @Autowired
   private PasswordEncoder pw;

   @Override
   public UserDetails loadUserByUsername(String username) throws UsernameNotFoundException {
      //1.查询数据库判断用户名是否存在,如果不存在抛出UsernameNotFoundException异常
      if (!"admin".equals(username)){
         throw new UsernameNotFoundException("用户名不存在");
      }
      //2.把查询出来的密码(注册时已经加密过)进行解析,或直接把密码放入构造方法中
      String password = pw.encode("123");
      return new User(username,password, AuthorityUtils.commaSeparatedStringToAuthorityList("admin,normal"));
   }
}
# 查看效果
重启项目后,在浏览器中输入账号:admin,密码:123。后可以正确进入到 login.html 页面。
# 自定义登录页面
虽然 Spring Security 给我们提供了登录页面,但是对于实际项目中,大多喜欢使用自己的登录页面。所以 Spring Security 中不仅仅提供了登录页面,还支持用户自定义登录页面。实现过程也比较简单,只需要修改配置类即可。
# 编写登录页面
login.html
<!DOCTYPE html>
<html lang="en">
<head>
    <meta charset="UTF-8">
    <title>Title</title>
</head>
<body>
<form action="/login" method="post">
    用户名:<input type="text" name="username" /><br/>
    密码:<input type="password" name="password" /><br/>
    <input type="submit" value="登录" />
</form>
</body>
</html>
# 修改配置类
修改配置类中主要是设置哪个页面是登录页面。配置类需要继承WebSecurityConfigurerAdapter,并重写 configure 方法。
successForwardUrl():登录成功后跳转地址loginPage():登录页面loginProcessingUrl:登录页面表单提交地址,此地址可以不真实存在。antMatchers():匹配内容permitAll():允许
package com.yjxxt.springsecuritydemo.config;

import org.springframework.context.annotation.Bean;
import org.springframework.context.annotation.Configuration;
import org.springframework.security.config.annotation.web.builders.HttpSecurity;
import org.springframework.security.config.annotation.web.configuration.WebSecurityConfigurerAdapter;
import org.springframework.security.crypto.bcrypt.BCryptPasswordEncoder;
import org.springframework.security.crypto.password.PasswordEncoder;

/**
 * @author zhoubin
 * @since 1.0.0
 */
@Configuration
public class SecurityConfig extends WebSecurityConfigurerAdapter {

   @Override
   protected void configure(HttpSecurity http) throws Exception {
      //表单提交
      http.formLogin()
            //自定义登录页面
            .loginPage("/login.html")
            //当发现/login时认为是登录,必须和表单提交的地址一样。去执行UserServiceImpl
            .loginProcessingUrl("/login")
            //登录成功后跳转页面,POST请求
            .successForwardUrl("/toMain");


      http.authorizeRequests()
            //login.html不需要被认证
            .antMatchers("/login.html").permitAll()
            //所有请求都必须被认证,必须登录后被访问
            .anyRequest().authenticated();

      //关闭csrf防护
      http.csrf().disable();
   }

   @Bean
   public PasswordEncoder getPw(){
      return new BCryptPasswordEncoder();
   }
}
# 编写控制器
package com.yjxxt.springsecuritydemo.controller;

import org.springframework.stereotype.Controller;
import org.springframework.web.bind.annotation.RequestMapping;

/**
 * 登录
 *
 * @author zhoubin
 * @since 1.0.0
 */
@Controller
public class LoginController {
   //该方法不执行
   // @RequestMapping("/login")
   // public String login(){
   //     System.out.println("登录方法");
   //     return "main.html";
   // }

   /**
    * 成功后跳转页面
    * @return
    */
   @RequestMapping("/toMain")
   public String toMain(){
      return "redirect:/main.html";
   }

}
# 认证过程其他常用配置
# 失败跳转
表单处理中成功会跳转到一个地址,失败也可以跳转到一个地址。
# 编写页面error.html
<!DOCTYPE html>
<html lang="en">
<head>
    <meta charset="UTF-8">
    <title>Title</title>
</head>
<body>
操作失败,请重新登录 <a href= "/login.html">跳转</a>
</body>
</html>
# 修改表单配置
在配置方法中表单认证部分添加failureForwardUrl()方法,表示登录失败跳转的 url。此处依然是 POST 请求,所以跳转到可以接收 POST请求的控制器/error中。
//表单提交
http.formLogin()
      //自定义登录页面
      .loginPage("/login.html")
      //当发现/login时认为是登录,必须和表单提交的地址一样。去执行UserServiceImpl
      .loginProcessingUrl("/login")
      //登录成功后跳转页面,POST请求
      .successForwardUrl("/toMain")
      //登录失败后跳转页面,POST请求
      .failureForwardUrl("/toError");
# 添加控制器的方法
在控制器类中添加控制器方法,方法映射路径/error。此处要注意:由于是 POST 请求访问/error。所以如果返回值直接转发到 error.html 中,即使有效果,控制台也会报警告,提示 error.html 不支持 POST 访问方式。
/**
 * 失败后跳转页面
 * @return
 */
@RequestMapping("/toError")
public String toError(){
   return "redirect:/error.html";
}
# 设置error.html不需要认证
http.authorizeRequests()
      //login.html不需要被认证
      .antMatchers("/login.html").permitAll()
      //error.html不需要被认证
      .antMatchers("/error.html").permitAll()
      //所有请求都必须被认证,必须登录后被访问
      .anyRequest().authenticated();
# 设置请求账户和密码的参数名
# 源码简介
当进行登录时会执行 UsernamePasswordAuthenticationFilter 过滤器。
usernamePasrameter:账户参数名passwordParameter:密码参数名postOnly=true:默认情况下只允许POST请求。

# 修改配置
//表单提交
http.formLogin()
      //自定义登录页面
      .loginPage("/login.html")
      //当发现/login时认为是登录,必须和表单提交的地址一样。去执行UserServiceImpl
      .loginProcessingUrl("/login")
      //登录成功后跳转页面,POST请求
      .successForwardUrl("/toMain")
      //登录失败后跳转页面,POST请求
      .failureForwardUrl("/toError")
      .usernameParameter("myusername")
      .passwordParameter("mypassword");
# 修改login.html
<form action="/login" method="post">
    用户名:<input type="text" name="myusername" /><br/>
    密码:<input type="password" name="mypassword" /><br/>
    <input type="submit" value="登录" />
</form>
# 自定义登录成功处理器
# 源码分析
使用successForwardUrl()时表示成功后转发请求到地址。内部是通过 successHandler()方法进行控制成功后交给哪个类进行处理

ForwardAuthenticationSuccessHandler内部就是最简单的请求转发。由于是请求转发,当遇到需要跳转到站外或在前后端分离的项目中就无法使用了。

当需要控制登录成功后去做一些事情时,可以进行自定义认证成功控制器。
# 代码实现
自定义类
新建类 com.yjxxt.handler.MyAuthenticationSuccessHandler 编写如下:
package com.yjxxt.springsecuritydemo.handler;

import org.springframework.security.core.Authentication;
import org.springframework.security.core.userdetails.User;
import org.springframework.security.web.authentication.AuthenticationSuccessHandler;

import javax.servlet.ServletException;
import javax.servlet.http.HttpServletRequest;
import javax.servlet.http.HttpServletResponse;
import java.io.IOException;

/**
 * @author zhoubin
 * @since 1.0.0
 */
public class MyAuthenticationSuccessHandler implements AuthenticationSuccessHandler {

   private String url;

   public MyAuthenticationSuccessHandler(String url) {
      this.url = url;
   }

   @Override
   public void onAuthenticationSuccess(HttpServletRequest request, HttpServletResponse response, Authentication authentication) throws IOException, ServletException {
      //Principal 主体,存放了登录用户的信息
      User user = (User) authentication.getPrincipal();
      System.out.println(user.getUsername());
      //输出null
      System.out.println(user.getPassword());
      System.out.println(user.getAuthorities());
      response.sendRedirect(url);
   }
}
修改配置项
使用 successHandler()方法设置成功后交给哪个对象进行处理
//表单提交
http.formLogin()
      //自定义登录页面
      .loginPage("/login.html")
      //当发现/login时认为是登录,必须和表单提交的地址一样。去执行UserServiceImpl
      .loginProcessingUrl("/login")
      //登录成功后跳转页面,POST请求
      // .successForwardUrl("/toMain")
      //和successForwardUrl不能共存
      .successHandler(new MyAuthenticationSuccessHandler("http://www.baidu.com"))
      //登录失败后跳转页面,POST请求
      .failureForwardUrl("/toError")
      .usernameParameter("myusername")
      .passwordParameter("mypassword");
# 自定义登录失败处理器
# 源码分析
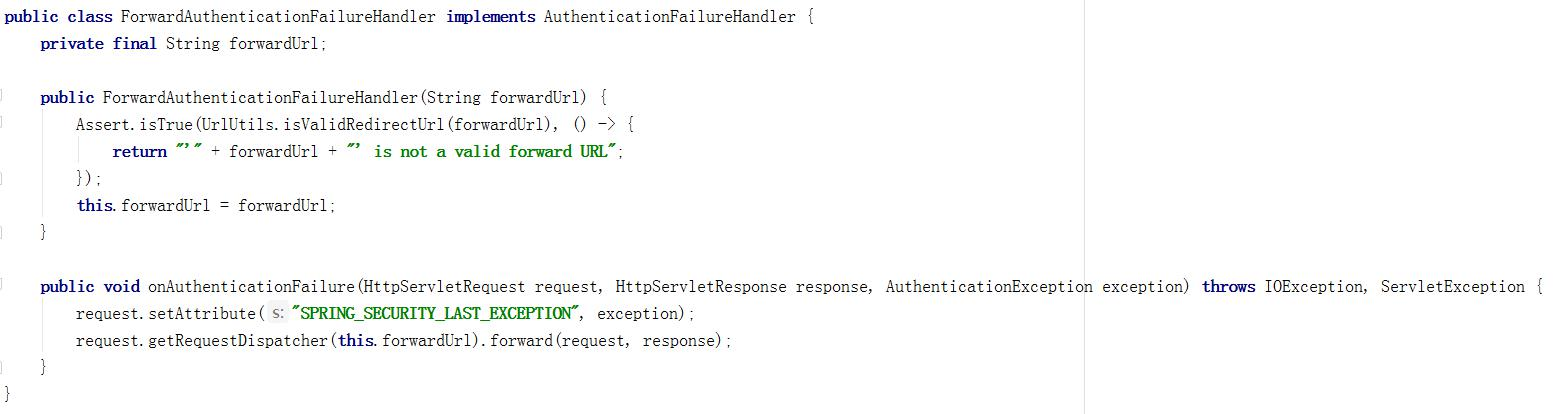
failureForwardUrl()内部调用的是failureHandler()方法

ForwardAuthenticationFailureHandler 中也是一个请求转发,并在request 作用域中设置 SPRING_SECURITY_LAST_EXCEPTION的 key,内容为异常对象。
# 代码实现
新建控制器
新建 com.yjxxt.handler.MyForwardAuthenticationFailureHandler 实现AuthenticationFailureHandler。在方法中添加重定向语句
package com.yjxxt.springsecuritydemo.handler;

import org.springframework.security.core.AuthenticationException;
import org.springframework.security.web.authentication.AuthenticationFailureHandler;

import javax.servlet.ServletException;
import javax.servlet.http.HttpServletRequest;
import javax.servlet.http.HttpServletResponse;
import java.io.IOException;

/**
 * @author zhoubin
 * @since 1.0.0
 */
public class MyForwardAuthenticationFailureHandler implements AuthenticationFailureHandler {

   private String url;

   public MyForwardAuthenticationFailureHandler(String url) {
      this.url = url;
   }

   @Override
   public void onAuthenticationFailure(HttpServletRequest request, HttpServletResponse response, AuthenticationException exception) throws IOException, ServletException {
      response.sendRedirect(url);
   }
}
修改配置类
修改配置类中表单登录部分。设置失败时交给失败处理器进行操作。failureForwardUrl和 failureHandler不可共存
//表单提交
http.formLogin()
      //自定义登录页面
      .loginPage("/login.html")
      //当发现/login时认为是登录,必须和表单提交的地址一样。去执行UserServiceImpl
      .loginProcessingUrl("/login")
      //登录成功后跳转页面,POST请求
      // .successForwardUrl("/toMain")
      //和successForwardUrl不能共存
      .successHandler(new MyAuthenticationSuccessHandler("http://www.baidu.com"))
      //登录失败后跳转页面,POST请求
      // .failureForwardUrl("/toError")
      .failureHandler(new MyForwardAuthenticationFailureHandler("/error.html"))
      .usernameParameter("myusername")
      .passwordParameter("mypassword");
# 访问控制url匹配
在前面讲解了认证中所有常用配置,主要是对http.formLogin()进行操作。而在配置类中 http.authorizeRequests()主要是对url进行控制,也就是我们所说的授权(访问控制)。http.authorizeRequests()也支持连缀写法,总体公式为:
- url 匹配规则.权限控制方法
通过上面的公式可以有很多 url 匹配规则和很多权限控制方法。这些内容进行各种组合就形成了Spring Security中的授权。
在所有匹配规则中取所有规则的交集。配置顺序影响了之后授权效果,越是具体的应该放在前面,越是笼统的应该放到后面。
# anyRequest()
在之前认证过程中我们就已经使用过 anyRequest(),表示匹配所有的请求。一般情况下此方法都会使用,设置全部内容都需要进行认证。
.anyRequest().authenticated();
# antMatcher()
方法定义如下
public C antMatchers(String... antPatterns)
参数是不定向参数,每个参数是一个 ant 表达式,用于匹配 URL规则。
规则如下:
?: 匹配一个字符*:匹配 0 个或多个字符**:匹配 0 个或多个目录
在实际项目中经常需要放行所有静态资源,下面演示放行 js 文件夹下所有脚本文件。
.antMatchers("/js/**","/css/**").permitAll()
还有一种配置方式是只要是.js 文件都放行
.antMatchers("/**/*.js").permitAll()
# regexMatchers()
# 介绍
使用正则表达式进行匹配。和 antMatchers()主要的区别就是参数,antMatchers()参数是 ant 表达式,regexMatchers()参数是正则表达式。
演示所有以.js 结尾的文件都被放行。
.regexMatchers( ".+[.]js").permitAll()
# 两个参数时使用方式
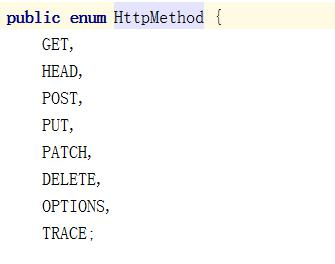
无论是antMatchers()还是regexMatchers()都具有两个参数的方法,其中第一个参数都是 HttpMethod,表示请求方式,当设置了HttpMethod后表示只有设定的特定的请求方式才执行对应的权限设置。
枚举类型 HttpMethod内置属性如下:
# mvcMatchers()
mvcMatchers()适用于配置了 servletPath 的情况。
servletPath就是所有的 URL 的统一前缀。在 SpringBoot 整合SpringMVC 的项目中可以在 application.properties 中添加下面内容设置 ServletPath
spring.mvc.servlet.path=/yjxxt
在 Spring Security 的配置类中配置.servletPath()是 mvcMatchers()返回值特有的方法,antMatchers()和 regexMatchers()没有这个方法。在servletPath()中配置了servletPath后,mvcMatchers()直接写 SpringMVC 中@RequestMapping()中设置的路径即可。
.mvcMatchers("/demo").servletPath("/yjxxt").permitAll()
如果不习惯使用 mvcMatchers()也可以使用 antMatchers(),下面代码和上面代码是等效
.antMatchers("/yjxxt/demo").permitAll()
# 内置访问控制方法
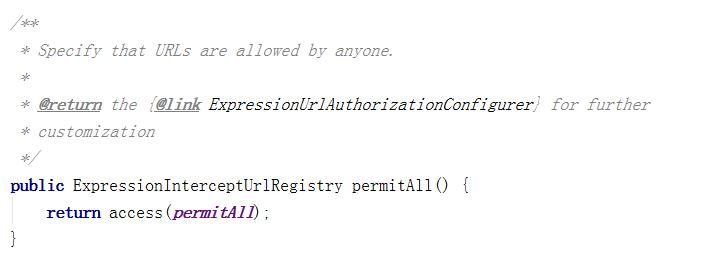
Spring Security 匹配了 URL 后调用了permitAll()表示不需要认证,随意访问。在 Spring Security 中提供了多种内置控制。
# permitAll()
permitAll()表示所匹配的 URL 任何人都允许访问。
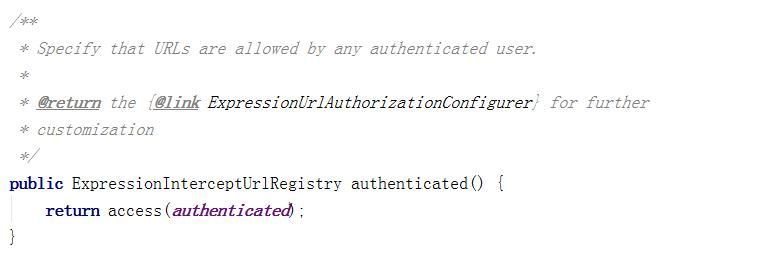
# authenticated()
authenticated()表示所匹配的 URL 都需要被认证才能访问。
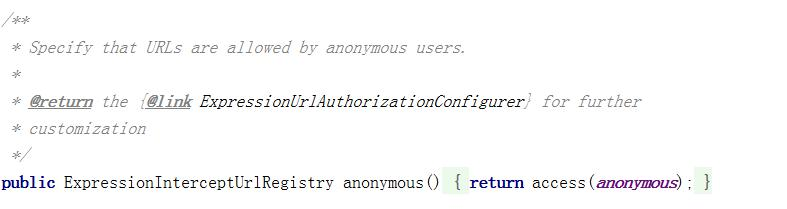
# anonymous()
anonymous()表示可以匿名访问匹配的URL。和permitAll()效果类似,只是设置为 anonymous()的 url 会执行 filter 链中
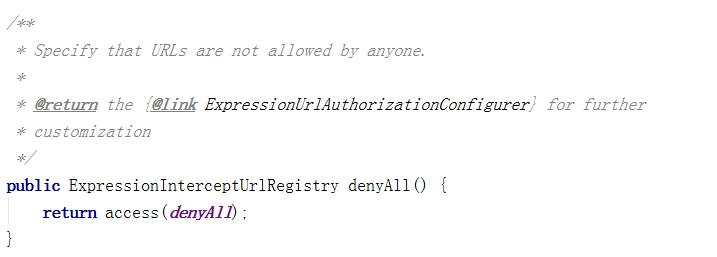
# denyAll()
denyAll()表示所匹配的 URL 都不允许被访问。
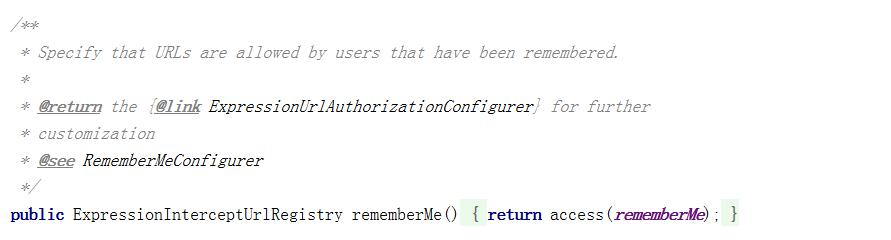
# rememberMe()
被“remember me”的用户允许访问
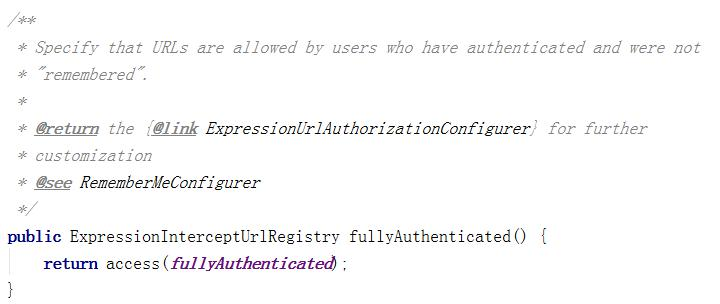
# fullyAuthenticated()
如果用户不是被 remember me 的,才可以访问。
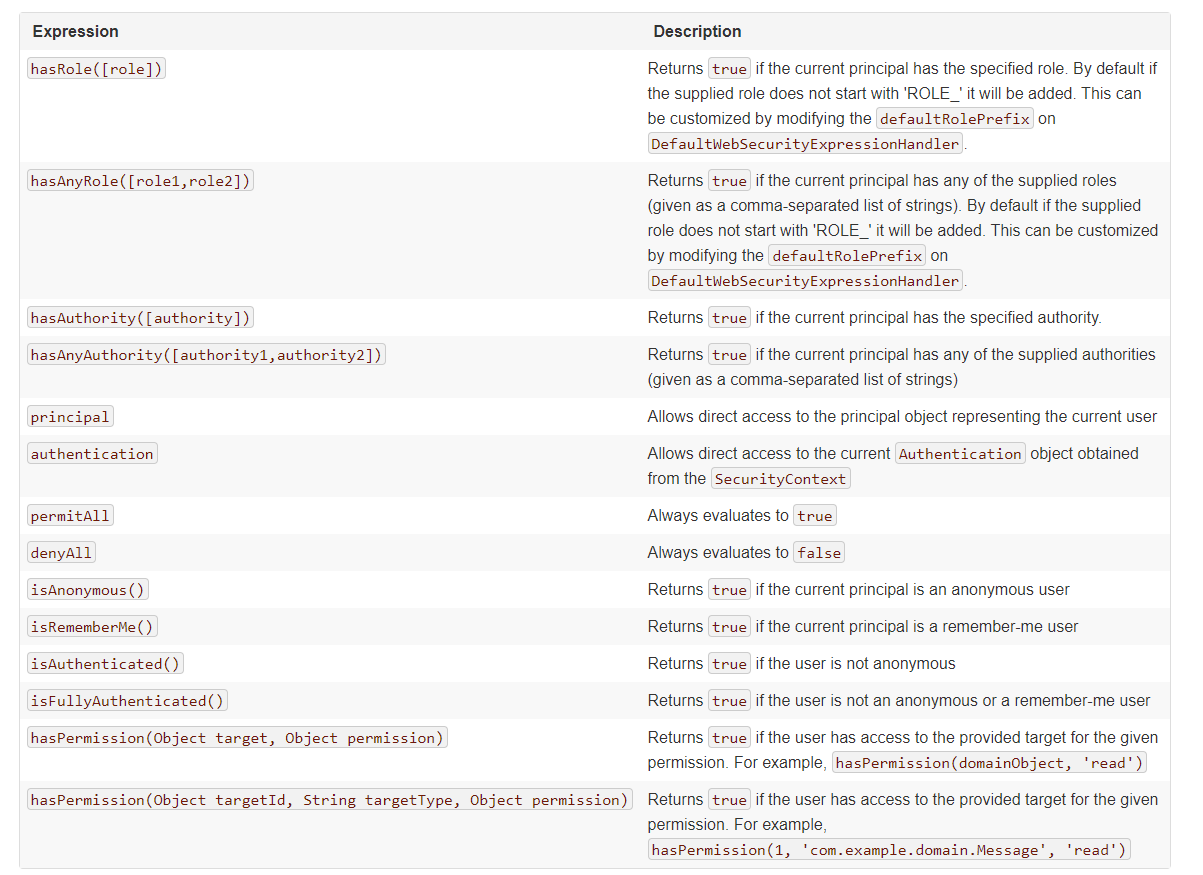
# 角色权限判断
除了之前讲解的内置权限控制。Spring Security 中还支持很多其他权限控制。这些方法一般都用于用户已经被认证后,判断用户是否具有特定的要求。
# hasAuthority(String)
判断用户是否具有特定的权限,用户的权限是在自定义登录逻辑中创建 User 对象时指定的。下图中 admin和normal 就是用户的权限。admin和normal 严格区分大小写。

在配置类中通过 hasAuthority(“admin”)设置具有 admin 权限时才能访问。
.antMatchers("/main1.html").hasAuthority("admin")
# hasAnyAuthority(String ...)
如果用户具备给定权限中某一个,就允许访问。
下面代码中由于大小写和用户的权限不相同,所以用户无权访问
.antMatchers("/main1.html").hasAnyAuthority("adMin","admiN")
# hasRole(String)
如果用户具备给定角色就允许访问。否则出现 403。
参数取值来源于自定义登录逻辑 UserDetailsService实现类中创建 User 对象时给 User 赋予的授权。
在给用户赋予角色时角色需要以:ROLE_开头,后面添加角色名称。例如:ROLE_abc 其中 abc 是角色名,ROLE_是固定的字符开头。
使用 hasRole()时参数也只写 abc 即可。否则启动报错。
给用户赋予角色:

在配置类中直接写 abc 即可。
.antMatchers("/main1.html").hasRole("abc")
# hasAnyRole(String ...)
如果用户具备给定角色的任意一个,就允许被访问
# hasIpAddress(String)
如果请求是指定的 IP 就运行访问。
可以通过 request.getRemoteAddr()获取 ip 地址。
需要注意的是在本机进行测试时 localhost 和 127.0.0.1 输出的 ip地址是不一样的。
当浏览器中通过 localhost 进行访问时控制台打印的内容:

当浏览器中通过 127.0.0.1 访问时控制台打印的内容:

当浏览器中通过具体 ip 进行访问时控制台打印内容:

.antMatchers("/main1.html").hasIpAddress("127.0.0.1")
# 自定义403处理方案
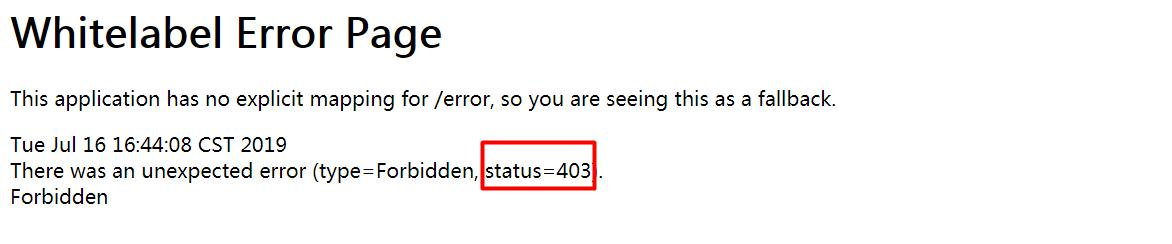
使用 Spring Security 时经常会看见 403(无权限),默认情况下显示的效果如下:
而在实际项目中可能都是一个异步请求,显示上述效果对于用户就不是特别友好了。Spring Security 支持自定义权限受限。
# 新建类
新建类实现 AccessDeniedHandler
package com.yjxxt.springsecuritydemo.handler;

import org.springframework.security.access.AccessDeniedException;
import org.springframework.security.web.access.AccessDeniedHandler;
import org.springframework.stereotype.Component;

import javax.servlet.ServletException;
import javax.servlet.http.HttpServletRequest;
import javax.servlet.http.HttpServletResponse;
import java.io.IOException;
import java.io.PrintWriter;

/**
 * @author zhoubin
 * @since 1.0.0
 */
@Component
public class MyAccessDeniedHandler implements AccessDeniedHandler {

   @Override
   public void handle(HttpServletRequest request, HttpServletResponse response, AccessDeniedException accessDeniedException) throws IOException, ServletException {
      response.setStatus(HttpServletResponse.SC_FORBIDDEN);
      response.setHeader("Content-Type", "application/json;charset=utf-8");
      PrintWriter out = response.getWriter();
      out.write("{\"status\":\"error\",\"msg\":\"权限不足,请联系管理员!\"}");
      out.flush();
      out.close();
   }
}
# 修改配置类
配置类中重点添加异常处理器。设置访问受限后交给哪个对象进行处理。
myAccessDeniedHandler 是在配置类中进行自动注入的。
//异常处理
http.exceptionHandling()
      .accessDeniedHandler(myAccessDeniedHandler);
# 基于表达式的访问控制
# access()方法使用
之前学习的登录用户权限判断实际上底层实现都是调用access(表达式)
可以通过access()实现和之前学习的权限控制完成相同的功能。
以 hasRole 和 和 permitAll 举例
# 使用自定义方法
虽然这里面已经包含了很多的表达式(方法)但是在实际项目中很有可能出现需要自己自定义逻辑的情况。
判断登录用户是否具有访问当前 URL 权限。
# 新建接口及实现类
MyService.java
package com.yjxxt.springsecuritydemo.service;

import org.springframework.security.core.Authentication;

import javax.servlet.http.HttpServletRequest;

public interface MyService {
   boolean hasPermission(HttpServletRequest request, Authentication authentication);
}
MyServiceImpl.java
package com.yjxxt.springsecuritydemo.service.impl;

import com.yjxxt.springsecuritydemo.service.MyService;
import org.springframework.security.core.Authentication;
import org.springframework.security.core.GrantedAuthority;
import org.springframework.security.core.authority.SimpleGrantedAuthority;
import org.springframework.security.core.userdetails.UserDetails;
import org.springframework.stereotype.Component;

import javax.servlet.http.HttpServletRequest;
import java.util.Collection;

/**
 * @author zhoubin
 * @since 1.0.0
 */
@Component
public class MyServiceImpl implements MyService {

   @Override
   public boolean hasPermission(HttpServletRequest request, Authentication authentication) {
      Object obj = authentication.getPrincipal();
      if (obj instanceof UserDetails){
         UserDetails userDetails = (UserDetails) obj;
         Collection<? extends GrantedAuthority> authorities = userDetails.getAuthorities();
         return authorities.contains(new SimpleGrantedAuthority(request.getRequestURI()));
      }
      return false;
   }
}
# 修改配置类
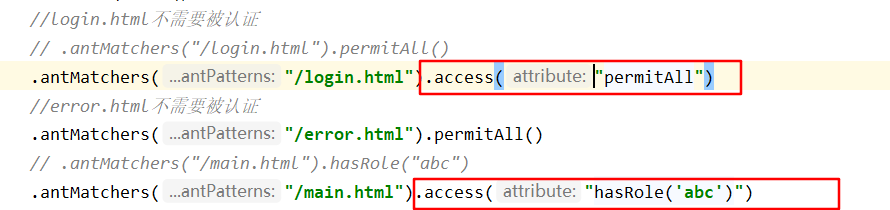
在 access 中通过@bean的id名.方法(参数)的形式进行调用配置类中修改如下:
//url拦截
http.authorizeRequests()
      //login.html不需要被认证
      // .antMatchers("/login.html").permitAll()
      .antMatchers("/login.html").access("permitAll")
      // .antMatchers("/main.html").hasRole("abc")
      .antMatchers("/main.html").access("hasRole('abc')")
      .anyRequest().access("@myServiceImpl.hasPermission(request,authentication)")
# 基于注解的访问控制
在 Spring Security 中提供了一些访问控制的注解。这些注解都是默认是都不可用的,需要通过@EnableGlobalMethodSecurity进行开启后使用。
如果设置的条件允许,程序正常执行。如果不允许会报 500

这些注解可以写到 Service 接口或方法上,也可以写到 Controller或 Controller 的方法上。通常情况下都是写在控制器方法上的,控制接口URL是否允许被访问。
# @Secured
@Secured 是专门用于判断是否具有角色的。能写在方法或类上。参数要以 ROLE_开头。
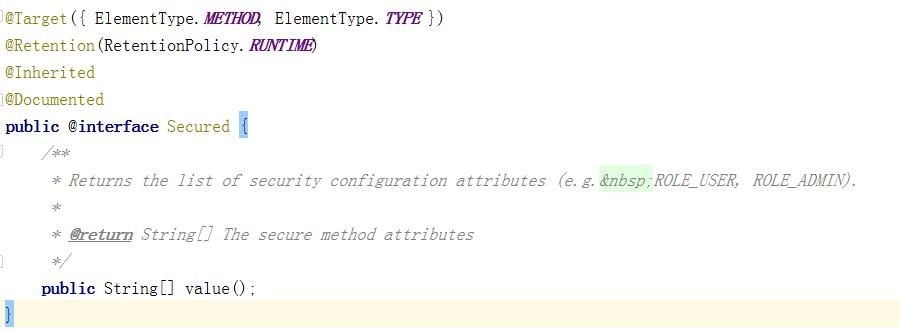
# 开启注解
在 启 动 类 ( 也 可 以 在 配 置 类 等 能 够 扫 描 的 类 上 ) 上 添 加@EnableGlobalMethodSecurity(securedEnabled = true)
@SpringBootApplication
@EnableGlobalMethodSecurity(securedEnabled = true)
public class SpringsecurityDemoApplication {

   public static void main(String[] args) {
      SpringApplication.run(SpringsecurityDemoApplication.class, args);
   }

}
# 在控制器方法上添加@Secured 注解
/**
 * 成功后跳转页面
 * @return
 */
@Secured("ROLE_abc")
@RequestMapping("/toMain")
public String toMain(){
   return "redirect:/main.html";
}
# 配置类
@Override
protected void configure(HttpSecurity http) throws Exception {
   //表单提交
   http.formLogin()
         //自定义登录页面
         .loginPage("/login.html")
         //当发现/login时认为是登录,必须和表单提交的地址一样。去执行UserServiceImpl
         .loginProcessingUrl("/login")
         //登录成功后跳转页面,POST请求
         .successForwardUrl("/toMain")

   //url拦截
   http.authorizeRequests()
         //login.html不需要被认证
         .antMatchers("/login.html").permitAll()
         //所有请求都必须被认证,必须登录后被访问
         .anyRequest().authenticated();
   //关闭csrf防护
   http.csrf().disable();
}
# @PreAuthorize/@PostAuthorize
@PreAuthorize 和@PostAuthorize 都是方法或类级别注解。
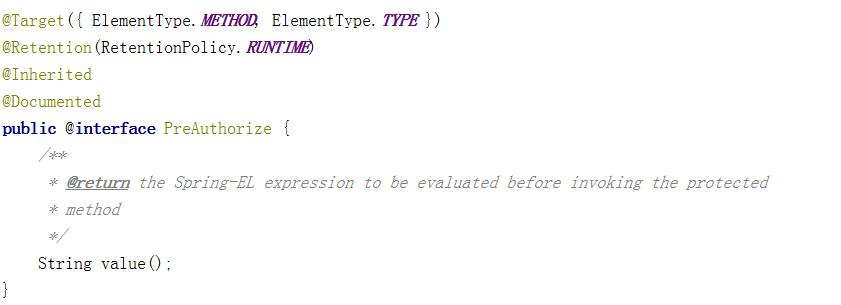
@PreAuthorize表示访问方法或类在执行之前先判断权限,大多情况下都是使用这个注解,注解的参数和access()方法参数取值相同,都是权限表达式。@PostAuthorize表示方法或类执行结束后判断权限,此注解很少被使用到。
# 开启注解
@SpringBootApplication
@EnableGlobalMethodSecurity(prePostEnabled = true)
public class SpringsecurityDemoApplication {

   public static void main(String[] args) {
      SpringApplication.run(SpringsecurityDemoApplication.class, args);
   }

}
# 添加@PreAuthorize
在控制器方法上添加@PreAuthorize,参数可以是任何 access()支持的表达式
/**
 * 成功后跳转页面
 * @return
 */
@PreAuthorize("hasRole('ROLE_abc')")
@RequestMapping("/toMain")
public String toMain(){
   return "redirect:/main.html";
}
# RememberMe功能实现
Spring Security 中 Remember Me 为“记住我”功能,用户只需要在登录时添加 remember-me复选框,取值为true。Spring Security 会自动把用户信息存储到数据源中,以后就可以不登录进行访问
# 添加依赖
Spring Security 实 现 Remember Me 功 能 时 底 层 实 现 依 赖Spring-JDBC,所以需要导入 Spring-JDBC。以后多使用 MyBatis 框架而很少直接导入 spring-jdbc,所以此处导入 mybatis 启动器同时还需要添加 MySQL 驱动
<!-- mybatis 依赖 -->
<dependency>
   <groupId>org.mybatis.spring.boot</groupId>
   <artifactId>mybatis-spring-boot-starter</artifactId>
   <version>2.1.1</version>
</dependency>
<!-- mysql 数据库依赖 -->
<dependency>
   <groupId>mysql</groupId>
   <artifactId>mysql-connector-java</artifactId>
   <version>8.0.18</version>
</dependency>
# 配置数据源
在 application.properties 中配置数据源。请确保数据库中已经存在shop数据库
spring.datasource.driver-class-name= com.mysql.cj.jdbc.Driver
spring.datasource.url= jdbc:mysql://localhost:3306/security?useUnicode=true&characterEncoding=UTF-8&serverTimezone=Asia/Shanghai
spring.datasource.username= root
spring.datasource.password= root
# 编写配置
RememberMeConfig.java
package com.yjxxt.springsecuritydemo.config;

import org.springframework.beans.factory.annotation.Autowired;
import org.springframework.context.annotation.Bean;
import org.springframework.context.annotation.Configuration;
import org.springframework.security.web.authentication.rememberme.JdbcTokenRepositoryImpl;
import org.springframework.security.web.authentication.rememberme.PersistentTokenRepository;

import javax.sql.DataSource;

/**
 * @author zhoubin
 * @since 1.0.0
 */
@Configuration
public class RememberMeConfig {

   @Autowired
   private DataSource dataSource;

   @Bean
   public PersistentTokenRepository getPersistentTokenRepository(){
      JdbcTokenRepositoryImpl jdbcTokenRepository = new JdbcTokenRepositoryImpl();
      jdbcTokenRepository.setDataSource(dataSource);
      //自动建表,第一次启动时需要,第二次启动时注释掉
      jdbcTokenRepository.setCreateTableOnStartup(true);
      return jdbcTokenRepository;
   }

}
# 修改SecurityConfig.java
在SecurityConfig中添加RememberMeConfig和UserDetailsService实现类对象,并自动注入。
在 configure 中添加下面配置内容。
http.rememberMe()
      //登录逻辑交给哪个对象
      .userDetailsService(userService)
      // 持久层对象
      .tokenRepository(persistentTokenRepository);
# 在客户端页面添加复选框
在客户端登录页面中添加 remember-me 的复选框,只要用户勾选了复选框下次就不需要进行登录了。
<form action="/login" method="post">
    用户名:<input type="text" name="username" /><br/>
    密码:<input type="password" name="password" /><br/>
    <input type="checkbox" name="remember-me" value="true"/><br/>
    <input type="submit" value="登录" />
</form>
# 有效时间
默认情况下重启项目后登录状态失效了。但是可以通过设置状态有效时间,即使项目重新启动下次也可以正常登录。
http.rememberMe()
      //失效时间,单位秒
      .tokenValiditySeconds(120)
      //登录逻辑交给哪个对象
      .userDetailsService(userService)
      // 持久层对象
      .tokenRepository(persistentTokenRepository);
# Thymeleaf中SpringSecurity的使用
Spring Security 可以在一些视图技术中进行控制显示效果。例如:JSP或 Thymeleaf。在非前后端分离且使用 Spring Boot 的项目中多使用 Thymeleaf作为视图展示技术。
Thymeleaf 对 Spring Security 的 支 持 都 放 在thymeleaf-extras-springsecurityX中,目前最新版本为 5。所以需要在项目中添加此 jar 包的依赖和 thymeleaf 的依赖。。
<!--thymeleaf springsecurity5 依赖-->
<dependency>
   <groupId>org.thymeleaf.extras</groupId>
   <artifactId>thymeleaf-extras-springsecurity5</artifactId>
</dependency>
<!--thymeleaf依赖-->
<dependency>
   <groupId>org.springframework.boot</groupId>
   <artifactId>spring-boot-starter-thymeleaf</artifactId>
</dependency>
在 html 页面中引入 thymeleaf 命名空间和 security 命名空间
<html xmlns="http://www.w3.org/1999/xhtml"
      xmlns:th="http://www.thymeleaf.org"
      xmlns:sec="http://www.thymeleaf.org/thymeleaf-extras-springsecurity5">
# 获取属性
可以在html页面中通过sec:authentication=""获取
UsernamePasswordAuthenticationToken中所有 getXXX的内容,包含父类中的 getXXX的内容。
根据源码得出下面属性:
name:登录账号名称principal:登录主体,在自定义登录逻辑中是 UserDetailscredentials:凭证authorities:权限和角色details:实际上是WebAuthenticationDetails的实例。可以获取remoteAddress(客户端 ip)和sessionId(当前 sessionId)
# 新建demo.html
在项目 resources 中新建 templates 文件夹,在 templates 中新建demo.html 页面
<!DOCTYPE html>
<html xmlns="http://www.w3.org/1999/xhtml"
      xmlns:sec="http://www.thymeleaf.org/thymeleaf-extras-springsecurity5">
<head>
    <meta charset="UTF-8">
    <title>Title</title>
</head>
<body>
    登录账号:<span sec:authentication="name"></span><br/>
    登录账号:<span sec:authentication="principal.username"></span><br/>
    凭证:<span sec:authentication="credentials"></span><br/>
    权限和角色:<span sec:authentication="authorities"></span><br/>
    客户端地址:<span sec:authentication="details.remoteAddress"></span><br/>
    sessionId:<span sec:authentication="details.sessionId"></span><br/>
</body>
</html>
# 编写Controller
thymeleaf 页面需要控制转发,在控制器类中编写下面方法
@RequestMapping("/demo")
public String demo(){
   return "demo";
}
# 权限判断
# 设置用户角色和权限
设定用户具有 admin,/insert,/delete 权限 ROLE_abc 角色。
return new User(username,password, AuthorityUtils.commaSeparatedStringToAuthorityList("admin,ROLE_abc,/insert,/delete"));
# 控制页面显示效果
在页面中根据用户权限和角色判断页面中显示的内容
通过权限判断:
<button sec:authorize="hasAuthority('/insert')">新增</button>
<button sec:authorize="hasAuthority('/delete')">删除</button>
<button sec:authorize="hasAuthority('/update')">修改</button>
<button sec:authorize="hasAuthority('/select')">查看</button>
<br/>
通过角色判断:
<button sec:authorize="hasRole('abc')">新增</button>
<button sec:authorize="hasRole('abc')">删除</button>
<button sec:authorize="hasRole('abc')">修改</button>
<button sec:authorize="hasRole('abc')">查看</button>
# 退出登录
用户只需要向 Spring Security 项目中发送/logout退出请求即可。
# 退出登录
实现退出非常简单,只要在页面中添加/logout 的超链接即可。
<a href="/logout">退出登录</a>
为了实现更好的效果,通常添加退出的配置。默认的退出 url 为/logout,退出成功后跳转到/login?logout
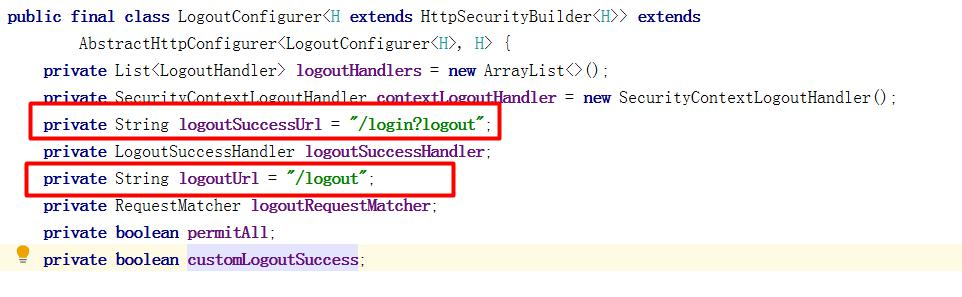
如果不希望使用默认值,可以通过下面的方法进行修改。
http.logout()
      .logoutUrl("/logout")
      .logoutSuccessUrl("/login.html");
# logout其他常用配置源码解读
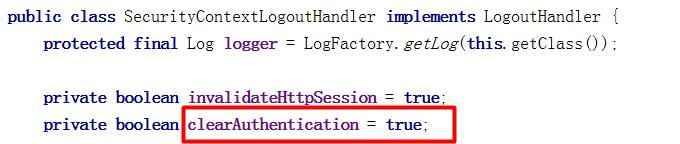
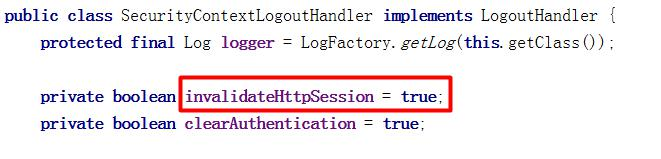
# addLogoutHandler(LogoutHandler)
默认是 contextLogoutHandler

默认实例内容

# clearAuthentication(boolean)
是否清除认证状态,默认为 true
# invalidateHttpSession(boolean)
是否销毁 HttpSession 对象,默认为 true
# logoutSuccessHandler(LogoutSuccessHandler)
退出成功处理器
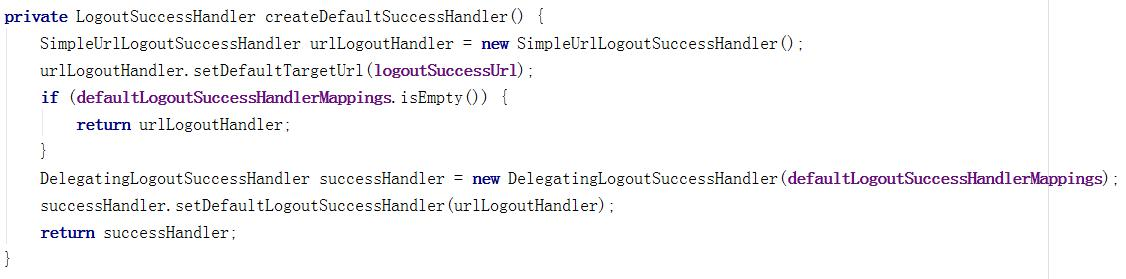
也可以自己进行定义退出成功处理器。只要实现了LogoutSuccessHandler接口。与之前讲解的登录成功处理器和登录失败处理器极其类似。
# SpringSecurity中的CSRF
从刚开始学习Spring Security时,在配置类中一直存在这样一行代码:http.csrf().disable();如果没有这行代码导致用户无法被认证。这行代码的含义是:关闭 csrf 防护。
# 什么是CSRF
CSRF(Cross-site request forgery)跨站请求伪造,也被称为“OneClick Attack” 或者 Session Riding。通过伪造用户请求访问受信任站点的非法请求访问。
跨域:只要网络协议,ip 地址,端口中任何一个不相同就是跨域请求。
客户端与服务进行交互时,由于 http 协议本身是无状态协议,所以引入了cookie进行记录客户端身份。在cookie中会存放session id用来识别客户端身份的。在跨域的情况下,session id 可能被第三方恶意劫持,通过这个 session id 向服务端发起请求时,服务端会认为这个请求是合法的,可能发生很多意想不到的事情。
# 2、Spring Security中的CSRF
从 Spring Security4开始CSRF防护默认开启。默认会拦截请求。进行CSRF处理。CSRF为了保证不是其他第三方网站访问,要求访问时携带参数名为_csrf值为token(token 在服务端产生)的内容,如果token和服务端的token匹配成功,则正常访问。
# 2.1、编写控制器方法
编写控制器方法,跳转到 templates 中 login.html 页面。
@RequestMapping("/showLogin")
public String showLogin(){
   return "login";
}
2.2、新建login.html
红色部分是必须存在的否则无法正常登录。
<!DOCTYPE html>
<html xmlns="http://www.w3.org/1999/xhtml"
      xmlns:th="http://www.thymeleaf.org"
>
<head>
    <meta charset="UTF-8">
    <title>Title</title>
</head>
<body>
<form action="/login" method="post">
    <input type="hidden" th:value="${_csrf.token}" name="_csrf" th:if="${_csrf}"/>
    用户名:<input type="text" name="username" /><br/>
    密码:<input type="password" name="password" /><br/>
    <input type="submit" value="登录" />
</form>
</body>
</html>
# 修改配置类
在配置类中注释掉 CSRF 防护失效
//关闭csrf防护
// http.csrf().disable();
# Oauth2认证
# Oauth2简介
# 简介
第三方认证技术方案最主要是解决认证协议的通用标准问题,因为要实现跨系统认证,各系统之间要遵循一定的接口协议。
OAUTH协议为用户资源的授权提供了一个安全的、开放而又简易的标准。同时,任何第三方都可以使用OAUTH认证服务,任何服务提供商都可以实现自身的OAUTH认证服务,因而OAUTH是开放的。业界提供了OAUTH的多种实现如PHP、JavaScript,Java,Ruby等各种语言开发包,大大节约了程序员的时间,因而OAUTH是简易的。互联网很多服务如Open API,很多大公司如Google,Yahoo,Microsoft等都提供了OAUTH认证服务,这些都足以说明OAUTH标准逐渐成为开放资源授权的标准。
Oauth协议目前发展到2.0版本,1.0版本过于复杂,2.0版本已得到广泛应用。
参考:https://baike.baidu.com/item/oAuth/7153134?fr=aladdin
Oauth 协议:https://tools.ietf.org/html/rfc6749
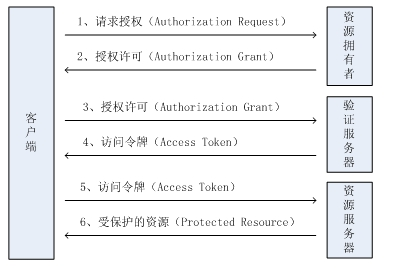
下边分析一个Oauth2认证的例子,网站使用微信认证的过程:

- 用户进入网站的登录页面,点击微信的图标以微信账号登录系统,用户是自己在微信里信息的资源拥有者。
点击“微信”出现一个二维码,此时用户扫描二维码,开始给网站授权。

- 资源拥有者同意给客户端授权
资源拥有者扫描二维码表示资源拥有者同意给客户端授权,微信会对资源拥有者的身份进行验证,验证通过后,微信会询问用户是否给授权网站访问自己的微信数据,用户点击“确认登录”表示同意授权,微信认证服务器会颁发一个授权码,并重定向到网站。
- 客户端获取到授权码,请求认证服务器申请令牌
此过程用户看不到,客户端应用程序请求认证服务器,请求携带授权码。
- 认证服务器向客户端响应令牌
认证服务器验证了客户端请求的授权码,如果合法则给客户端颁发令牌,令牌是客户端访问资源的通行证。此交互过程用户看不到,当客户端拿到令牌后,用户在网站看到已经登录成功。
- 客户端请求资源服务器的资源
客户端携带令牌访问资源服务器的资源。网站携带令牌请求访问微信服务器获取用户的基本信息。
- 资源服务器返回受保护资源
资源服务器校验令牌的合法性,如果合法则向用户响应资源信息内容。
注意:资源服务器和认证服务器可以是一个服务也可以分开的服务,如果是分开的服务资源服务器通常要请求认证服务器来校验令牌的合法性。
Oauth2.0认证流程如下:
引自Oauth2.0协议rfc6749 https://tools.ietf.org/html/rfc6749
# 角色
客户端
本身不存储资源,需要通过资源拥有者的授权去请求资源服务器的资源,比如:Android客户端、Web客户端(浏览器端)、微信客户端等。
资源拥有者
通常为用户,也可以是应用程序,即该资源的拥有者。
授权服务器(也称认证服务器)
用来对资源拥有的身份进行认证、对访问资源进行授权。客户端要想访问资源需要通过认证服务器由资源拥有者授权后方可访问。
资源服务器
存储资源的服务器,比如,网站用户管理服务器存储了网站用户信息,网站相册服务器存储了用户的相册信息,微信的资源服务存储了微信的用户信息等。客户端最终访问资源服务器获取资源信息。
# 常用术语
客户凭证(client Credentials):客户端的clientId和密码用于认证客户令牌(tokens):授权服务器在接收到客户请求后,颁发的访问令牌作用域(scopes):客户请求访问令牌时,由资源拥有者额外指定的细分权限(permission)
# 令牌类型
授权码:仅用于授权码授权类型,用于交换获取访问令牌和刷新令牌访问令牌:用于代表一个用户或服务直接去访问受保护的资源刷新令牌:用于去授权服务器获取一个刷新访问令牌BearerToken:不管谁拿到Token都可以访问资源,类似现金Proof of Possession(PoP) Token:可以校验client是否对Token有明确的拥有权
# 特点
优点:
更安全,客户端不接触用户密码,服务器端更易集中保护
广泛传播并被持续采用
短寿命和封装的token
资源服务器和授权服务器解耦
集中式授权,简化客户端
HTTP/JSON友好,易于请求和传递token
考虑多种客户端架构场景
客户可以具有不同的信任级别
缺点:
协议框架太宽泛,造成各种实现的兼容性和互操作性差
不是一个认证协议,本身并不能告诉你任何用户信息。
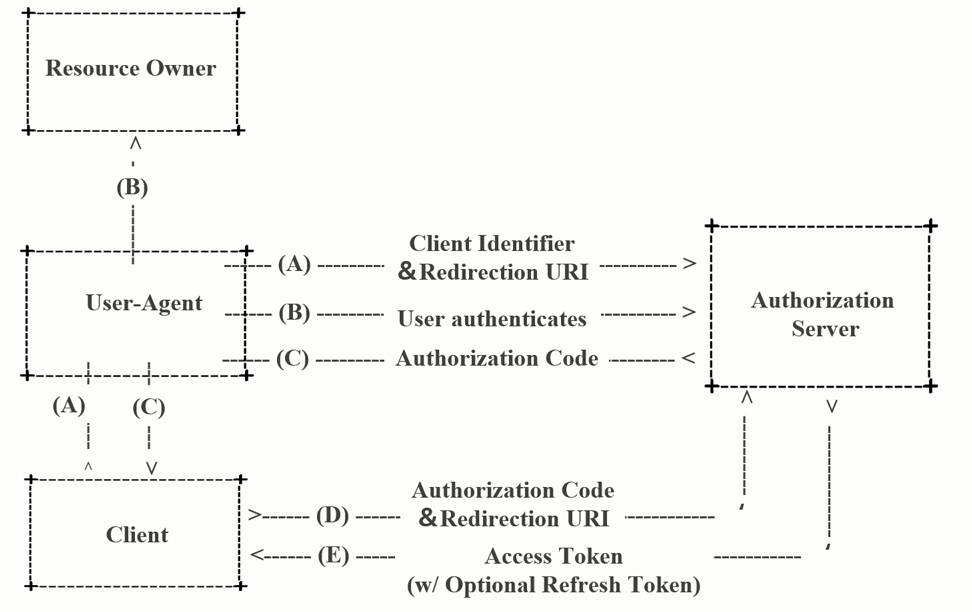
# 授权模式
# 授权码模式(Authorization Code)
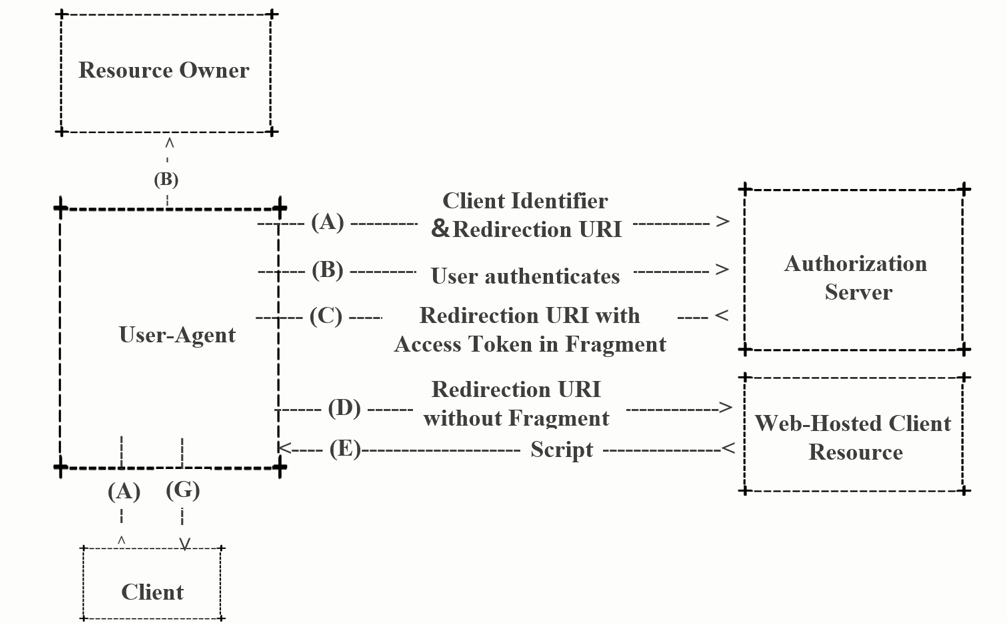
# 简化授权模式(Implicit)
# 密码模式(Resource Owner PasswordCredentials)
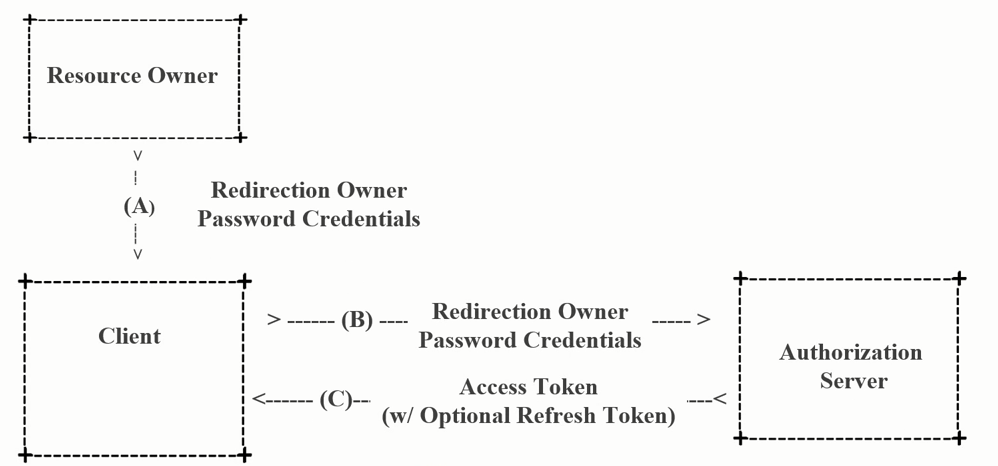
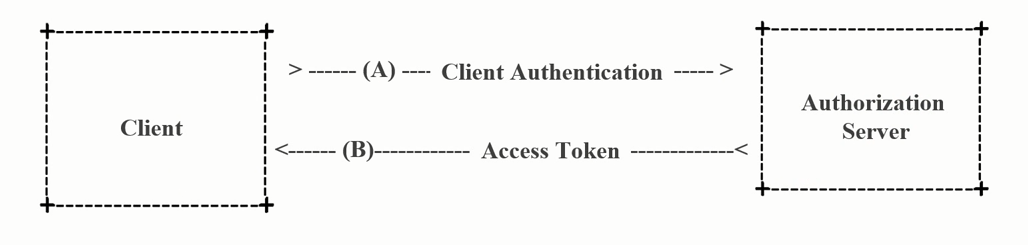
# 客户端模式(Client Credentials)
# 刷新令牌
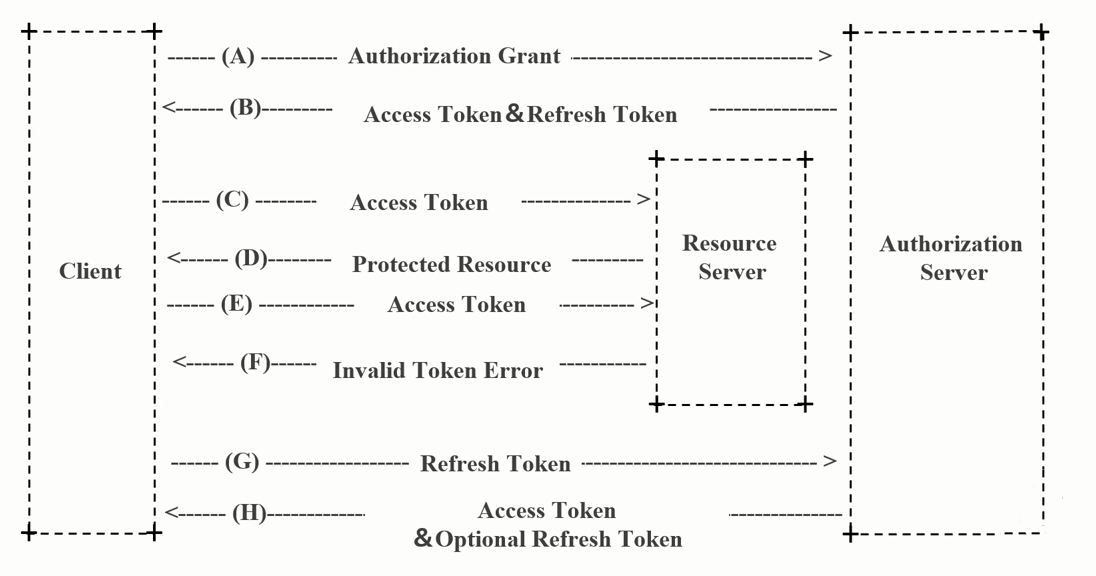
# Spring Security Oauth2
# 授权服务器
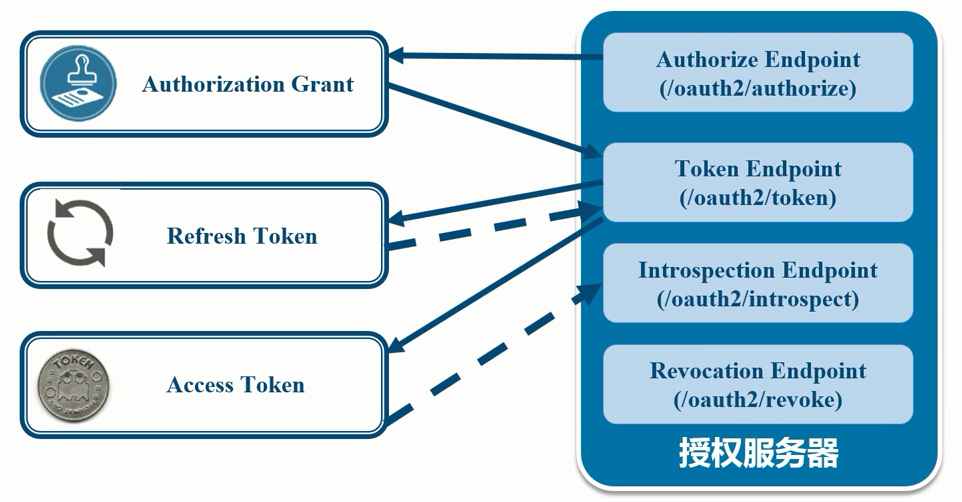
Authorize Endpoint:授权端点,进行授权Token Endpoint:令牌端点,经过授权拿到对应的TokenIntrospection Endpoint:校验端点,校验Token的合法性Revocation Endpoint:撤销端点,撤销授权
# Spring Security Oauth2架构
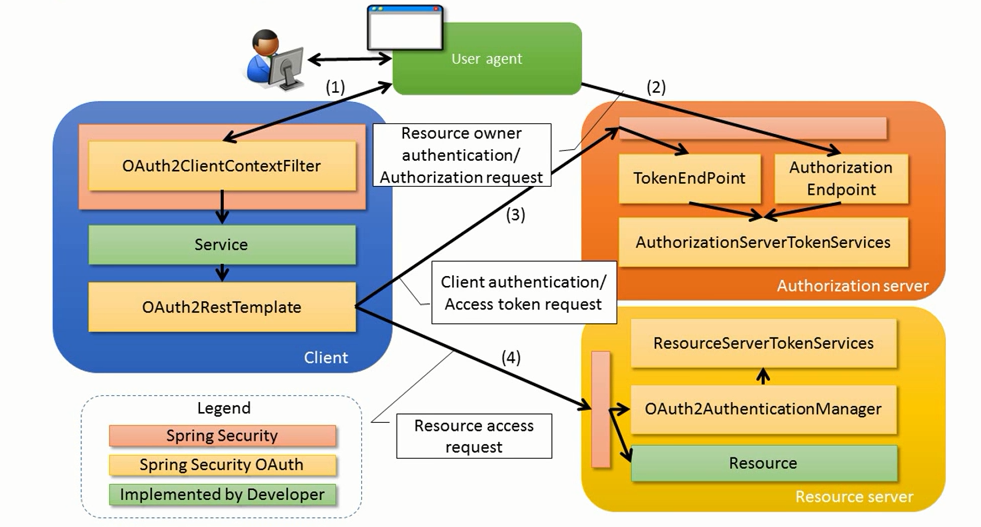
流程:
用户访问,此时没有Token。Oauth2RestTemplate会报错,这个报错信息会被Oauth2ClientContextFilter捕获并重定向到认证服务器
认证服务器通过Authorization Endpoint进行授权,并通过AuthorizationServerTokenServices生成授权码并返回给客户端
客户端拿到授权码去认证服务器通过Token Endpoint调用AuthorizationServerTokenServices生成Token并返回给客户端
客户端拿到Token去资源服务器访问资源,一般会通过Oauth2AuthenticationManager调用ResourceServerTokenServices进行校验。校验通过可以获取资源。
# Spring Security Oauth2授权码模式
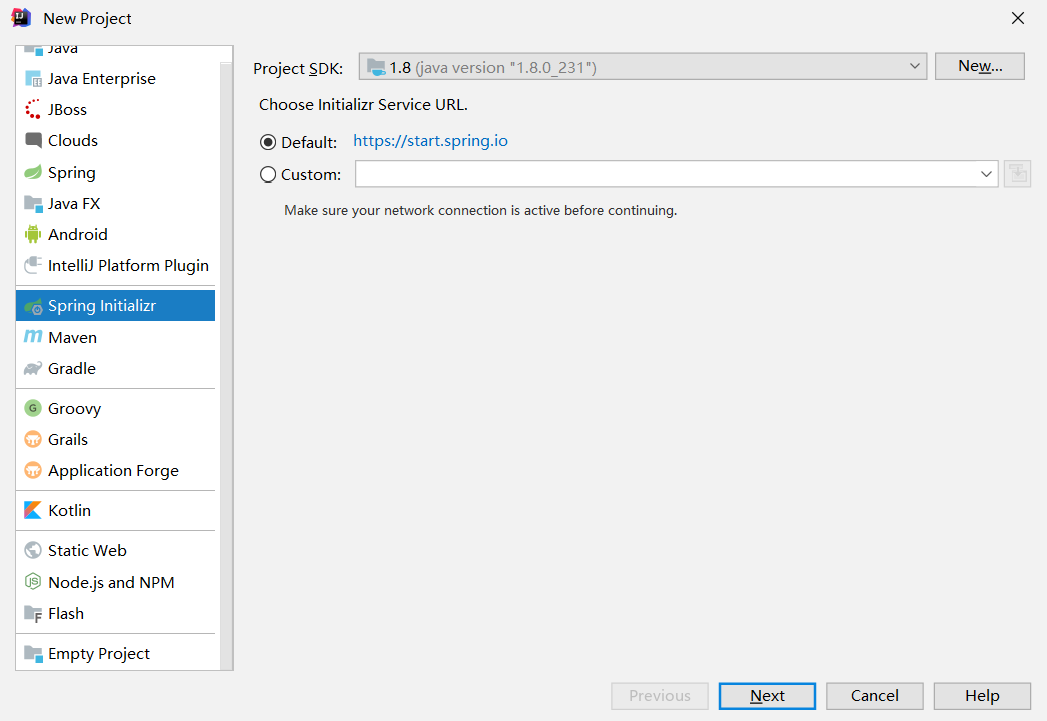
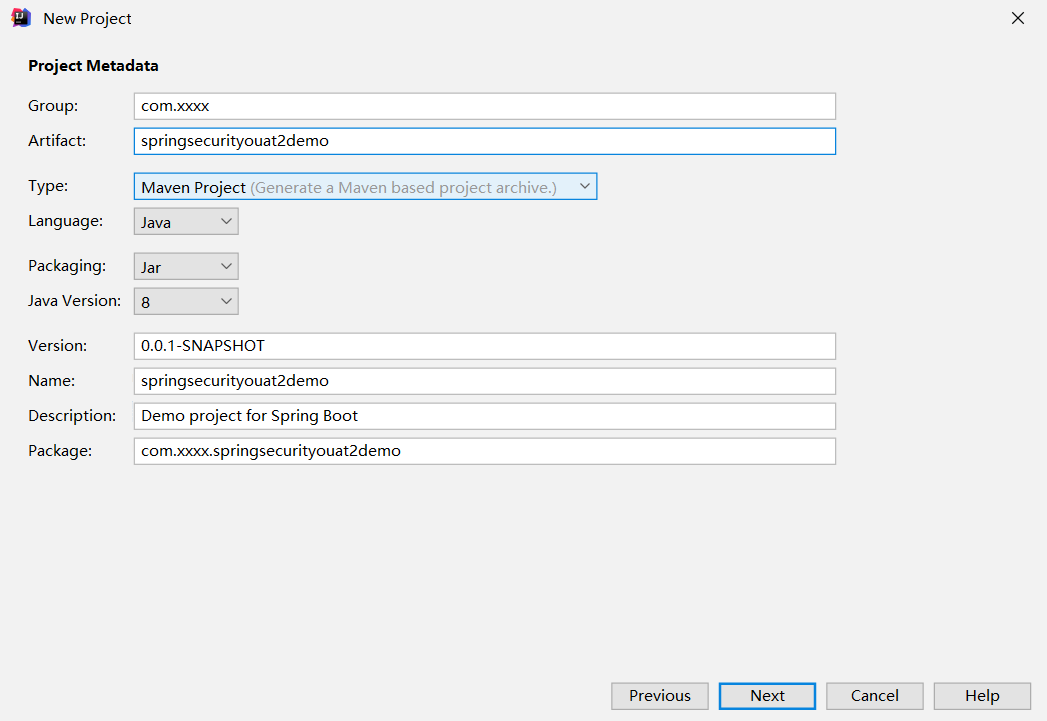
# 创建项目
# 2、添加依赖
<?xml version="1.0" encoding="UTF-8"?>
<project xmlns="http://maven.apache.org/POM/4.0.0" xmlns:xsi="http://www.w3.org/2001/XMLSchema-instance"
         xsi:schemaLocation="http://maven.apache.org/POM/4.0.0 https://maven.apache.org/xsd/maven-4.0.0.xsd">
   <modelVersion>4.0.0</modelVersion>
   <parent>
      <groupId>org.springframework.boot</groupId>
      <artifactId>spring-boot-starter-parent</artifactId>
      <version>2.2.2.RELEASE</version>
      <relativePath/> <!-- lookup parent from repository -->
   </parent>
   <groupId>com.yjxxt</groupId>
   <artifactId>springsecurityoauth2demo</artifactId>
   <version>0.0.1-SNAPSHOT</version>
   <name>springsecurityoauth2demo</name>
   <description>Demo project for Spring Boot</description>

   <properties>
      <java.version>1.8</java.version>
      <spring-cloud.version>Greenwich.SR2</spring-cloud.version>
   </properties>

   <dependencies>
      <dependency>
         <groupId>org.springframework.cloud</groupId>
         <artifactId>spring-cloud-starter-oauth2</artifactId>
      </dependency>
      <dependency>
         <groupId>org.springframework.cloud</groupId>
         <artifactId>spring-cloud-starter-security</artifactId>
      </dependency>
      <dependency>
         <groupId>org.springframework.boot</groupId>
         <artifactId>spring-boot-starter-web</artifactId>
      </dependency>
      <dependency>
         <groupId>org.springframework.boot</groupId>
         <artifactId>spring-boot-starter-test</artifactId>
         <scope>test</scope>
      </dependency>
   </dependencies>

   <dependencyManagement>
      <dependencies>
         <dependency>
            <groupId>org.springframework.cloud</groupId>
            <artifactId>spring-cloud-dependencies</artifactId>
            <version>${spring-cloud.version}</version>
            <type>pom</type>
            <scope>import</scope>
         </dependency>
      </dependencies>
   </dependencyManagement>

   <build>
      <plugins>
         <plugin>
            <groupId>org.springframework.boot</groupId>
            <artifactId>spring-boot-maven-plugin</artifactId>
         </plugin>
      </plugins>
   </build>

</project>
# 3、编写实体类
User.java
package com.yjxxt.springsecurityoauth2demo.pojo;

import org.springframework.security.core.GrantedAuthority;
import org.springframework.security.core.userdetails.UserDetails;

import java.util.Collection;
import java.util.List;

/**
 * 用户类
 */
public class User implements UserDetails {

    private String username;
    private String password;
    private List<GrantedAuthority> authorities;

    public User(String username, String password, List<GrantedAuthority> authorities) {
        this.username = username;
        this.password = password;
        this.authorities = authorities;
    }

    @Override
    public Collection<? extends GrantedAuthority> getAuthorities() {
        return authorities;
    }

    @Override
    public String getPassword() {
        return password;
    }

    @Override
    public String getUsername() {
        return username;
    }

    @Override
    public boolean isAccountNonExpired() {
        return true;
    }

    @Override
    public boolean isAccountNonLocked() {
        return true;
    }

    @Override
    public boolean isCredentialsNonExpired() {
        return true;
    }

    @Override
    public boolean isEnabled() {
        return true;
    }
}
# 4、编写Service
UserService.java
package com.yjxxt.springsecurityoauth2demo.service;

import com.yjxxt.springsecurityoauth2demo.pojo.User;
import org.springframework.beans.factory.annotation.Autowired;
import org.springframework.security.core.authority.AuthorityUtils;
import org.springframework.security.core.userdetails.UserDetails;
import org.springframework.security.core.userdetails.UserDetailsService;
import org.springframework.security.core.userdetails.UsernameNotFoundException;
import org.springframework.security.crypto.password.PasswordEncoder;
import org.springframework.stereotype.Service;

/**
 * @author zhoubin
 * @since 1.0.0
 */
@Service
public class UserService implements UserDetailsService {

   @Autowired
   private PasswordEncoder passwordEncoder;

   @Override
   public UserDetails loadUserByUsername(String username) throws UsernameNotFoundException {
      String password = passwordEncoder.encode("123456");
      return new User("admin",password, AuthorityUtils.commaSeparatedStringToAuthorityList("admin"));
   }
}
# 5、编写Controller
UserController.java
package com.yjxxt.springsecurityoauth2demo.controller;
import org.springframework.security.core.Authentication;
import org.springframework.web.bind.annotation.GetMapping;
import org.springframework.web.bind.annotation.RequestMapping;
import org.springframework.web.bind.annotation.RestController;
/**
* @author zhoubin
* @since 1.0.0
*/
@RestController
@RequestMapping("/user")
public class UserController {
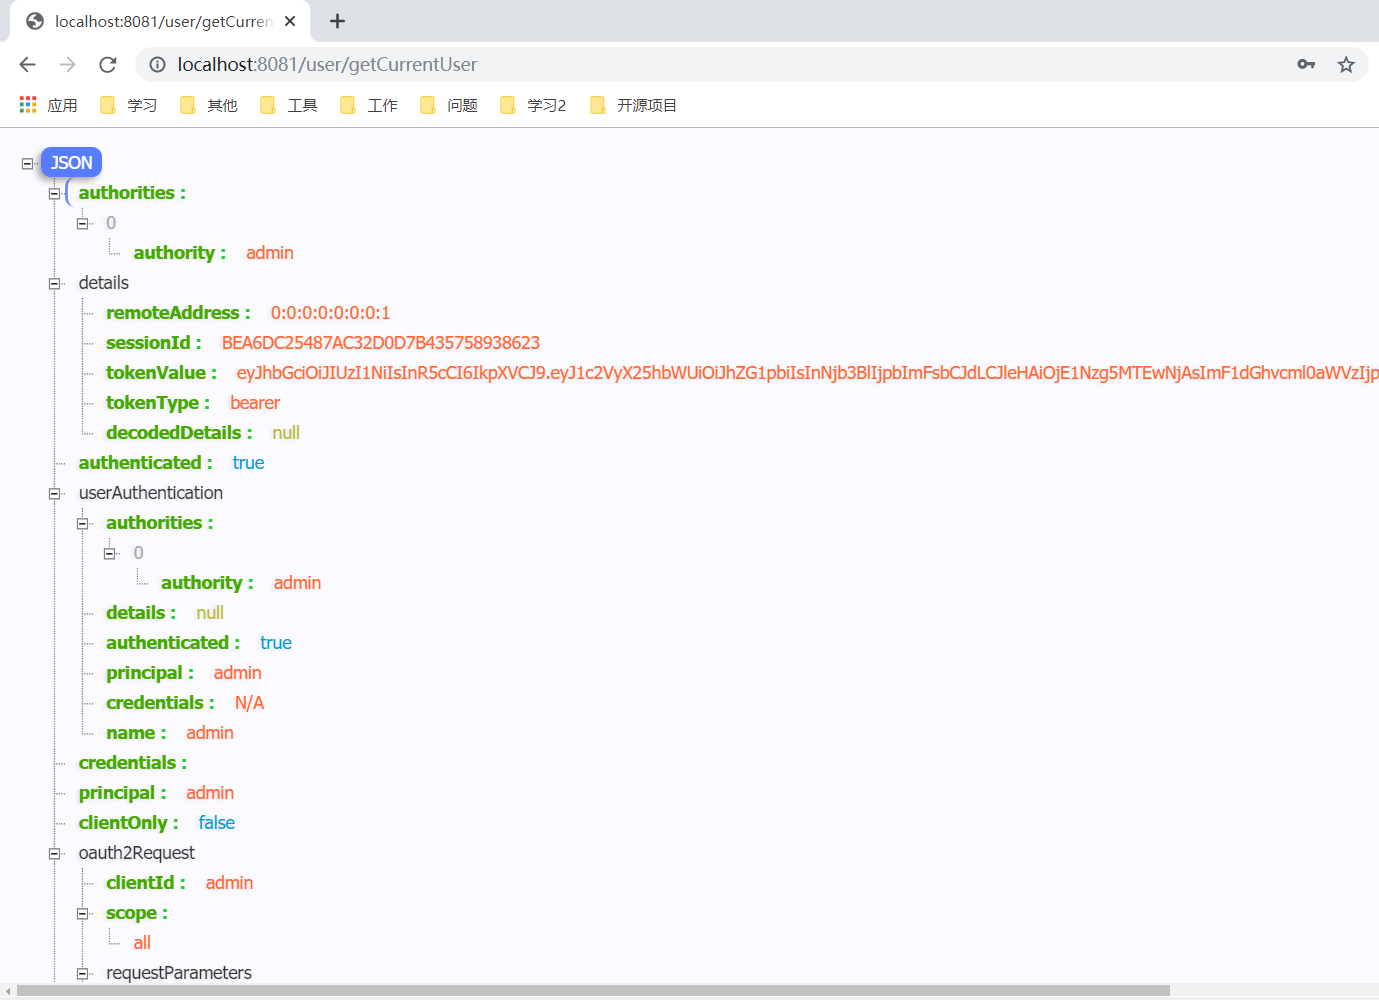
@GetMapping("/getCurrentUser")
public Object getCurrentUser(Authentication authentication) {
return authentication.getPrincipal();
}
}
# 6、编写配置类
SecurityConfig.java
package com.yjxxt.springsecurityoauth2demo.config;

import org.springframework.context.annotation.Bean;
import org.springframework.context.annotation.Configuration;
import org.springframework.security.config.annotation.web.builders.HttpSecurity;
import org.springframework.security.config.annotation.web.configuration.EnableWebSecurity;
import org.springframework.security.config.annotation.web.configuration.WebSecurityConfigurerAdapter;
import org.springframework.security.crypto.bcrypt.BCryptPasswordEncoder;
import org.springframework.security.crypto.password.PasswordEncoder;

/**
 * Spring Security 配置类
 *
 * @author zhoubin
 */
@Configuration
@EnableWebSecurity
public class SecurityConfig extends WebSecurityConfigurerAdapter {

   @Bean
   public PasswordEncoder passwordEncoder() {
      return new BCryptPasswordEncoder();
   }


   @Override
   public void configure(HttpSecurity http) throws Exception {
      http.csrf()
            .disable()
            .authorizeRequests()
            .antMatchers("/oauth/**", "/login/**", "/logout/**")
            .permitAll()
            .anyRequest()
            .authenticated()
            .and()
            .formLogin()
            .permitAll();
   }
}
AuthorizationServerConfig.java
package com.yjxxt.springsecurityoauth2demo.config;

import org.springframework.beans.factory.annotation.Autowired;
import org.springframework.context.annotation.Configuration;
import org.springframework.security.crypto.password.PasswordEncoder;
import org.springframework.security.oauth2.config.annotation.configurers.ClientDetailsServiceConfigurer;
import org.springframework.security.oauth2.config.annotation.web.configuration.AuthorizationServerConfigurerAdapter;
import org.springframework.security.oauth2.config.annotation.web.configuration.EnableAuthorizationServer;

/**
 * 授权服务器配置
 * @author zhoubin
 * @since 1.0.0
 */
@Configuration
@EnableAuthorizationServer
public class AuthorizationServerConfig extends AuthorizationServerConfigurerAdapter {

    @Autowired
    private PasswordEncoder passwordEncoder;


    @Override
    public void configure(ClientDetailsServiceConfigurer clients) throws Exception {
        clients.inMemory()
                //配置client_id
                .withClient("admin")
                //配置client-secret
                .secret(passwordEncoder.encode("112233"))
                //配置redirect_uri,用于授权成功后跳转
                .redirectUris("http://www.baidu.com")
                //配置申请的权限范围
                .scopes("all")
                //配置grant_type,表示授权类型
                .authorizedGrantTypes("authorization_code");
    }
}
ResourceServerConfig.java
package com.yjxxt.springsecurityoauth2demo.config;

import org.springframework.context.annotation.Configuration;
import org.springframework.security.config.annotation.web.builders.HttpSecurity;
import org.springframework.security.oauth2.config.annotation.web.configuration.EnableResourceServer;
import org.springframework.security.oauth2.config.annotation.web.configuration.ResourceServerConfigurerAdapter;

/**
 * 资源服务器配置
 *
 * @author zhoubin
 * @since 1.0.0
 */
@Configuration
@EnableResourceServer
public class ResourceServerConfig extends ResourceServerConfigurerAdapter {

    @Override
    public void configure(HttpSecurity http) throws Exception {
        http.authorizeRequests()
                .anyRequest()
                .authenticated()
                .and()
                .requestMatchers()
                .antMatchers("/user/**");//配置需要保护的资源路径
    }
}
# 7、测试
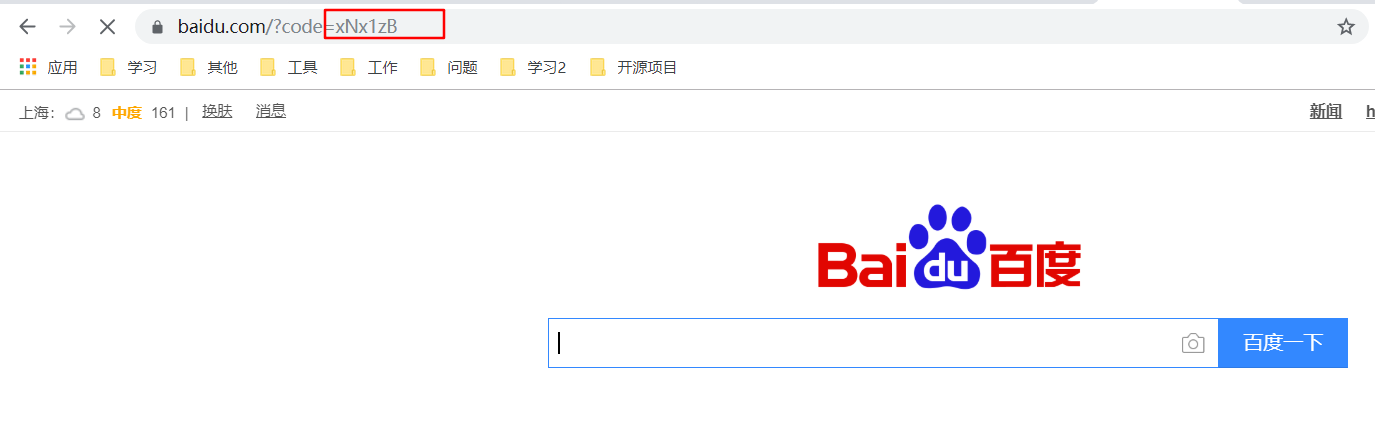
# 获取授权码
http://localhost:8080/oauth/authorize?response_type=code&client_id=admin&redirect_uri=http://www.baidu.com&scope=all
输入账户密码
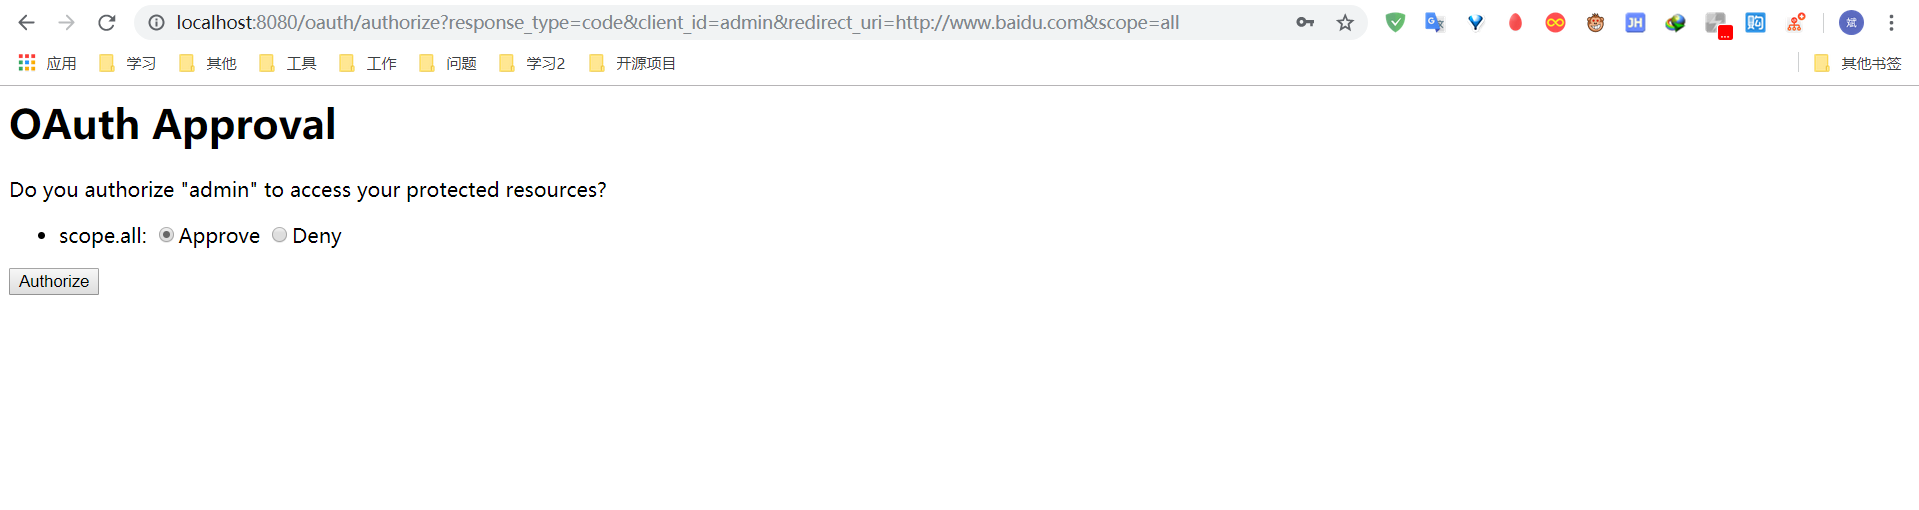
点击授权获取授权码
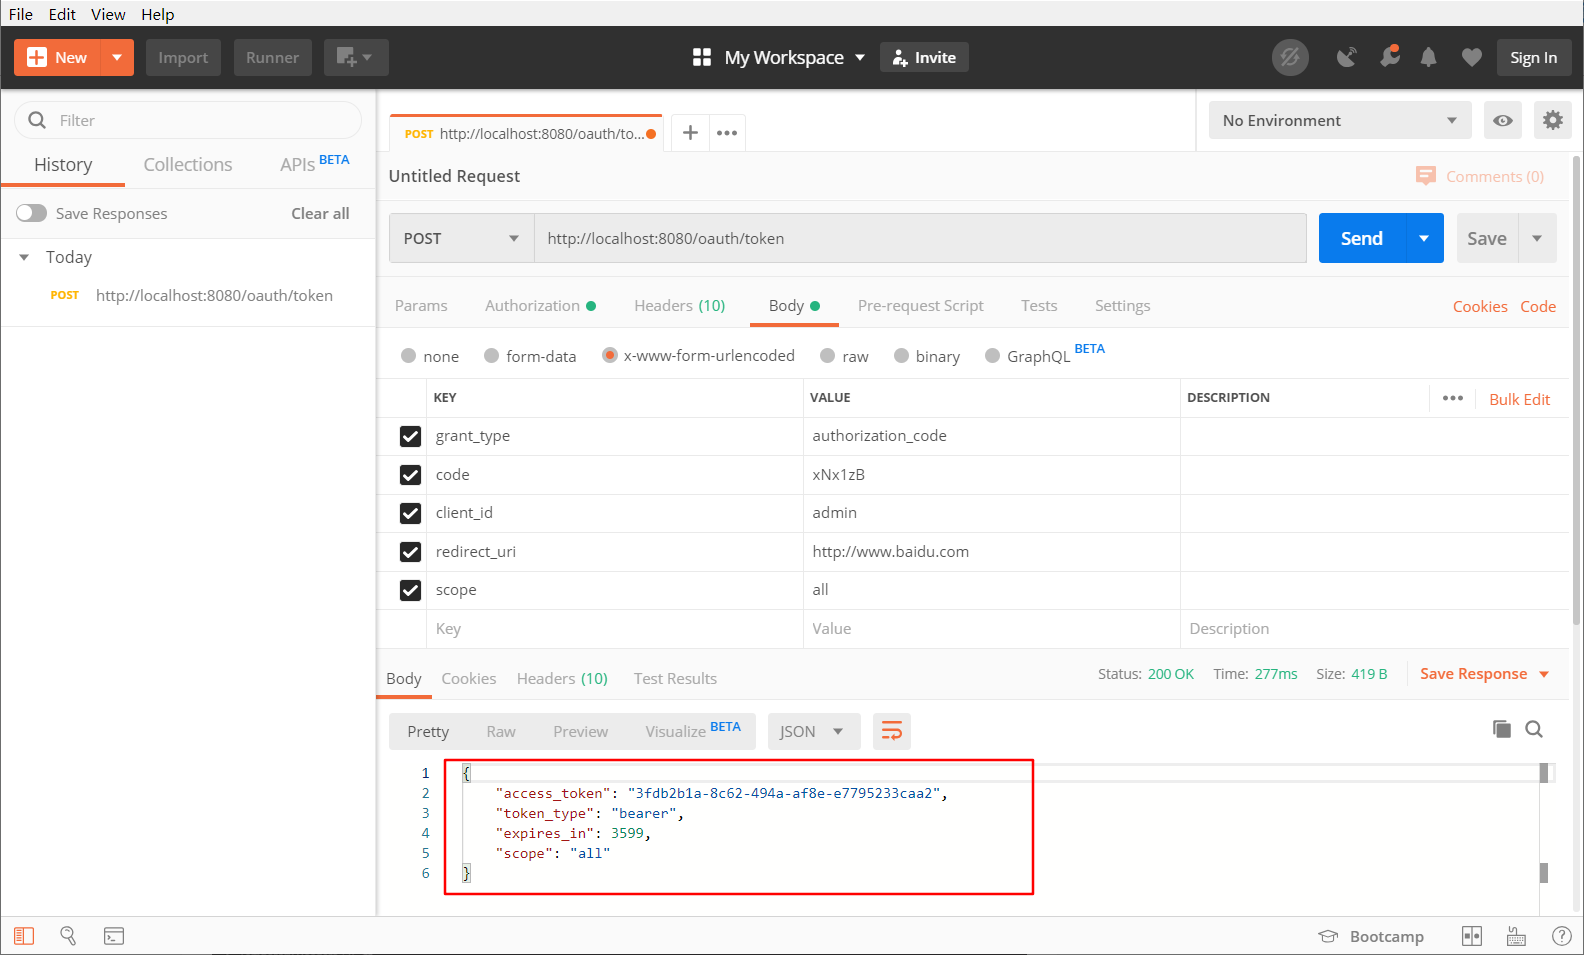
# 根据授权码获取令牌(POST请求)
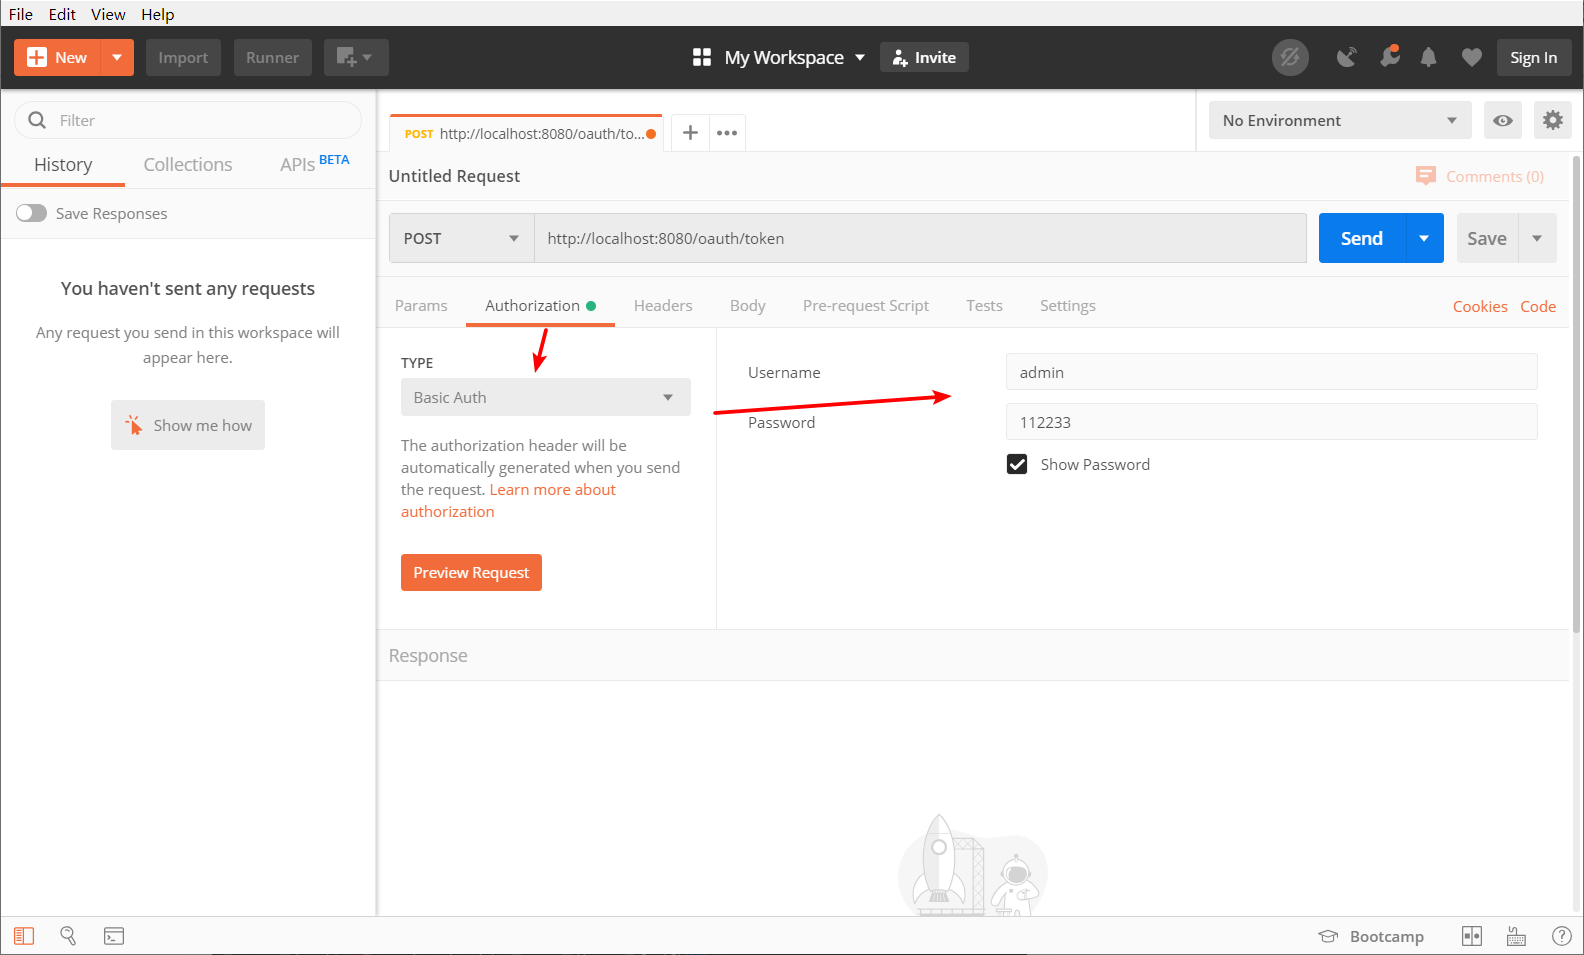
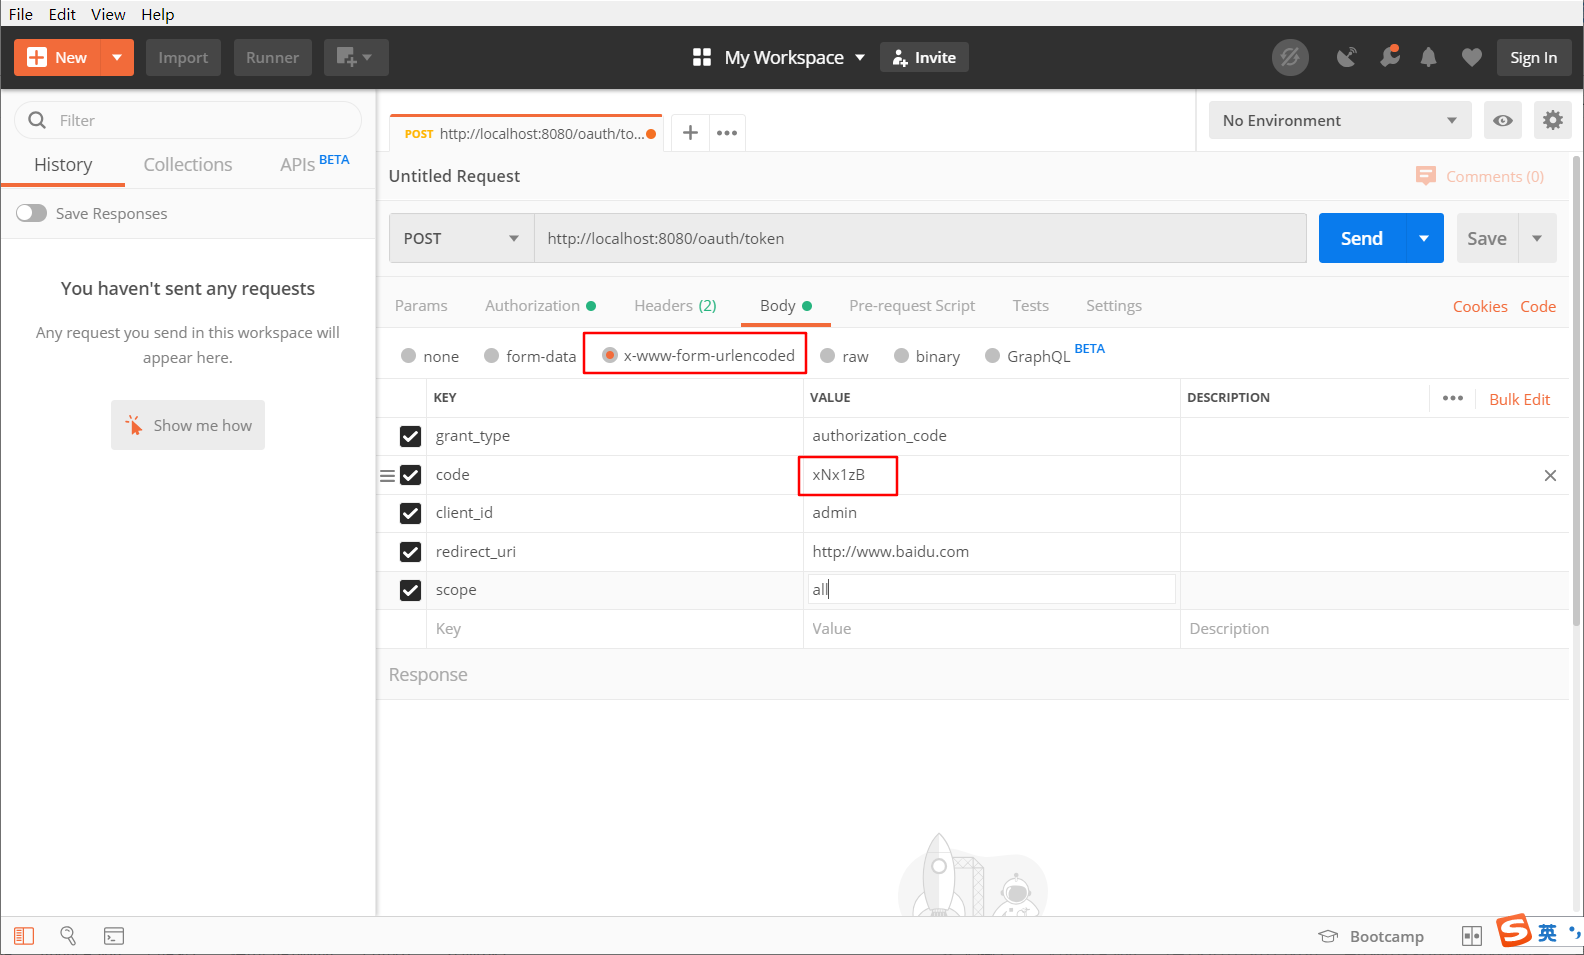
grant_type:授权类型,填写authorization_code,表示授权码模式code:授权码,就是刚刚获取的授权码,注意:授权码只使用一次就无效了,需要重新申请。client_id:客户端标识redirect_uri:申请授权码时的跳转url,一定和申请授权码时用的redirect_uri一致。scope:授权范围。
认证失败服务端返回 401 Unauthorized
注意:此时无法请求到令牌,访问服务器会报错
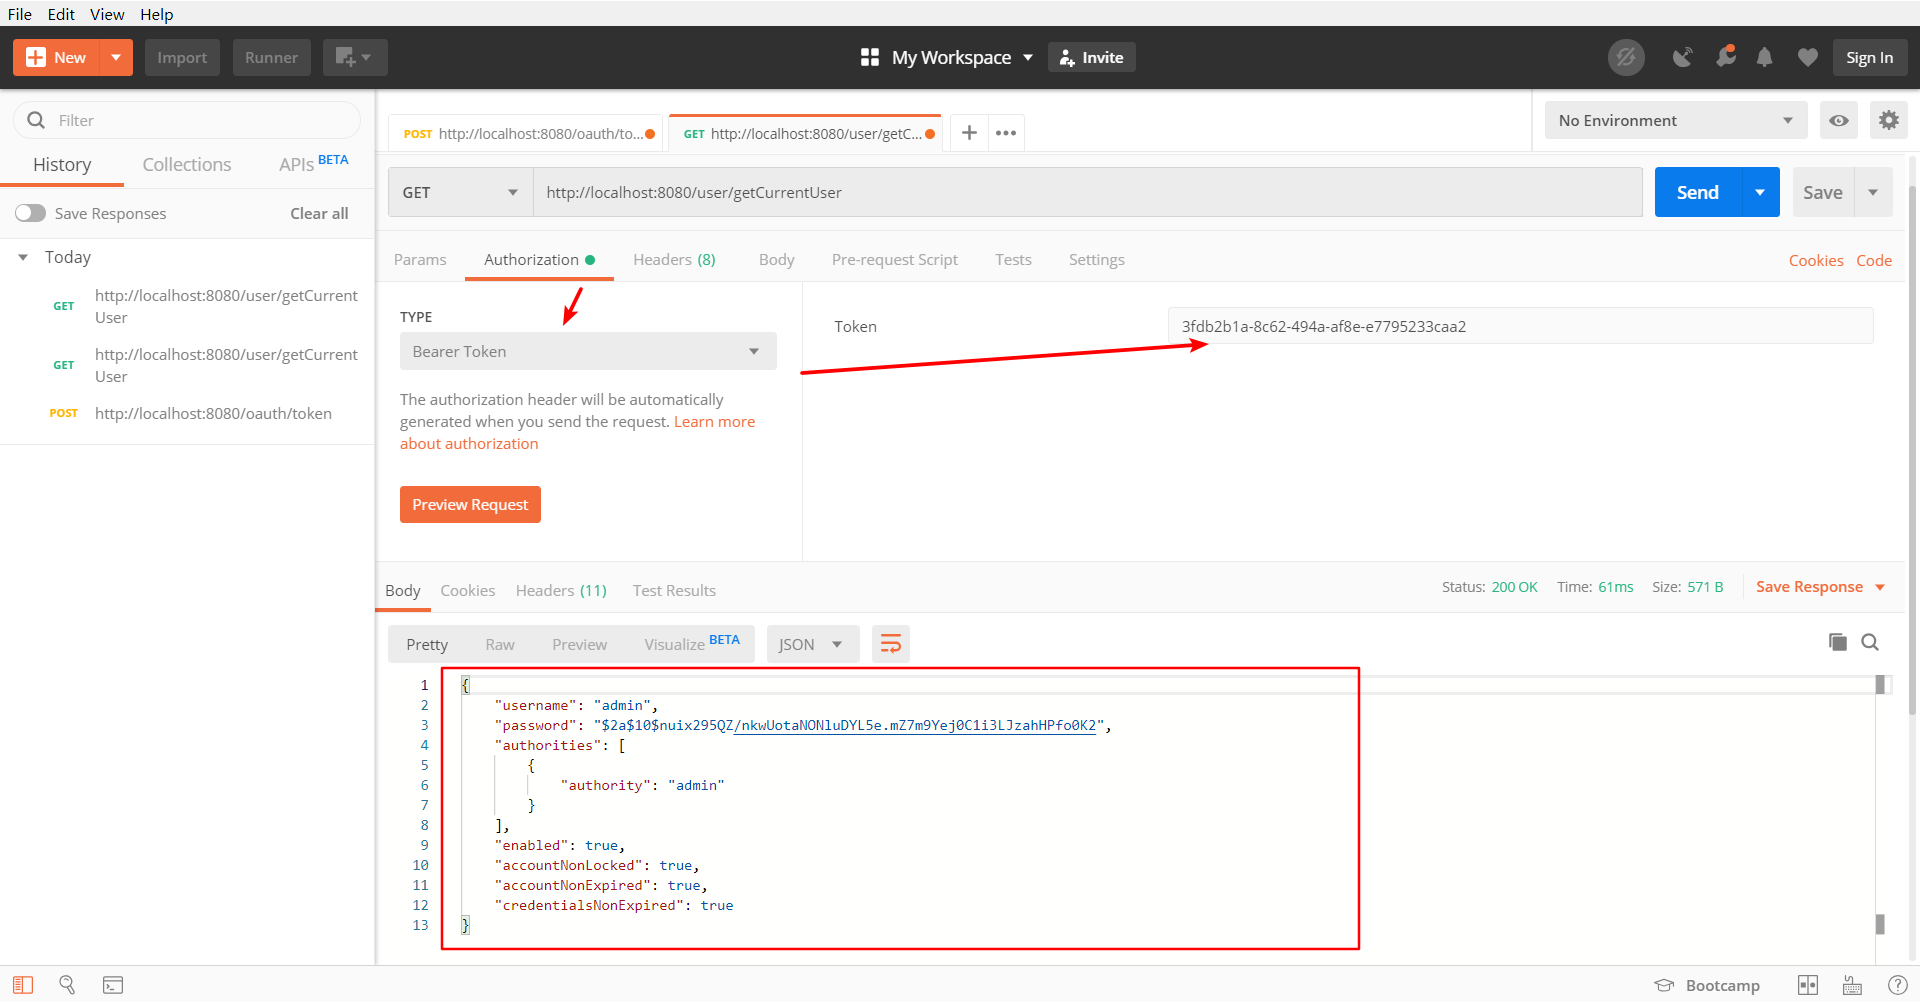
# 根据token去资源服务器拿资源
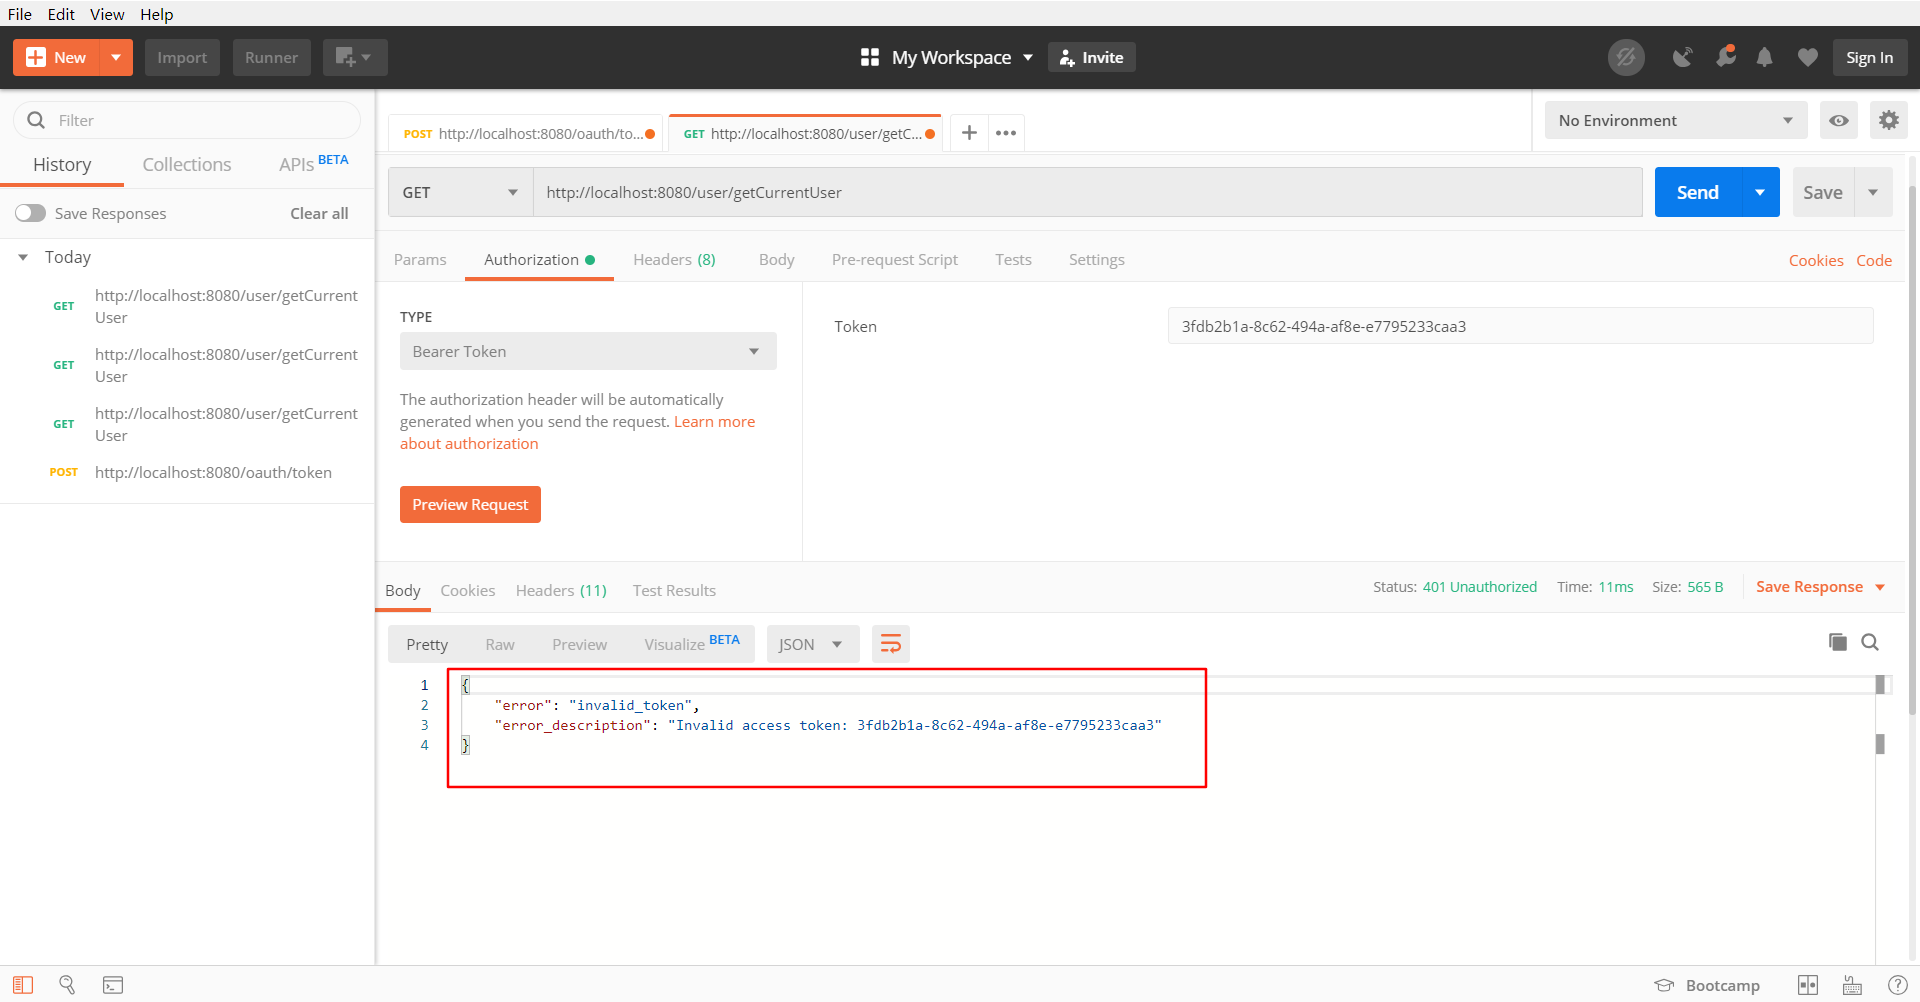
如果修改token就会报错
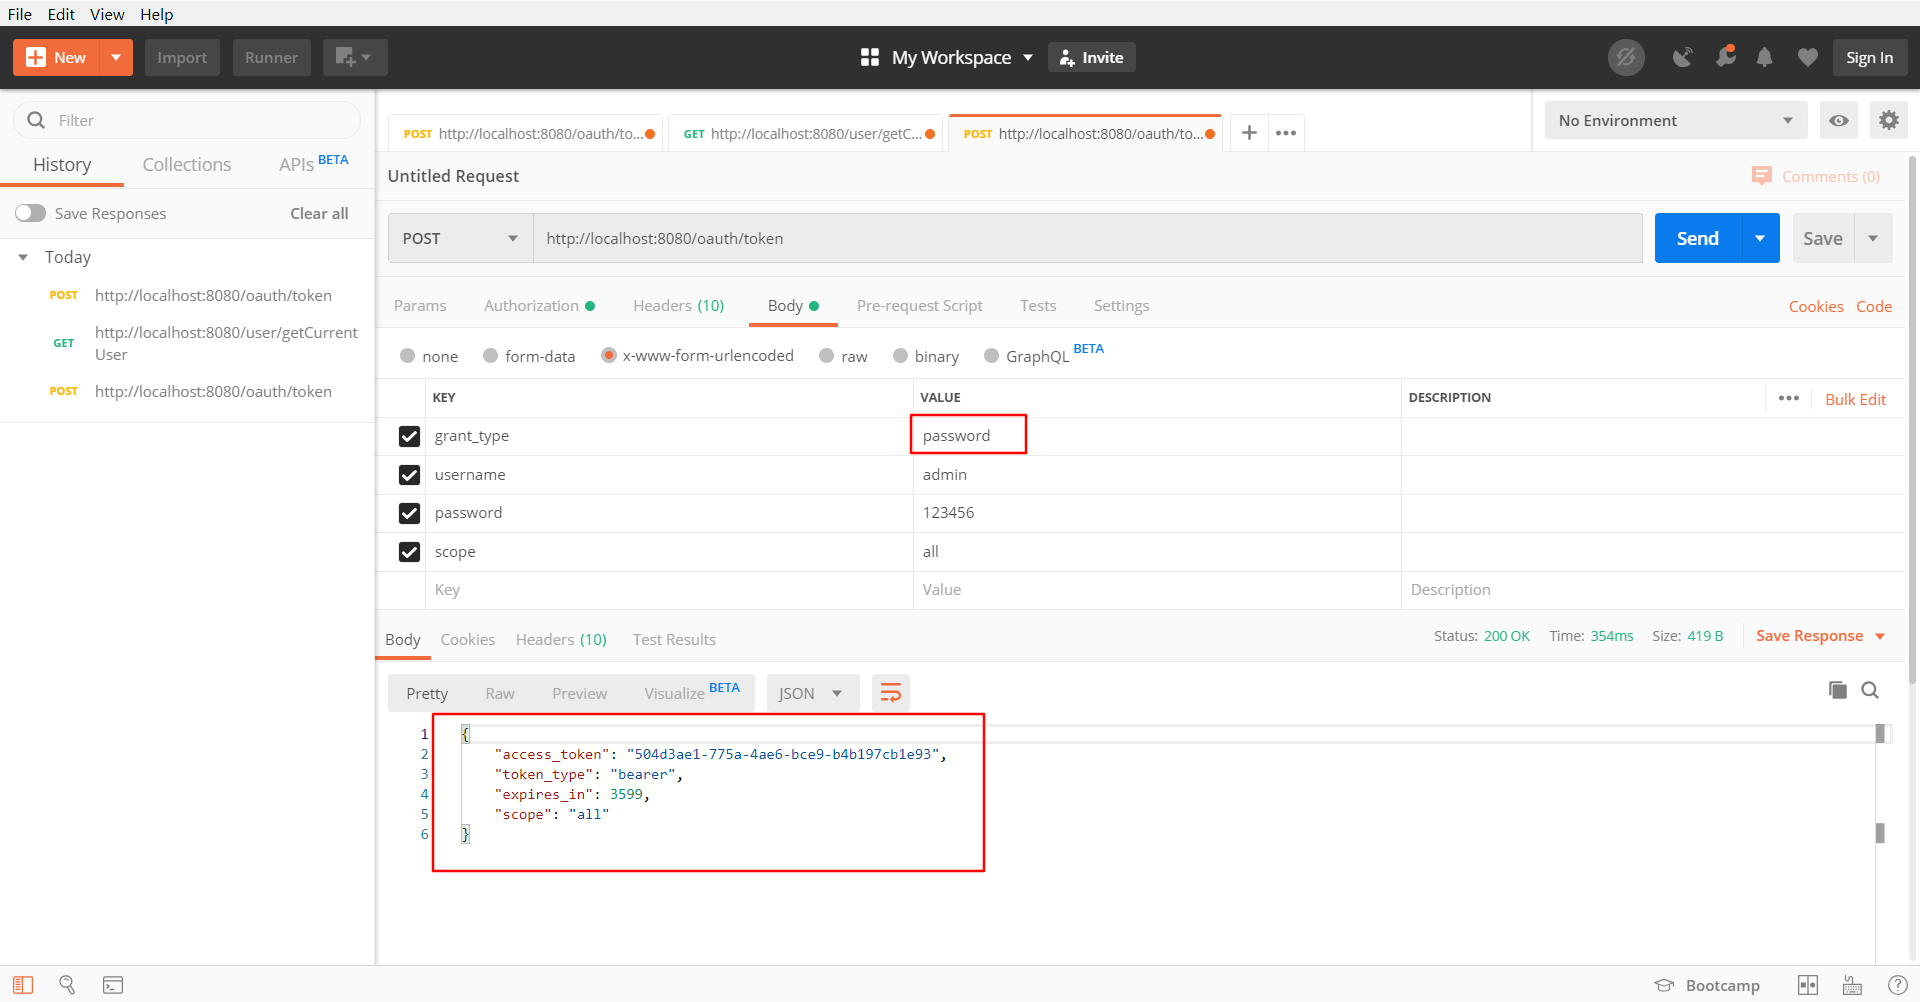
# Spring Security Oauth2 密码模式
在上面的代码中进行适当的修改即可
SecurityConfig.java
package com.yjxxt.springsecurityoauth2demo.config;

import org.springframework.context.annotation.Bean;
import org.springframework.context.annotation.Configuration;
import org.springframework.security.authentication.AuthenticationManager;
import org.springframework.security.config.annotation.web.builders.HttpSecurity;
import org.springframework.security.config.annotation.web.configuration.EnableWebSecurity;
import org.springframework.security.config.annotation.web.configuration.WebSecurityConfigurerAdapter;
import org.springframework.security.crypto.bcrypt.BCryptPasswordEncoder;
import org.springframework.security.crypto.password.PasswordEncoder;

/**
 * Spring Security 配置类
 *
 * @author zhoubin
 */
@Configuration
@EnableWebSecurity
public class SecurityConfig extends WebSecurityConfigurerAdapter {

   @Bean
   public PasswordEncoder passwordEncoder() {
      return new BCryptPasswordEncoder();
   }

   @Bean
   @Override
   public AuthenticationManager authenticationManagerBean() throws Exception {
      return super.authenticationManagerBean();
   }

   @Override
   public void configure(HttpSecurity http) throws Exception {
      http.csrf()
            .disable()
            .authorizeRequests()
            .antMatchers("/oauth/**", "/login/**", "/logout/**")
            .permitAll()
            .anyRequest()
            .authenticated()
            .and()
            .formLogin()
            .permitAll();
   }
}
AuthorizationServerConfig.java
package com.yjxxt.springsecurityoauth2demo.config;

import com.yjxxt.springsecurityoauth2demo.service.UserService;
import org.springframework.beans.factory.annotation.Autowired;
import org.springframework.context.annotation.Configuration;
import org.springframework.security.authentication.AuthenticationManager;
import org.springframework.security.crypto.password.PasswordEncoder;
import org.springframework.security.oauth2.config.annotation.configurers.ClientDetailsServiceConfigurer;
import org.springframework.security.oauth2.config.annotation.web.configuration.AuthorizationServerConfigurerAdapter;
import org.springframework.security.oauth2.config.annotation.web.configuration.EnableAuthorizationServer;
import org.springframework.security.oauth2.config.annotation.web.configurers.AuthorizationServerEndpointsConfigurer;

/**
 * 授权服务器配置
 * @author zhoubin
 * @since 1.0.0
 */
@Configuration
@EnableAuthorizationServer
public class AuthorizationServerConfig extends AuthorizationServerConfigurerAdapter {

    @Autowired
    private PasswordEncoder passwordEncoder;

    @Autowired
    private AuthenticationManager authenticationManager;

    @Autowired
    private UserService userService;

    /**
     * 使用密码模式需要配置
     */
    @Override
    public void configure(AuthorizationServerEndpointsConfigurer endpoints) {
        endpoints.authenticationManager(authenticationManager)
                .userDetailsService(userService);
    }

    @Override
    public void configure(ClientDetailsServiceConfigurer clients) throws Exception {
        clients.inMemory()
                //配置client_id
                .withClient("admin")
                //配置client-secret
                .secret(passwordEncoder.encode("112233"))
                //配置访问token的有效期
                .accessTokenValiditySeconds(3600)
                //配置刷新token的有效期
                .refreshTokenValiditySeconds(864000)
                //配置redirect_uri,用于授权成功后跳转
                .redirectUris("http://www.baidu.com")
                //配置申请的权限范围
                .scopes("all")
                //配置grant_type,表示授权类型
                .authorizedGrantTypes("authorization_code","password");
    }
}
测试:
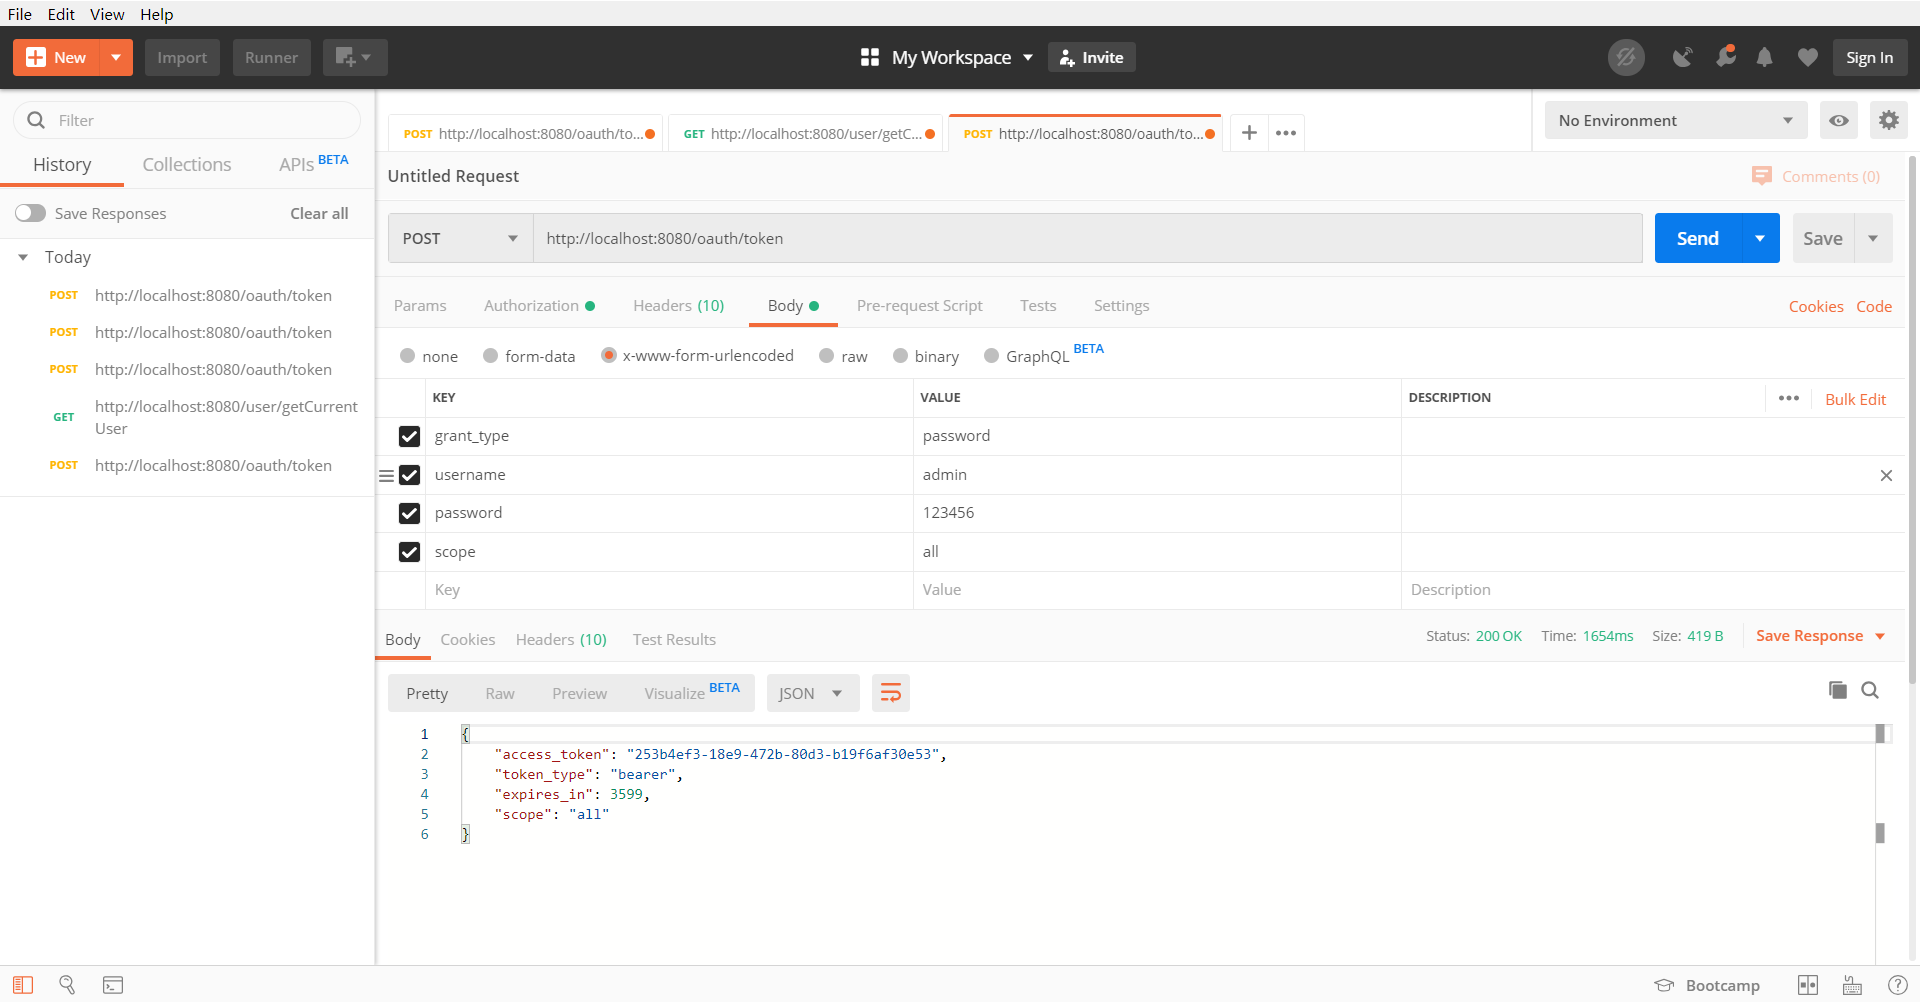
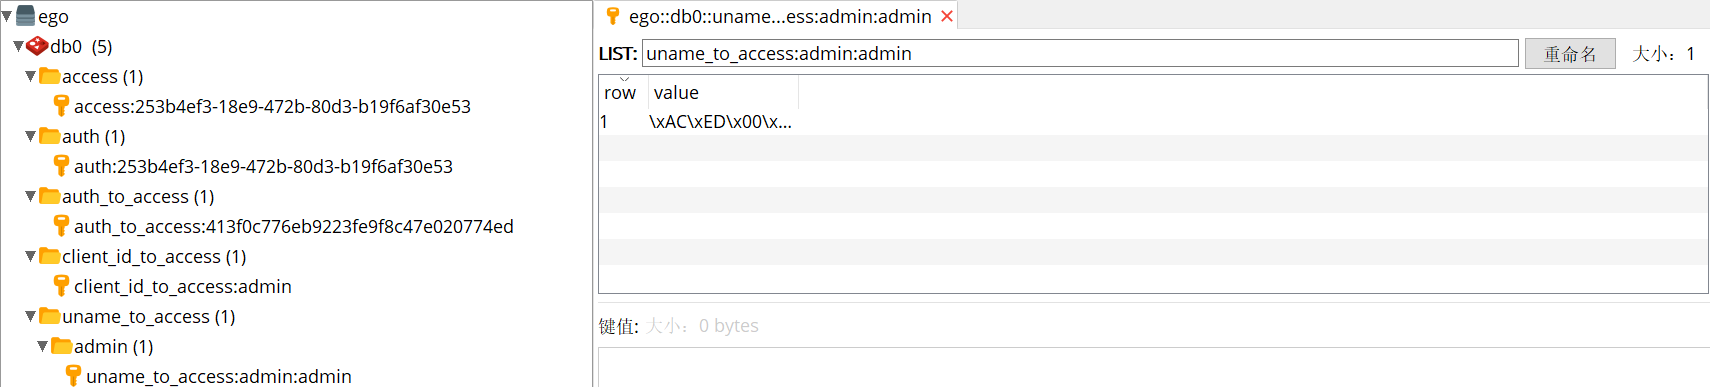
# 在Redis中存储token
之前的代码我们将token直接存在内存中,这在生产环境中是不合理的,下面我们将其改造成存储在Redis中
# 添加依赖及配置
pom.xml
<!--redis 依赖-->
<dependency>
   <groupId>org.springframework.boot</groupId>
   <artifactId>spring-boot-starter-data-redis</artifactId>
</dependency>
<!-- commons-pool2 对象池依赖 -->
<dependency>
   <groupId>org.apache.commons</groupId>
   <artifactId>commons-pool2</artifactId>
</dependency>
application.properties
# Redis配置
spring.redis.host=192.168.10.100
# 编写Redis配置类
RedisConfig.java
package com.yjxxt.springsecurityoauth2demo.config;

import org.springframework.beans.factory.annotation.Autowired;
import org.springframework.context.annotation.Bean;
import org.springframework.context.annotation.Configuration;
import org.springframework.data.redis.connection.RedisConnectionFactory;
import org.springframework.security.oauth2.provider.token.TokenStore;
import org.springframework.security.oauth2.provider.token.store.redis.RedisTokenStore;

/**
 * 使用redis存储token的配置
 * @author zhoubin
 * @since 1.0.0
 */
@Configuration
public class RedisConfig {
   @Autowired
   private RedisConnectionFactory redisConnectionFactory;

   @Bean
   public TokenStore redisTokenStore(){
      return new RedisTokenStore(redisConnectionFactory);
   }

}
# 在认证服务器配置中指定令牌的存储策略为Redis
package com.yjxxt.springsecurityoauth2demo.config;

import com.yjxxt.springsecurityoauth2demo.service.UserService;
import org.springframework.beans.factory.annotation.Autowired;
import org.springframework.beans.factory.annotation.Qualifier;
import org.springframework.context.annotation.Configuration;
import org.springframework.security.authentication.AuthenticationManager;
import org.springframework.security.crypto.password.PasswordEncoder;
import org.springframework.security.oauth2.config.annotation.configurers.ClientDetailsServiceConfigurer;
import org.springframework.security.oauth2.config.annotation.web.configuration.AuthorizationServerConfigurerAdapter;
import org.springframework.security.oauth2.config.annotation.web.configuration.EnableAuthorizationServer;
import org.springframework.security.oauth2.config.annotation.web.configurers.AuthorizationServerEndpointsConfigurer;
import org.springframework.security.oauth2.provider.token.TokenStore;

/**
 * 授权服务器配置
 * @author zhoubin
 * @since 1.0.0
 */
@Configuration
@EnableAuthorizationServer
public class AuthorizationServerConfig extends AuthorizationServerConfigurerAdapter {

    @Autowired
    private PasswordEncoder passwordEncoder;

    @Autowired
    private AuthenticationManager authenticationManager;

    @Autowired
    private UserService userService;

    @Autowired
    @Qualifier("redisTokenStore")
    private TokenStore tokenStore;

    /**
     * 使用密码模式需要配置
     */
    @Override
    public void configure(AuthorizationServerEndpointsConfigurer endpoints) {
        endpoints.authenticationManager(authenticationManager)
                .userDetailsService(userService)
                .tokenStore(tokenStore);
    }

    @Override
    public void configure(ClientDetailsServiceConfigurer clients) throws Exception {
        clients.inMemory()
                //配置client_id
                .withClient("admin")
                //配置client-secret
                .secret(passwordEncoder.encode("112233"))
                //配置访问token的有效期
                .accessTokenValiditySeconds(3600)
                //配置刷新token的有效期
                .refreshTokenValiditySeconds(864000)
                //配置redirect_uri,用于授权成功后跳转
                .redirectUris("http://www.baidu.com")
                //配置申请的权限范围
                .scopes("all")
                //配置grant_type,表示授权类型
                .authorizedGrantTypes("password");
    }
}
测试:
使用密码模式请求token
# JWT
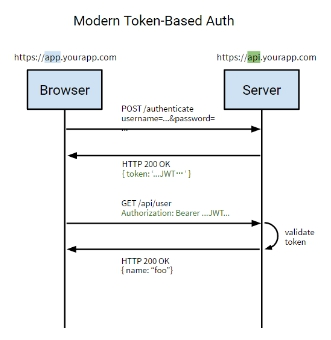
# 常见的认证机制
# HTTP Basic Auth
HTTP Basic Auth简单点说明就是每次请求API时都提供用户的username和password,简言之,Basic Auth是配合RESTful API 使用的最简单的认证方式,只需提供用户名密码即可,但由于有把用户名密码暴露给第三方客户端的风险,在生产环境下被使用的越来越少。因此,在开发对外开放的RESTful API时,尽量避免采用HTTP Basic Auth。
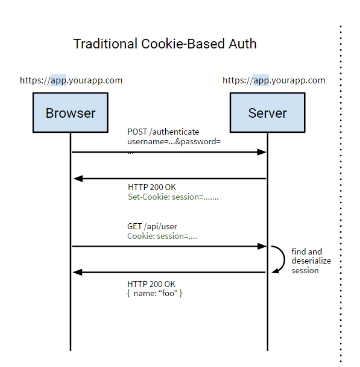
# Cookie Auth
Cookie认证机制就是为一次请求认证在服务端创建一个Session对象,同时在客户端的浏览器端创建了一个Cookie对象;通过客户端带上来Cookie对象来与服务器端的session对象匹配来实现状态管理的。默认的,当我们关闭浏览器的时候,cookie会被删除。但可以通过修改cookie 的expire time使cookie在一定时间内有效。
# OAuth
OAuth(开放授权,Open Authorization)是一个开放的授权标准,允许用户让第三方应用访问该用户在某一web服务上存储的私密的资源(如照片,视频,联系人列表),而无需将用户名和密码提供给第三方应用。如网站通过微信、微博登录等,主要用于第三方登录。
OAuth允许用户提供一个令牌,而不是用户名和密码来访问他们存放在特定服务提供者的数据。每一个令牌授权一个特定的第三方系统(例如,视频编辑网站)在特定的时段(例如,接下来的2小时内)内访问特定的资源(例如仅仅是某一相册中的视频)。这样,OAuth让用户可以授权第三方网站访问他们存储在另外服务提供者的某些特定信息,而非所有内容。
下面是OAuth2.0的流程:

这种基于OAuth的认证机制适用于个人消费者类的互联网产品,如社交类APP等应用,但是不太适合拥有自有认证权限管理的企业应用。
缺点:过重。
# Token Auth
使用基于 Token 的身份验证方法,在服务端不需要存储用户的登录记录。大概的流程是这样的:
客户端使用用户名跟密码请求登录
服务端收到请求,去验证用户名与密码
验证成功后,服务端会签发一个 Token,再把这个 Token 发送给客户端
客户端收到 Token 以后可以把它存储起来,比如放在 Cookie 里
客户端每次向服务端请求资源的时候需要带着服务端签发的 Token
服务端收到请求,然后去验证客户端请求里面带着的 Token,如果验证成功,就向客户端返回请求的数据
比第一种方式更安全,比第二种方式更节约服务器资源,比第三种方式更加轻量。
具体,Token Auth的优点(Token机制相对于Cookie机制又有什么好处呢?):
支持跨域访问: Cookie是不允许垮域访问的,这一点对Token机制是不存在的,前提是传输的用户认证信息通过HTTP头传输.
无状态(也称:服务端可扩展行):Token机制在服务端不需要存储session信息,因为Token 自身包含了所有登录用户的信息,只需要在客户端的cookie或本地介质存储状态信息.
更适用CDN: 可以通过内容分发网络请求你服务端的所有资料(如:javascript,HTML,图片等),而你的服务端只要提供API即可.
去耦: 不需要绑定到一个特定的身份验证方案。Token可以在任何地方生成,只要在你的API被调用的时候,你可以进行Token生成调用即可.
更适用于移动应用: 当你的客户端是一个原生平台(iOS, Android,Windows 10等)时,Cookie是不被支持的(你需要通过Cookie容器进行处理),这时采用Token认证机制就会简单得多。
CSRF:因为不再依赖于Cookie,所以你就不需要考虑对CSRF(跨站请求伪造)的防范。
性能: 一次网络往返时间(通过数据库查询session信息)总比做一次HMACSHA256计算的Token验证和解析要费时得多.
不需要为登录页面做特殊处理: 如果你使用Protractor 做功能测试的时候,不再需要为登录页面做特殊处理.
基于标准化:你的API可以采用标准化的 JSON Web Token (JWT). 这个标准已经存在多个后端库(.NET, Ruby, Java,Python, PHP)和多家公司的支持(如:Firebase,Google, Microsoft).
# JWT简介
# 什么是JWT
JSON Web Token(JWT)是一个开放的行业标准(RFC 7519),它定义了一种简介的、自包含的协议格式,用于在通信双方传递json对象,传递的信息经过数字签名可以被验证和信任。JWT可以使用HMAC算法或使用RSA的公钥/私钥对来签名,防止被篡改。
官网: https://jwt.io/
标准: https://tools.ietf.org/html/rfc7519
JWT令牌的优点:
jwt基于json,非常方便解析。
可以在令牌中自定义丰富的内容,易扩展。
通过非对称加密算法及数字签名技术,JWT防止篡改,安全性高。
资源服务使用JWT可不依赖认证服务即可完成授权。
缺点:
- JWT令牌较长,占存储空间比较大。
# JWT组成
一个JWT实际上就是一个字符串,它由三部分组成,头部、载荷与签名。
# 头部(Header)
头部用于描述关于该JWT的最基本的信息,例如其类型(即JWT)以及签名所用的算法(如HMAC SHA256或RSA)等。这也可以被表示成一个JSON对象。
{
  "alg": "HS256",
  "typ": "JWT"
}
typ:是类型。alg:签名的算法,这里使用的算法是HS256算法
我们对头部的json字符串进行BASE64编码(网上有很多在线编码的网站),编码后的字符串如下:
eyJhbGciOiJIUzI1NiIsInR5cCI6IkpXVCJ9
Base64是一种基于64个可打印字符来表示二进制数据的表示方法。由于2的6次方等于64,所以每6个比特为一个单元,对应某个可打印字符。三个字节有24个比特,对应于4个Base64单元,即3个字节需要用4个可打印字符来表示。JDK 中提供了非常方便的 BASE64Encoder和 BASE64Decoder,用它们可以非常方便的完成基于 BASE64 的编码和解码。
# 负载(Payload)
第二部分是负载,就是存放有效信息的地方。这个名字像是特指飞机上承载的货品,这些有效信息包含三个部分:
- 标准中注册的声明(建议但不强制使用)
iss: jwt签发者
sub: jwt所面向的用户
aud: 接收jwt的一方
exp: jwt的过期时间,这个过期时间必须要大于签发时间
nbf: 定义在什么时间之前,该jwt都是不可用的.
iat: jwt的签发时间
jti: jwt的唯一身份标识,主要用来作为一次性token,从而回避重放攻击。
- 公共的声明
公共的声明可以添加任何的信息,一般添加用户的相关信息或其他业务需要的必要信息.但不建议添加敏感信息,因为该部分在客户端可解密.
- 私有的声明
私有声明是提供者和消费者所共同定义的声明,一般不建议存放敏感信息,因为base64是对称解密的,意味着该部分信息可以归类为明文信息。
这个指的就是自定义的claim。比如下面那个举例中的name都属于自定的claim。这些claim跟JWT标准规定的claim区别在于:JWT规定的claim,JWT的接收方在拿到JWT之后,都知道怎么对这些标准的claim进行验证(还不知道是否能够验证);而private claims不会验证,除非明确告诉接收方要对这些claim进行验证以及规则才行。
{
  "sub": "1234567890",
  "name": "John Doe",
  "iat": 1516239022
}
其中sub是标准的声明,name是自定义的声明(公共的或私有的)
然后将其进行base64编码,得到Jwt的第二部分:
eyJzdWIiOiIxMjM0NTY3ODkwIiwibmFtZSI6IkphbWVzIiwiYWRtaW4iOnRydWV9
提示:声明中不要放一些敏感信息。
# 签证、签名(signature)
jwt的第三部分是一个签证信息,这个签证信息由三部分组成:
header (base64后的)
payload (base64后的)
secret(盐,一定要保密)
这个部分需要base64加密后的header和base64加密后的payload使用.连接组成的字符串,然后通过header中声明的加密方式进行加盐secret组合加密,然后就构成了jwt的第三部分:
8HI-Lod0ncfVDnbKIPJJqLH998duF9DSDGkx3gRPNVI
将这三部分用.连接成一个完整的字符串,构成了最终的jwt:
eyJhbGciOiJIUzI1NiIsInR9cCI6IkpXVCJ9.eyJzdWIiOiIxMjM0NTY3ODkwIiwibmFtZSI6IkpvaG4gRG9lIiwiaWF0IjoxNTE2MjM5MDIyfQ.8HI-Lod0ncfVDnbKIPJJqLH998duF9DSDGkx3gRPNVI
注意:secret是保存在服务器端的,jwt的签发生成也是在服务器端的,secret就是用来进行jwt的签发和jwt的验证,所以,它就是你服务端的私钥,在任何场景都不应该流露出去。一旦客户端得知这个secret, 那就意味着客户端是可以自我签发jwt了。
# JJWT简介
# 什么是JJWT
JJWT是一个提供端到端的JWT创建和验证的Java库。永远免费和开源(Apache License,版本2.0),JJW很容易使用和理解。它被设计成一个以建筑为中心的流畅界面,隐藏了它的大部分复杂性。
规范官网:https://jwt.io/
# 快速入门
# token的创建
创建SpringBoot工程,引入依赖
<?xml version="1.0" encoding="UTF-8"?>
<project xmlns="http://maven.apache.org/POM/4.0.0" xmlns:xsi="http://www.w3.org/2001/XMLSchema-instance"
         xsi:schemaLocation="http://maven.apache.org/POM/4.0.0 https://maven.apache.org/xsd/maven-4.0.0.xsd">
   <modelVersion>4.0.0</modelVersion>
   <parent>
      <groupId>org.springframework.boot</groupId>
      <artifactId>spring-boot-starter-parent</artifactId>
      <version>2.2.2.RELEASE</version>
      <relativePath/> <!-- lookup parent from repository -->
   </parent>
   <groupId>com.yjxxt</groupId>
   <artifactId>jwtdemo</artifactId>
   <version>0.0.1-SNAPSHOT</version>
   <name>jwtdemo</name>
   <description>Demo project for Spring Boot</description>

   <properties>
      <java.version>1.8</java.version>
   </properties>

   <dependencies>
      <dependency>
         <groupId>org.springframework.boot</groupId>
         <artifactId>spring-boot-starter-web</artifactId>
      </dependency>
      <!--JWT依赖-->
      <dependency>
         <groupId>io.jsonwebtoken</groupId>
         <artifactId>jjwt</artifactId>
         <version>0.9.0</version>
      </dependency>

      <dependency>
         <groupId>org.springframework.boot</groupId>
         <artifactId>spring-boot-starter-test</artifactId>
         <scope>test</scope>
         <exclusions>
            <exclusion>
               <groupId>org.junit.vintage</groupId>
               <artifactId>junit-vintage-engine</artifactId>
            </exclusion>
         </exclusions>
      </dependency>
   </dependencies>
</project>
创建测试类JwtTest,用于生成token:
package com.yjxxt.jwtdemo;

import io.jsonwebtoken.JwtBuilder;
import io.jsonwebtoken.Jwts;
import io.jsonwebtoken.SignatureAlgorithm;
import io.jsonwebtoken.impl.Base64Codec;
import org.junit.jupiter.api.Test;
import org.springframework.boot.test.context.SpringBootTest;

import java.util.Date;

@SpringBootTest
public class JwtdemoApplicationTests {

   /**
    * 创建token
    */
   @Test
   public void testCreatToken() {
      //创建一个JwtBuilder对象
      JwtBuilder jwtBuilder = Jwts.builder()
            //声明的标识{"jti":"888"}
            .setId("888")
            //主体,用户{"sub":"Rose"}
            .setSubject("Rose")
            //创建日期{"ita":"yjxxtxx"}
            .setIssuedAt(new Date())
            //签名手段,参数1:算法,参数2:盐
            .signWith(SignatureAlgorithm.HS256,"yjxxt");
      //获取jwt的token
      String token = jwtBuilder.compact();
      System.out.println(token);

      //三部分的base64解密
      System.out.println("--------------------");
      String[] split = token.split("\\.");
      System.out.println(Base64Codec.BASE64.decodeToString(split[0]));
      System.out.println(Base64Codec.BASE64.decodeToString(split[1]));
      //无法解密
      System.out.println(Base64Codec.BASE64.decodeToString(split[2]));
   }
}
运行结果如下

再次运行,会发现每次运行的结果是不一样的,因为我们的载荷中包含了时间
# token的验证解析
我们刚才已经创建了token ,在web应用中这个操作是由服务端进行然后发给客户端,客户端在下次向服务端发送请求时需要携带这个token(这就好像是拿着一张门票一样),那服务端接到这个token 应该解析出token中的信息(例如用户id),根据这些信息查询数据库返回相应的结果。
@Test
public void testParseToken(){
   //token
   String token = "eyJhbGciOiJIUzI1NiJ9.eyJqdGkiOiI4ODgiLCJzdWIiOiJSb3NlIiwiaWF0IjoxNTc4ODE0MjUyfQ" +
         ".-FYFMHyfTcGzq900f_Drfdsges0ge2UjaWvPW9gCDto";
   //解析token获取负载中的声明对象
   Claims claims = Jwts.parser()
         .setSigningKey("yjxxt")
         .parseClaimsJws(token)
         .getBody();
   //打印声明的属性
   System.out.println("id:"+claims.getId());
   System.out.println("subject:"+claims.getSubject());
   System.out.println("issuedAt:"+claims.getIssuedAt());
}
试着将token或签名秘钥篡改一下,会发现运行时就会报错,所以解析token也就是验证token
# token过期校验
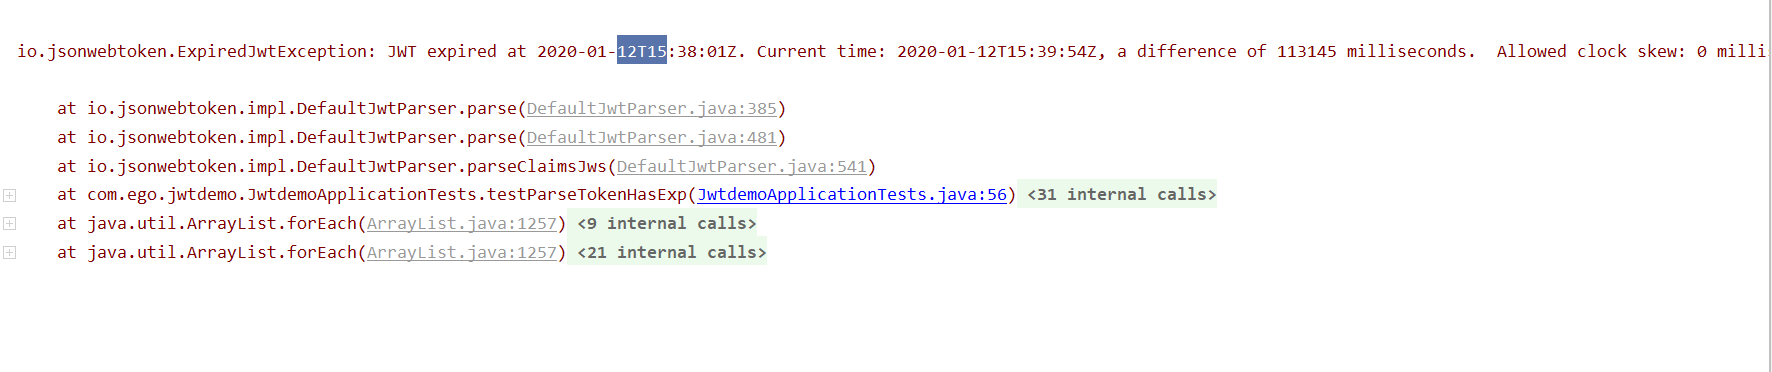
有很多时候,我们并不希望签发的token是永久生效的(上节的token是永久的),所以我们可以为token添加一个过期时间。原因:从服务器发出的token,服务器自己并不做记录,就存在一个弊端就是,服务端无法主动控制某token的立刻失效。
测试用例:
@Test
public void testCreatTokenHasExp() {
   //当前系统时间的长整型
   long now = System.currentTimeMillis();
   //过期时间,这里是1分钟后的时间长整型
   long exp = now + 60 * 1000;
   //创建一个JwtBuilder对象
   JwtBuilder jwtBuilder = Jwts.builder()
         //声明的标识{"jti":"888"}
         .setId("888")
         //主体,用户{"sub":"Rose"}
         .setSubject("Rose")
         //创建日期{"ita":"yjxxtxx"}
         .setIssuedAt(new Date())
         //签名手段,参数1:算法,参数2:盐
         .signWith(SignatureAlgorithm.HS256, "yjxxt")
         //设置过期时间
         .setExpiration(new Date(exp));
   //获取jwt的token
   String token = jwtBuilder.compact();
   System.out.println(token);
}


@Test
public void testParseTokenHasExp() {
   //token
   String token = "eyJhbGciOiJIUzI1NiJ9" +
         ".eyJqdGkiOiI4ODgiLCJzdWIiOiJSb3NlIiwiaWF0IjoxNTc4ODE1MDYyLCJleHAiOjE1Nzg4MTUxMjIsInJvbGVzIjoiYWRtaW4iLCJsb2dvIjoic2hzeHQuanBnIn0.hKog0RsZ9_6II_R8kUCp0HLAouUAYXAJVbz3xtLTUh4";
   //解析token获取负载中的声明对象
   Claims claims = Jwts.parser()
         .setSigningKey("yjxxt")
         .parseClaimsJws(token)
         .getBody();
   //打印声明的属性
   System.out.println("id:" + claims.getId());
   System.out.println("subject:" + claims.getSubject());
   System.out.println("issuedAt:" + claims.getIssuedAt());
   DateFormat sf =new SimpleDateFormat("yyyy-MM-dd HH:mm:ss");
   System.out.println("签发时间:"+sf.format(claims.getIssuedAt()));
   System.out.println("过期时间:"+sf.format(claims.getExpiration()));
   System.out.println("当前时间:"+sf.format(new Date()));
}
测试:当未过期时可以正常读取,当过期时会引发io.jsonwebtoken.ExpiredJwtException异常。
# 自定义claims
我们刚才的例子只是存储了id和subject两个信息,如果你想存储更多的信息(例如角色)可以定义自定义claims
测试用例:
@Test
public void testCreatTokenByClaims() {
   //当前系统时间的长整型
   long now = System.currentTimeMillis();
   //过期时间,这里是1分钟后的时间长整型
   long exp = now + 60 * 1000;
   //创建一个JwtBuilder对象
   JwtBuilder jwtBuilder = Jwts.builder()
         //声明的标识{"jti":"888"}
         .setId("888")
         //主体,用户{"sub":"Rose"}
         .setSubject("Rose")
         //创建日期{"ita":"yjxxtxx"}
         .setIssuedAt(new Date())
         //签名手段,参数1:算法,参数2:盐
         .signWith(SignatureAlgorithm.HS256, "yjxxt")
         //设置过期时间
         .setExpiration(new Date(exp))
         //直接传入map
         // .addClaims(map)
         .claim("roles","admin")
         .claim("logo","yjxxt.jpg");
   //获取jwt的token
   String token = jwtBuilder.compact();
   System.out.println(token);
}


@Test
public void testParseTokenByClaims() {
   //token
   String token = "eyJhbGciOiJIUzI1NiJ9" +
         ".eyJqdGkiOiI4ODgiLCJzdWIiOiJSb3NlIiwiaWF0IjoxNTc4ODE1MDYyLCJleHAiOjE1Nzg4MTUxMjIsInJvbGVzIjoiYWRtaW4iLCJsb2dvIjoic2hzeHQuanBnIn0.hKog0RsZ9_6II_R8kUCp0HLAouUAYXAJVbz3xtLTUh4";
   //解析token获取负载中的声明对象
   Claims claims = Jwts.parser()
         .setSigningKey("yjxxt")
         .parseClaimsJws(token)
         .getBody();
   //打印声明的属性
   System.out.println("id:" + claims.getId());
   System.out.println("subject:" + claims.getSubject());
   System.out.println("issuedAt:" + claims.getIssuedAt());
   DateFormat sf =new SimpleDateFormat("yyyy-MM-dd HH:mm:ss");
   System.out.println("签发时间:"+sf.format(claims.getIssuedAt()));
   System.out.println("过期时间:"+sf.format(claims.getExpiration()));
   System.out.println("当前时间:"+sf.format(new Date()));

   System.out.println("roles:"+claims.get("roles"));
   System.out.println("logo:"+claims.get("logo"));
}
# Spring Security Oauth2 整合JWT
# 整合JWT
我们拿之前Spring Security Oauth2的完整代码进行修改
添加配置文件JwtTokenStoreConfig.java
package com.yjxxt.springsecurityoauth2demo.config;

import org.springframework.context.annotation.Bean;
import org.springframework.context.annotation.Configuration;
import org.springframework.security.oauth2.provider.token.TokenStore;
import org.springframework.security.oauth2.provider.token.store.JwtAccessTokenConverter;
import org.springframework.security.oauth2.provider.token.store.JwtTokenStore;

/**
 * 使用Jwt存储token的配置
 * @author zhoubin
 * @since 1.0.0
 */
@Configuration
public class JwtTokenStoreConfig {

   @Bean
   public TokenStore jwtTokenStore(){
      return new JwtTokenStore(jwtAccessTokenConverter());
   }

   @Bean
   public JwtAccessTokenConverter jwtAccessTokenConverter(){
      JwtAccessTokenConverter accessTokenConverter = new JwtAccessTokenConverter();
      //配置JWT使用的秘钥
      accessTokenConverter.setSigningKey("test_key");
      return accessTokenConverter;
   }
}
在认证服务器配置中指定令牌的存储策略为JWT
package com.yjxxt.springsecurityoauth2demo.config;

import com.yjxxt.springsecurityoauth2demo.service.UserService;
import org.springframework.beans.factory.annotation.Autowired;
import org.springframework.beans.factory.annotation.Qualifier;
import org.springframework.context.annotation.Configuration;
import org.springframework.security.authentication.AuthenticationManager;
import org.springframework.security.crypto.password.PasswordEncoder;
import org.springframework.security.oauth2.config.annotation.configurers.ClientDetailsServiceConfigurer;
import org.springframework.security.oauth2.config.annotation.web.configuration.AuthorizationServerConfigurerAdapter;
import org.springframework.security.oauth2.config.annotation.web.configuration.EnableAuthorizationServer;
import org.springframework.security.oauth2.config.annotation.web.configurers.AuthorizationServerEndpointsConfigurer;
import org.springframework.security.oauth2.provider.token.TokenStore;
import org.springframework.security.oauth2.provider.token.store.JwtAccessTokenConverter;

/**
 * 授权服务器配置
 * @author zhoubin
 * @since 1.0.0
 */
@Configuration
@EnableAuthorizationServer
public class AuthorizationServerConfig extends AuthorizationServerConfigurerAdapter {

    @Autowired
    private PasswordEncoder passwordEncoder;

    @Autowired
    private AuthenticationManager authenticationManager;

    @Autowired
    private UserService userService;

    @Autowired
    @Qualifier("jwtTokenStore")
    private TokenStore tokenStore;

    @Autowired
    private JwtAccessTokenConverter jwtAccessTokenConverter;


    /**
     * 使用密码模式需要配置
     */
    @Override
    public void configure(AuthorizationServerEndpointsConfigurer endpoints) {
        endpoints.authenticationManager(authenticationManager)
                .userDetailsService(userService)
                //配置存储令牌策略
                .tokenStore(tokenStore)
                .accessTokenConverter(jwtAccessTokenConverter);
    }

    @Override
    public void configure(ClientDetailsServiceConfigurer clients) throws Exception {
        clients.inMemory()
                //配置client_id
                .withClient("admin")
                //配置client-secret
                .secret(passwordEncoder.encode("112233"))
                //配置访问token的有效期
                .accessTokenValiditySeconds(3600)
                //配置刷新token的有效期
                .refreshTokenValiditySeconds(864000)
                //配置redirect_uri,用于授权成功后跳转
                .redirectUris("http://www.baidu.com")
                //配置申请的权限范围
                .scopes("all")
                //配置grant_type,表示授权类型
                .authorizedGrantTypes("authorization_code","password");
    }
}
用密码模式测试:
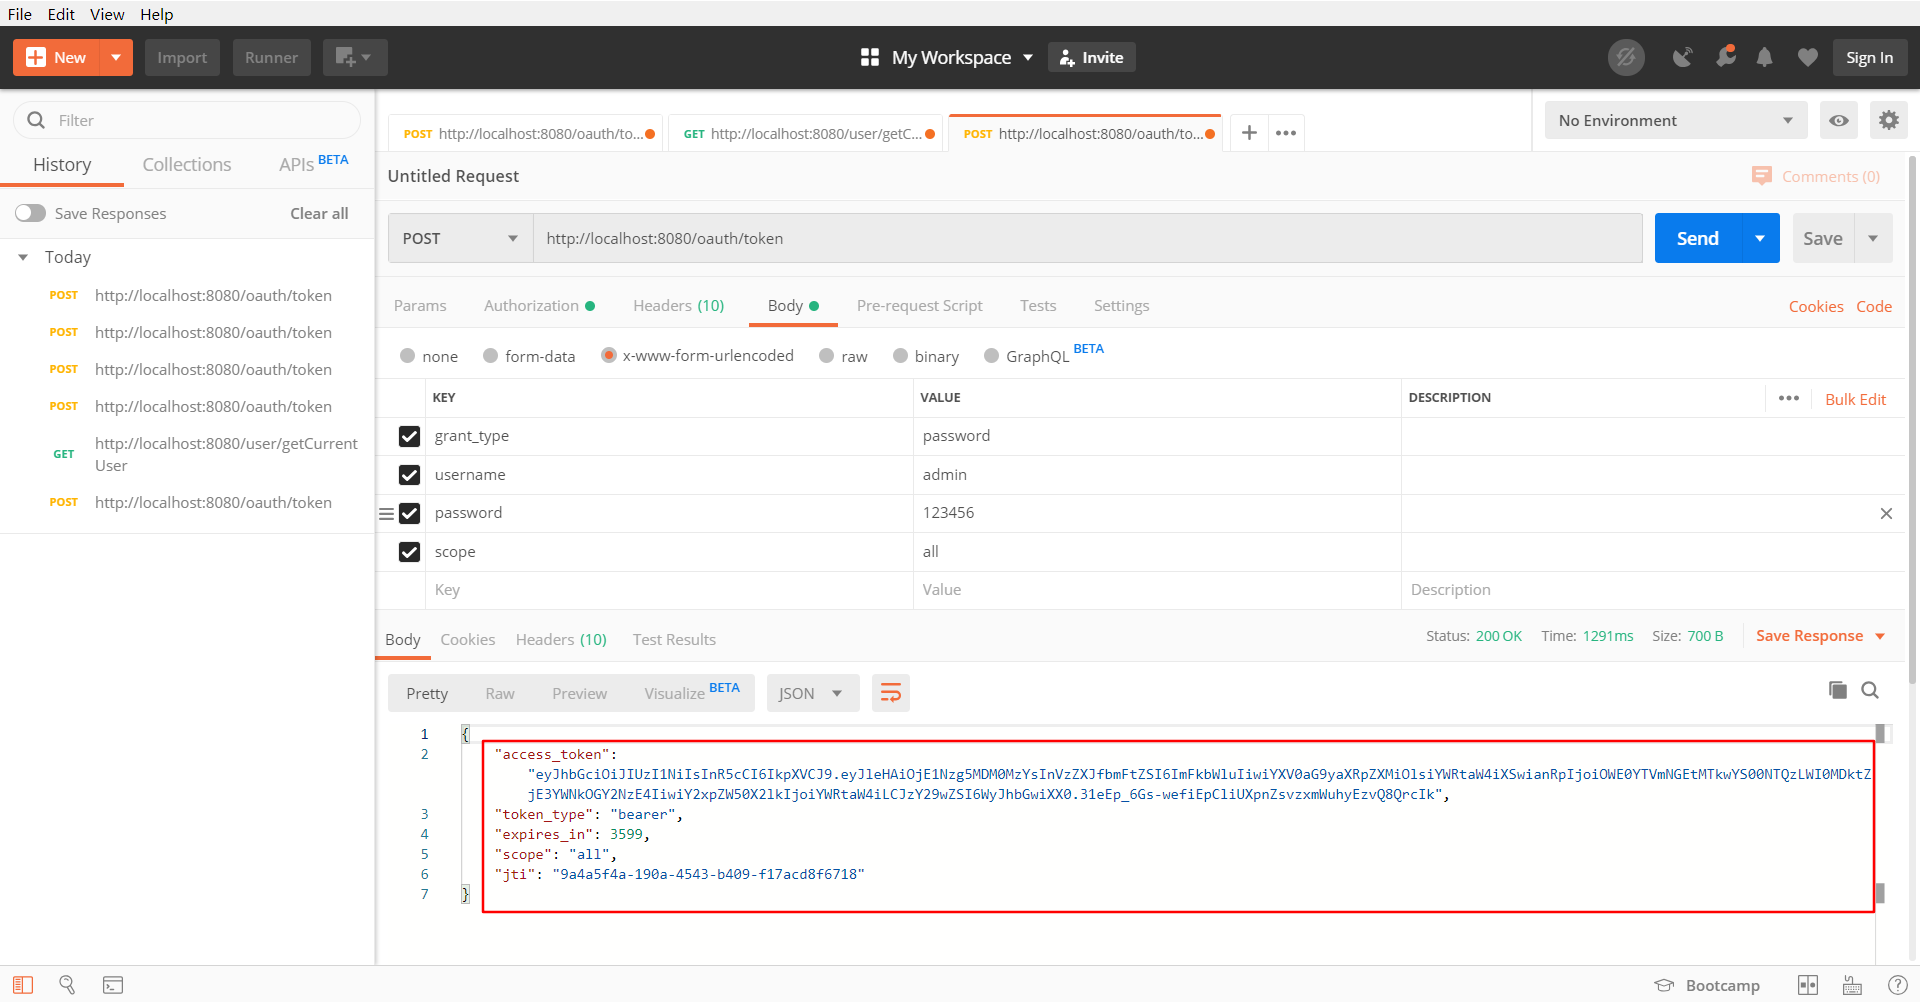
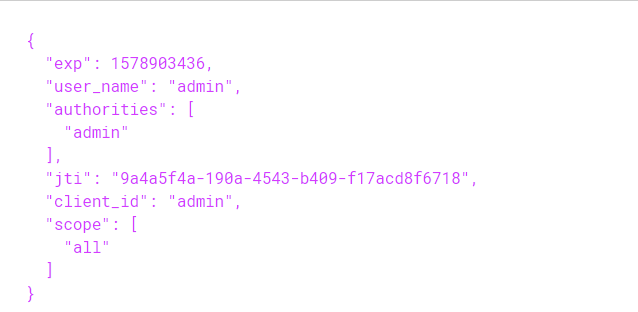
发现获取到的令牌已经变成了JWT令牌,将access_token拿到https://jwt.io/ 网站上去解析下可以获得其中内容。
# 扩展JWT中存储的内容
有时候我们需要扩展JWT中存储的内容,这里我们在JWT中扩展一个key为enhance,value为enhance info的数据。
继承TokenEnhancer实现一个JWT内容增强器
package com.yjxxt.springsecurityoauth2demo.config;

import org.springframework.security.oauth2.common.DefaultOAuth2AccessToken;
import org.springframework.security.oauth2.common.OAuth2AccessToken;
import org.springframework.security.oauth2.provider.OAuth2Authentication;
import org.springframework.security.oauth2.provider.token.TokenEnhancer;

import java.util.HashMap;
import java.util.Map;

/**
 * JWT内容增强器
 * @author zhoubin
 * @since 1.0.0
 */
public class JwtTokenEnhancer implements TokenEnhancer {

   @Override
   public OAuth2AccessToken enhance(OAuth2AccessToken accessToken, OAuth2Authentication authentication) {
      Map<String,Object> info = new HashMap<>();
      info.put("enhance","enhance info");
      ((DefaultOAuth2AccessToken)accessToken).setAdditionalInformation(info);
      return accessToken;
   }
}
创建一个JwtTokenEnhancer实例
package com.yjxxt.springsecurityoauth2demo.config;

import org.springframework.context.annotation.Bean;
import org.springframework.context.annotation.Configuration;
import org.springframework.security.oauth2.provider.token.TokenStore;
import org.springframework.security.oauth2.provider.token.store.JwtAccessTokenConverter;
import org.springframework.security.oauth2.provider.token.store.JwtTokenStore;

/**
 * 使用Jwt存储token的配置
 * @author zhoubin
 * @since 1.0.0
 */
@Configuration
public class JwtTokenStoreConfig {

   @Bean
   public TokenStore jwtTokenStore(){
      return new JwtTokenStore(jwtAccessTokenConverter());
   }

   @Bean
   public JwtAccessTokenConverter jwtAccessTokenConverter(){
      JwtAccessTokenConverter accessTokenConverter = new JwtAccessTokenConverter();
      //配置JWT使用的秘钥
      accessTokenConverter.setSigningKey("test_key");
      return accessTokenConverter;
   }

   @Bean
   public JwtTokenEnhancer jwtTokenEnhancer() {
      return new JwtTokenEnhancer();
   }
}
在认证服务器配置中配置JWT的内容增强器
package com.yjxxt.springsecurityoauth2demo.config;

import com.yjxxt.springsecurityoauth2demo.component.JwtTokenEnhancer;
import com.yjxxt.springsecurityoauth2demo.service.UserService;
import org.springframework.beans.factory.annotation.Autowired;
import org.springframework.beans.factory.annotation.Qualifier;
import org.springframework.context.annotation.Configuration;
import org.springframework.security.authentication.AuthenticationManager;
import org.springframework.security.crypto.password.PasswordEncoder;
import org.springframework.security.oauth2.config.annotation.configurers.ClientDetailsServiceConfigurer;
import org.springframework.security.oauth2.config.annotation.web.configuration.AuthorizationServerConfigurerAdapter;
import org.springframework.security.oauth2.config.annotation.web.configuration.EnableAuthorizationServer;
import org.springframework.security.oauth2.config.annotation.web.configurers.AuthorizationServerEndpointsConfigurer;
import org.springframework.security.oauth2.provider.token.TokenEnhancer;
import org.springframework.security.oauth2.provider.token.TokenEnhancerChain;
import org.springframework.security.oauth2.provider.token.TokenStore;
import org.springframework.security.oauth2.provider.token.store.JwtAccessTokenConverter;

import java.util.ArrayList;
import java.util.List;

/**
 * 授权服务器配置
 * @author zhoubin
 * @since 1.0.0
 */
@Configuration
@EnableAuthorizationServer
public class AuthorizationServerConfig extends AuthorizationServerConfigurerAdapter {

    @Autowired
    private PasswordEncoder passwordEncoder;

    @Autowired
    private AuthenticationManager authenticationManager;

    @Autowired
    private UserService userService;

    @Autowired
    @Qualifier("jwtTokenStore")
    private TokenStore tokenStore;
    @Autowired
    private JwtAccessTokenConverter jwtAccessTokenConverter;
    @Autowired
    private JwtTokenEnhancer jwtTokenEnhancer;

    /**
     * 使用密码模式需要配置
     */
    @Override
    public void configure(AuthorizationServerEndpointsConfigurer endpoints) {
        TokenEnhancerChain enhancerChain = new TokenEnhancerChain();
        List<TokenEnhancer> delegates = new ArrayList<>();
        //配置JWT的内容增强器
        delegates.add(jwtTokenEnhancer);
        delegates.add(jwtAccessTokenConverter);
        enhancerChain.setTokenEnhancers(delegates);
        endpoints.authenticationManager(authenticationManager)
                .userDetailsService(userService)
                //配置存储令牌策略
                .tokenStore(tokenStore)
                .accessTokenConverter(jwtAccessTokenConverter)
                .tokenEnhancer(enhancerChain);
    }

    @Override
    public void configure(ClientDetailsServiceConfigurer clients) throws Exception {
        clients.inMemory()
                //配置client_id
                .withClient("admin")
                //配置client-secret
                .secret(passwordEncoder.encode("112233"))
                //配置访问token的有效期
                .accessTokenValiditySeconds(3600)
                //配置刷新token的有效期
                .refreshTokenValiditySeconds(864000)
                //配置redirect_uri,用于授权成功后跳转
                .redirectUris("http://www.baidu.com")
                //配置申请的权限范围
                .scopes("all")
                //配置grant_type,表示授权类型
                .authorizedGrantTypes("authorization_code","password");
    }
}
运行项目后使用密码模式来获取令牌,之后对令牌进行解析,发现已经包含扩展的内容。
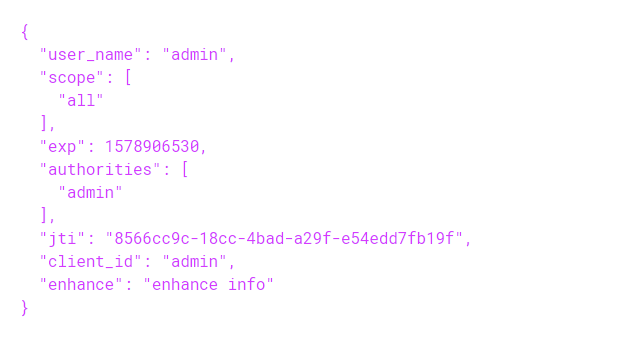
# Java中解析JWT中的内容
添加依赖
<!--jwt 依赖-->
<dependency>
   <groupId>io.jsonwebtoken</groupId>
   <artifactId>jjwt</artifactId>
   <version>0.9.0</version>
</dependency>
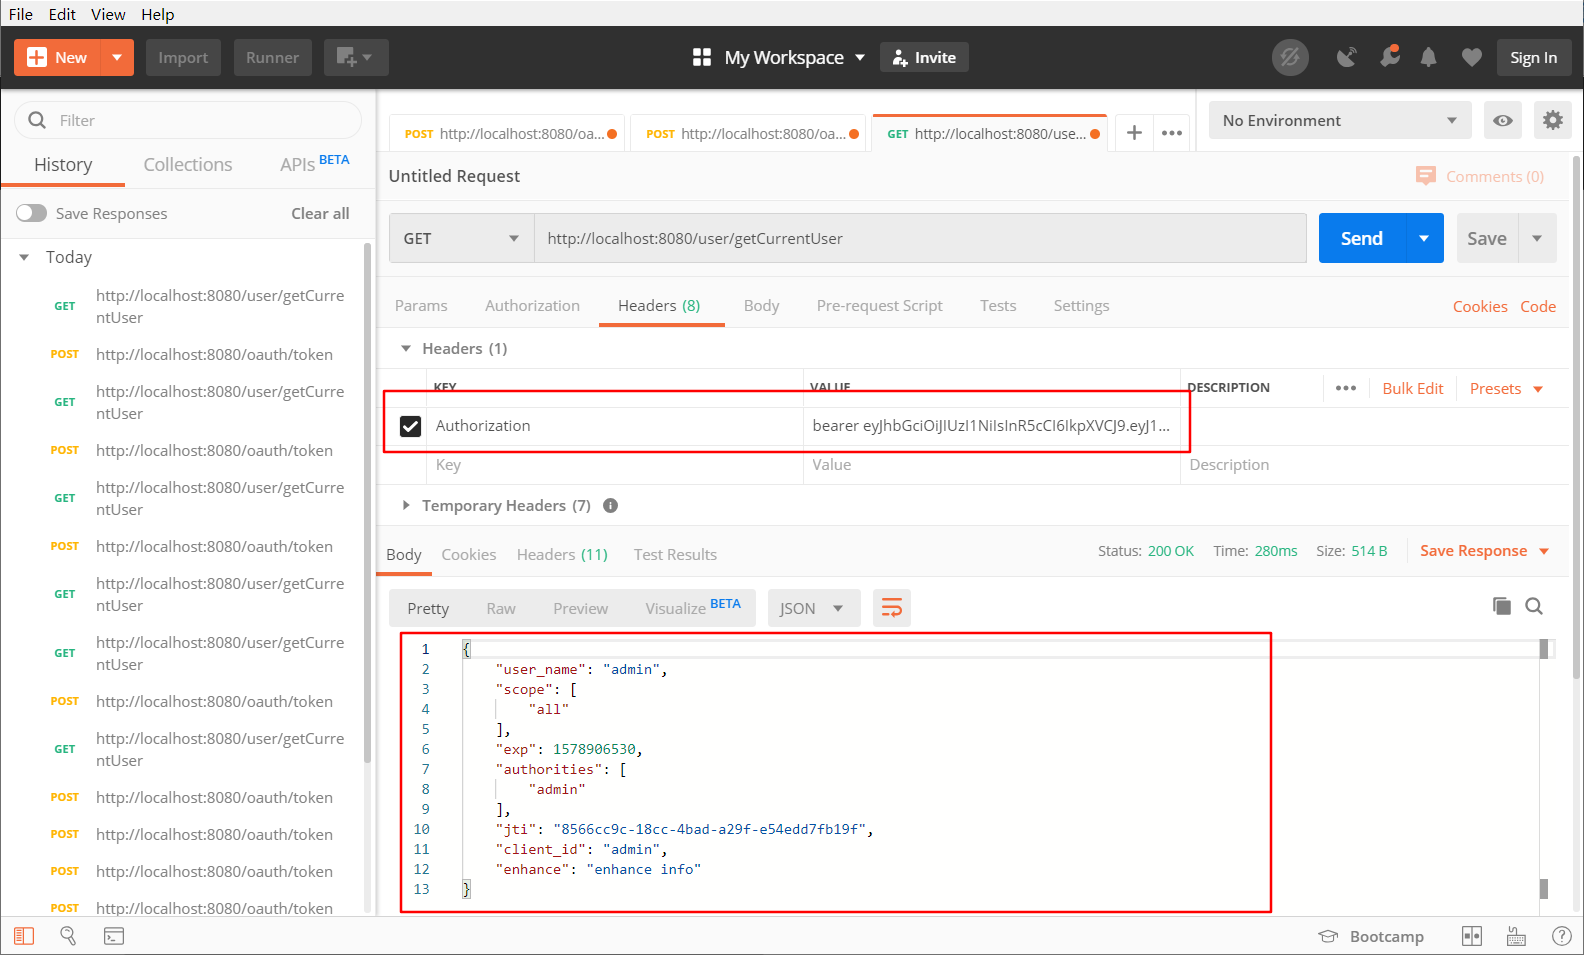
修改UserController类,使用jjwt工具类来解析Authorization头中存储的JWT内容
package com.yjxxt.springsecurityoauth2demo.controller;

import io.jsonwebtoken.Jwts;
import org.springframework.security.core.Authentication;
import org.springframework.web.bind.annotation.GetMapping;
import org.springframework.web.bind.annotation.RequestMapping;
import org.springframework.web.bind.annotation.RestController;

import javax.servlet.http.HttpServletRequest;
import java.nio.charset.StandardCharsets;

/**
 * @author zhoubin
 * @since 1.0.0
 */
@RestController
@RequestMapping("/user")
public class UserController {

   @GetMapping("/getCurrentUser")
   public Object getCurrentUser(Authentication authentication, HttpServletRequest request) {
      String header = request.getHeader("Authorization");
      String token = header.substring(header.indexOf("bearer") + 7);
      return Jwts.parser()
            .setSigningKey("test_key".getBytes(StandardCharsets.UTF_8))
            .parseClaimsJws(token)
            .getBody();
   }
}
将令牌放入Authorization头中,访问如下地址获取信息:
http://localhost:8080/user/getCurrentUser
# 刷新令牌
在Spring Cloud Security 中使用oauth2时,如果令牌失效了,可以使用刷新令牌通过refresh_token的授权模式再次获取access_token。
只需修改认证服务器的配置,添加refresh_token的授权模式即可。
@Override
public void configure(ClientDetailsServiceConfigurer clients) throws Exception {
    clients.inMemory()
            //配置client_id
            .withClient("admin")
            //配置client-secret
            .secret(passwordEncoder.encode("112233"))
            //配置访问token的有效期
            .accessTokenValiditySeconds(3600)
            //配置刷新token的有效期
            .refreshTokenValiditySeconds(86400)
            //配置redirect_uri,用于授权成功后跳转
            .redirectUris("http://www.baidu.com")
            //配置申请的权限范围
            .scopes("all")
            //配置grant_type,表示授权类型
            .authorizedGrantTypes("authorization_code","password","refresh_token");
}
使用刷新令牌模式来获取新的令牌,访问如下地址:
http://localhost:8080/oauth/token

# Spring Security Oauth2 整合单点登录(SSO)
# 创建客户端


# 添加依赖
<?xml version="1.0" encoding="UTF-8"?>
<project xmlns="http://maven.apache.org/POM/4.0.0" xmlns:xsi="http://www.w3.org/2001/XMLSchema-instance"
         xsi:schemaLocation="http://maven.apache.org/POM/4.0.0 https://maven.apache.org/xsd/maven-4.0.0.xsd">
   <modelVersion>4.0.0</modelVersion>
   <parent>
      <groupId>org.springframework.boot</groupId>
      <artifactId>spring-boot-starter-parent</artifactId>
      <version>2.2.2.RELEASE</version>
      <relativePath/> <!-- lookup parent from repository -->
   </parent>
   <groupId>com.yjxxt</groupId>
   <artifactId>oauth2client01demo</artifactId>
   <version>0.0.1-SNAPSHOT</version>
   <name>oauth2client01demo</name>
   <description>Demo project for Spring Boot</description>

   <properties>
      <java.version>1.8</java.version>
      <spring-cloud.version>Greenwich.SR2</spring-cloud.version>
   </properties>

   <dependencies>
      <dependency>
         <groupId>org.springframework.cloud</groupId>
         <artifactId>spring-cloud-starter-oauth2</artifactId>
      </dependency>
      <dependency>
         <groupId>org.springframework.cloud</groupId>
         <artifactId>spring-cloud-starter-security</artifactId>
      </dependency>
      <dependency>
         <groupId>org.springframework.boot</groupId>
         <artifactId>spring-boot-starter-web</artifactId>
      </dependency>
      <dependency>
         <groupId>io.jsonwebtoken</groupId>
         <artifactId>jjwt</artifactId>
         <version>0.9.0</version>
      </dependency>

      <dependency>
         <groupId>org.springframework.boot</groupId>
         <artifactId>spring-boot-starter-test</artifactId>
         <scope>test</scope>
      </dependency>
   </dependencies>

   <dependencyManagement>
      <dependencies>
         <dependency>
            <groupId>org.springframework.cloud</groupId>
            <artifactId>spring-cloud-dependencies</artifactId>
            <version>${spring-cloud.version}</version>
            <type>pom</type>
            <scope>import</scope>
         </dependency>
      </dependencies>
   </dependencyManagement>

   <build>
      <plugins>
         <plugin>
            <groupId>org.springframework.boot</groupId>
            <artifactId>spring-boot-maven-plugin</artifactId>
         </plugin>
      </plugins>
   </build>
</project>
# 修改配置文件
application.properties
server.port=8081
#防止Cookie冲突,冲突会导致登录验证不通过
server.servlet.session.cookie.name=OAUTH2-CLIENT-SESSIONID01
#授权服务器地址
oauth2-server-url: http://localhost:8080
#与授权服务器对应的配置
security.oauth2.client.client-id=admin
security.oauth2.client.client-secret=112233
security.oauth2.client.user-authorization-uri=${oauth2-server-url}/oauth/authorize
security.oauth2.client.access-token-uri=${oauth2-server-url}/oauth/token
security.oauth2.resource.jwt.key-uri=${oauth2-server-url}/oauth/token_key
# 在启动类上添加@EnableOAuth2Sso注解来启用单点登录功能
package com.yjxxt.oauth2client01demo;

import org.springframework.boot.SpringApplication;
import org.springframework.boot.autoconfigure.SpringBootApplication;
import org.springframework.boot.autoconfigure.security.oauth2.client.EnableOAuth2Sso;

@SpringBootApplication
@EnableOAuth2Sso
public class Oauth2client01demoApplication {

   public static void main(String[] args) {
      SpringApplication.run(Oauth2client01demoApplication.class, args);
   }

}
# 添加接口用于获取当前登录用户信息
package com.yjxxt.oauth2client01demo.controller;

import org.springframework.security.core.Authentication;
import org.springframework.web.bind.annotation.GetMapping;
import org.springframework.web.bind.annotation.RequestMapping;
import org.springframework.web.bind.annotation.RestController;

@RestController
@RequestMapping("/user")
public class UserController {

    @GetMapping("/getCurrentUser")
    public Object getCurrentUser(Authentication authentication) {
        return authentication;
    }

}
# 修改认证服务器配置
修改授权服务器中的AuthorizationServerConfig类,将绑定的跳转路径为
http://localhost:8081/login,并添加获取秘钥时的身份认证
@Override
public void configure(ClientDetailsServiceConfigurer clients) throws Exception {
    clients.inMemory()
            //配置client_id
            .withClient("admin")
            //配置client-secret
            .secret(passwordEncoder.encode("112233"))
            //配置访问token的有效期
            .accessTokenValiditySeconds(3600)
            //配置刷新token的有效期
            .refreshTokenValiditySeconds(864000)
            //配置redirect_uri,用于授权成功后跳转
            // .redirectUris("http://www.baidu.com")
            //单点登录时配置
            .redirectUris("http://localhost:8081/login")
            //配置申请的权限范围
            .scopes("all")
            //自动授权配置
            .autoApprove(true)
            //配置grant_type,表示授权类型
            .authorizedGrantTypes("authorization_code","password","refresh_token");
}

@Override
public void configure(AuthorizationServerSecurityConfigurer security) {
    // 获取密钥需要身份认证,使用单点登录时必须配置
    security.tokenKeyAccess("isAuthenticated()");
}
# 测试
启动授权服务和客户端服务;
访问客户端需要授权的接口http://localhost:8081/user/getCurrentUser
会跳转到授权服务的登录界面;
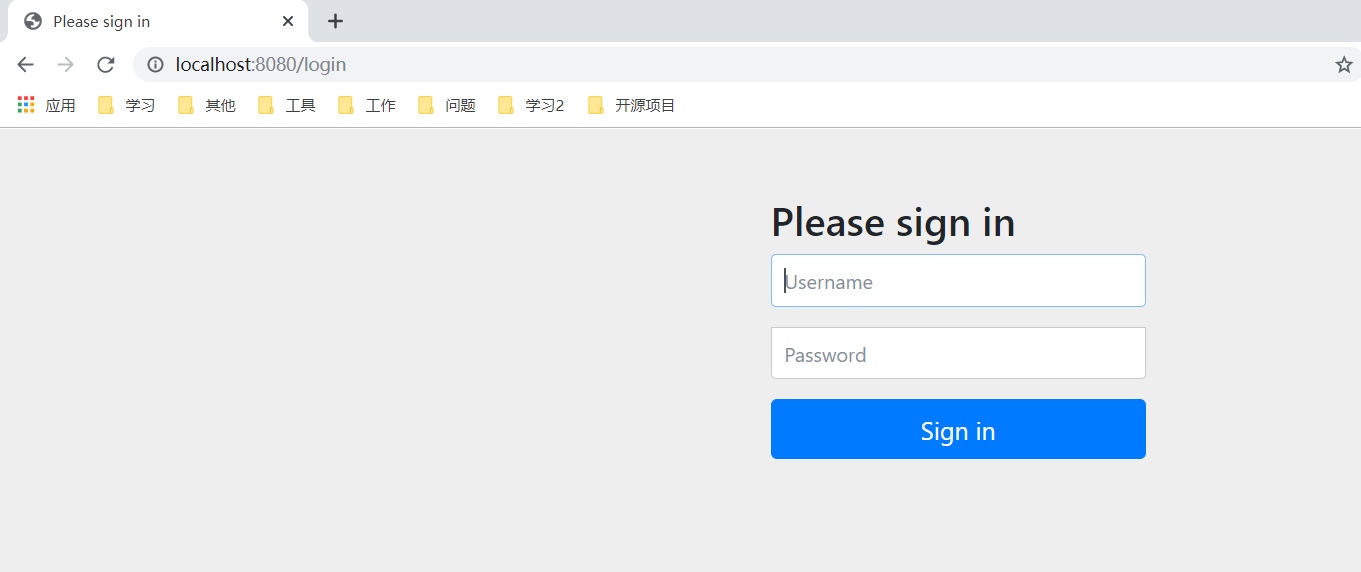
授权后会跳转到原来需要权限的接口地址,展示登录用户信息;